
Table of Contents
Introduction
The Apilogy Publisher Portal makes it easier for developers to build professional and well-structured APIs without investing extensive time and resources. With this guide, you can efficiently manage everything from simple to more complex projects, ensuring your APIs are well-optimized.
This article provides a comprehensive guide to the Apilogy Publisher Portal. It walks developers through the entire process, from setting up the environment to creating, launching, and supporting APIs.
Apilogy
APILOGY is an API marketplace platform used to publish, discover, use, and manage collection of APIS (Application Programming Interface) to accelerate development process.
The Publisher Portal (publisher.apilogy.id) makes internal APIs discoverable, consumable, and reusable for internal development teams to accelerate time-to-market, while enabling a more consistent end-user experience across the organization’s applications.
Become a Publisher
Before becoming a Publisher, you can reach out to the APILOGY Support team to discuss your request and agree on the terms for using the APILOGY platform. Simply send an email to [email protected] with the subject line “Join as Publisher APILOGY” for detailed information and assistance with your request.
Alternatively, if you’re ready to get started right away, you can register as outlined in the section below.
Register
This registration is specifically for Publishers who do not yet have access to the platform. Please follow the steps outlined below to complete your registration.
1. Visit APILOGY Publisher Portal on https://publisher.apilogy.id/ or https://apilogy.id/, then you will enter the dashboard home > click the Login button.
2. Then on the Login page click the blue icon with the text Register.


3. On the Register page, enter personal data such as Full Name, Username, Phone Number, Email and Password (password must have 8 characters containing letters, numbers, and symbols).
4. Checklist Captcha and Checklist Terms Service and Privacy Policy agreement.
5. Click Create Account to send Email Verification to your email account.
6. Wait for a moment until you get the Email Verification. If you cannot get the email, click Resend to resend the email.
7. Open the email inbox, click Verify your Account.
8. Your account is verified.
9. Contact APILOGY Support team, give your email and username information to Whitelist account as a Publisher, and your account can use APILOGY Publisher Portal.

Login as a Publisher
After obtaining access to your account in the Publisher Portal from the APILOGY team, you can log in using the provided account information. Follow the steps outlined below to start managing and developing your APIs on APILOGY effectively.
1. Visit APILOGY Publisher Portal on https://publisher.apilogy.id/
2. Click Login button > On the Login page enter your Username and Password then click the Login button. If you forget your password, then click on the “Forgot password” button > then fill in the same email when registering an APILOGY account > then check the email to change the password.

3. On your first login activity, you will immediately need to set up a Two-Factor Authentication settings for your account security. Start by downloading an Authenticator app in your phone. Open the app and click the + button on the right bottom corner dan select Scan a QR code.

4. Then, scan the QR code displayed in the APILOGY page.
5. You will need to enter a different code every time you log in into your account because the code in the Authentication app will renew every few seconds. Start exploring your APILOGY account after you have successfully get in to your account.
6. If the login is successful, you will be redirect to Dashboard Page.
Publish API
In this API publishing process, there are several stages that need to be completed, including Backend, API, Plan, and Plugin. You can follow some of the steps outlined below to guide you through these stages.
Backend
The backend is the server side of an application. It handles most of the logic and data storage. Set up and configure your backend settings, ensuring that your details are correctly input.
1. Visit Publisher Portal APILOGY, after login session user on Dashboard page. Click Backend menu.
2. Click on Add New Backend to add new backend.
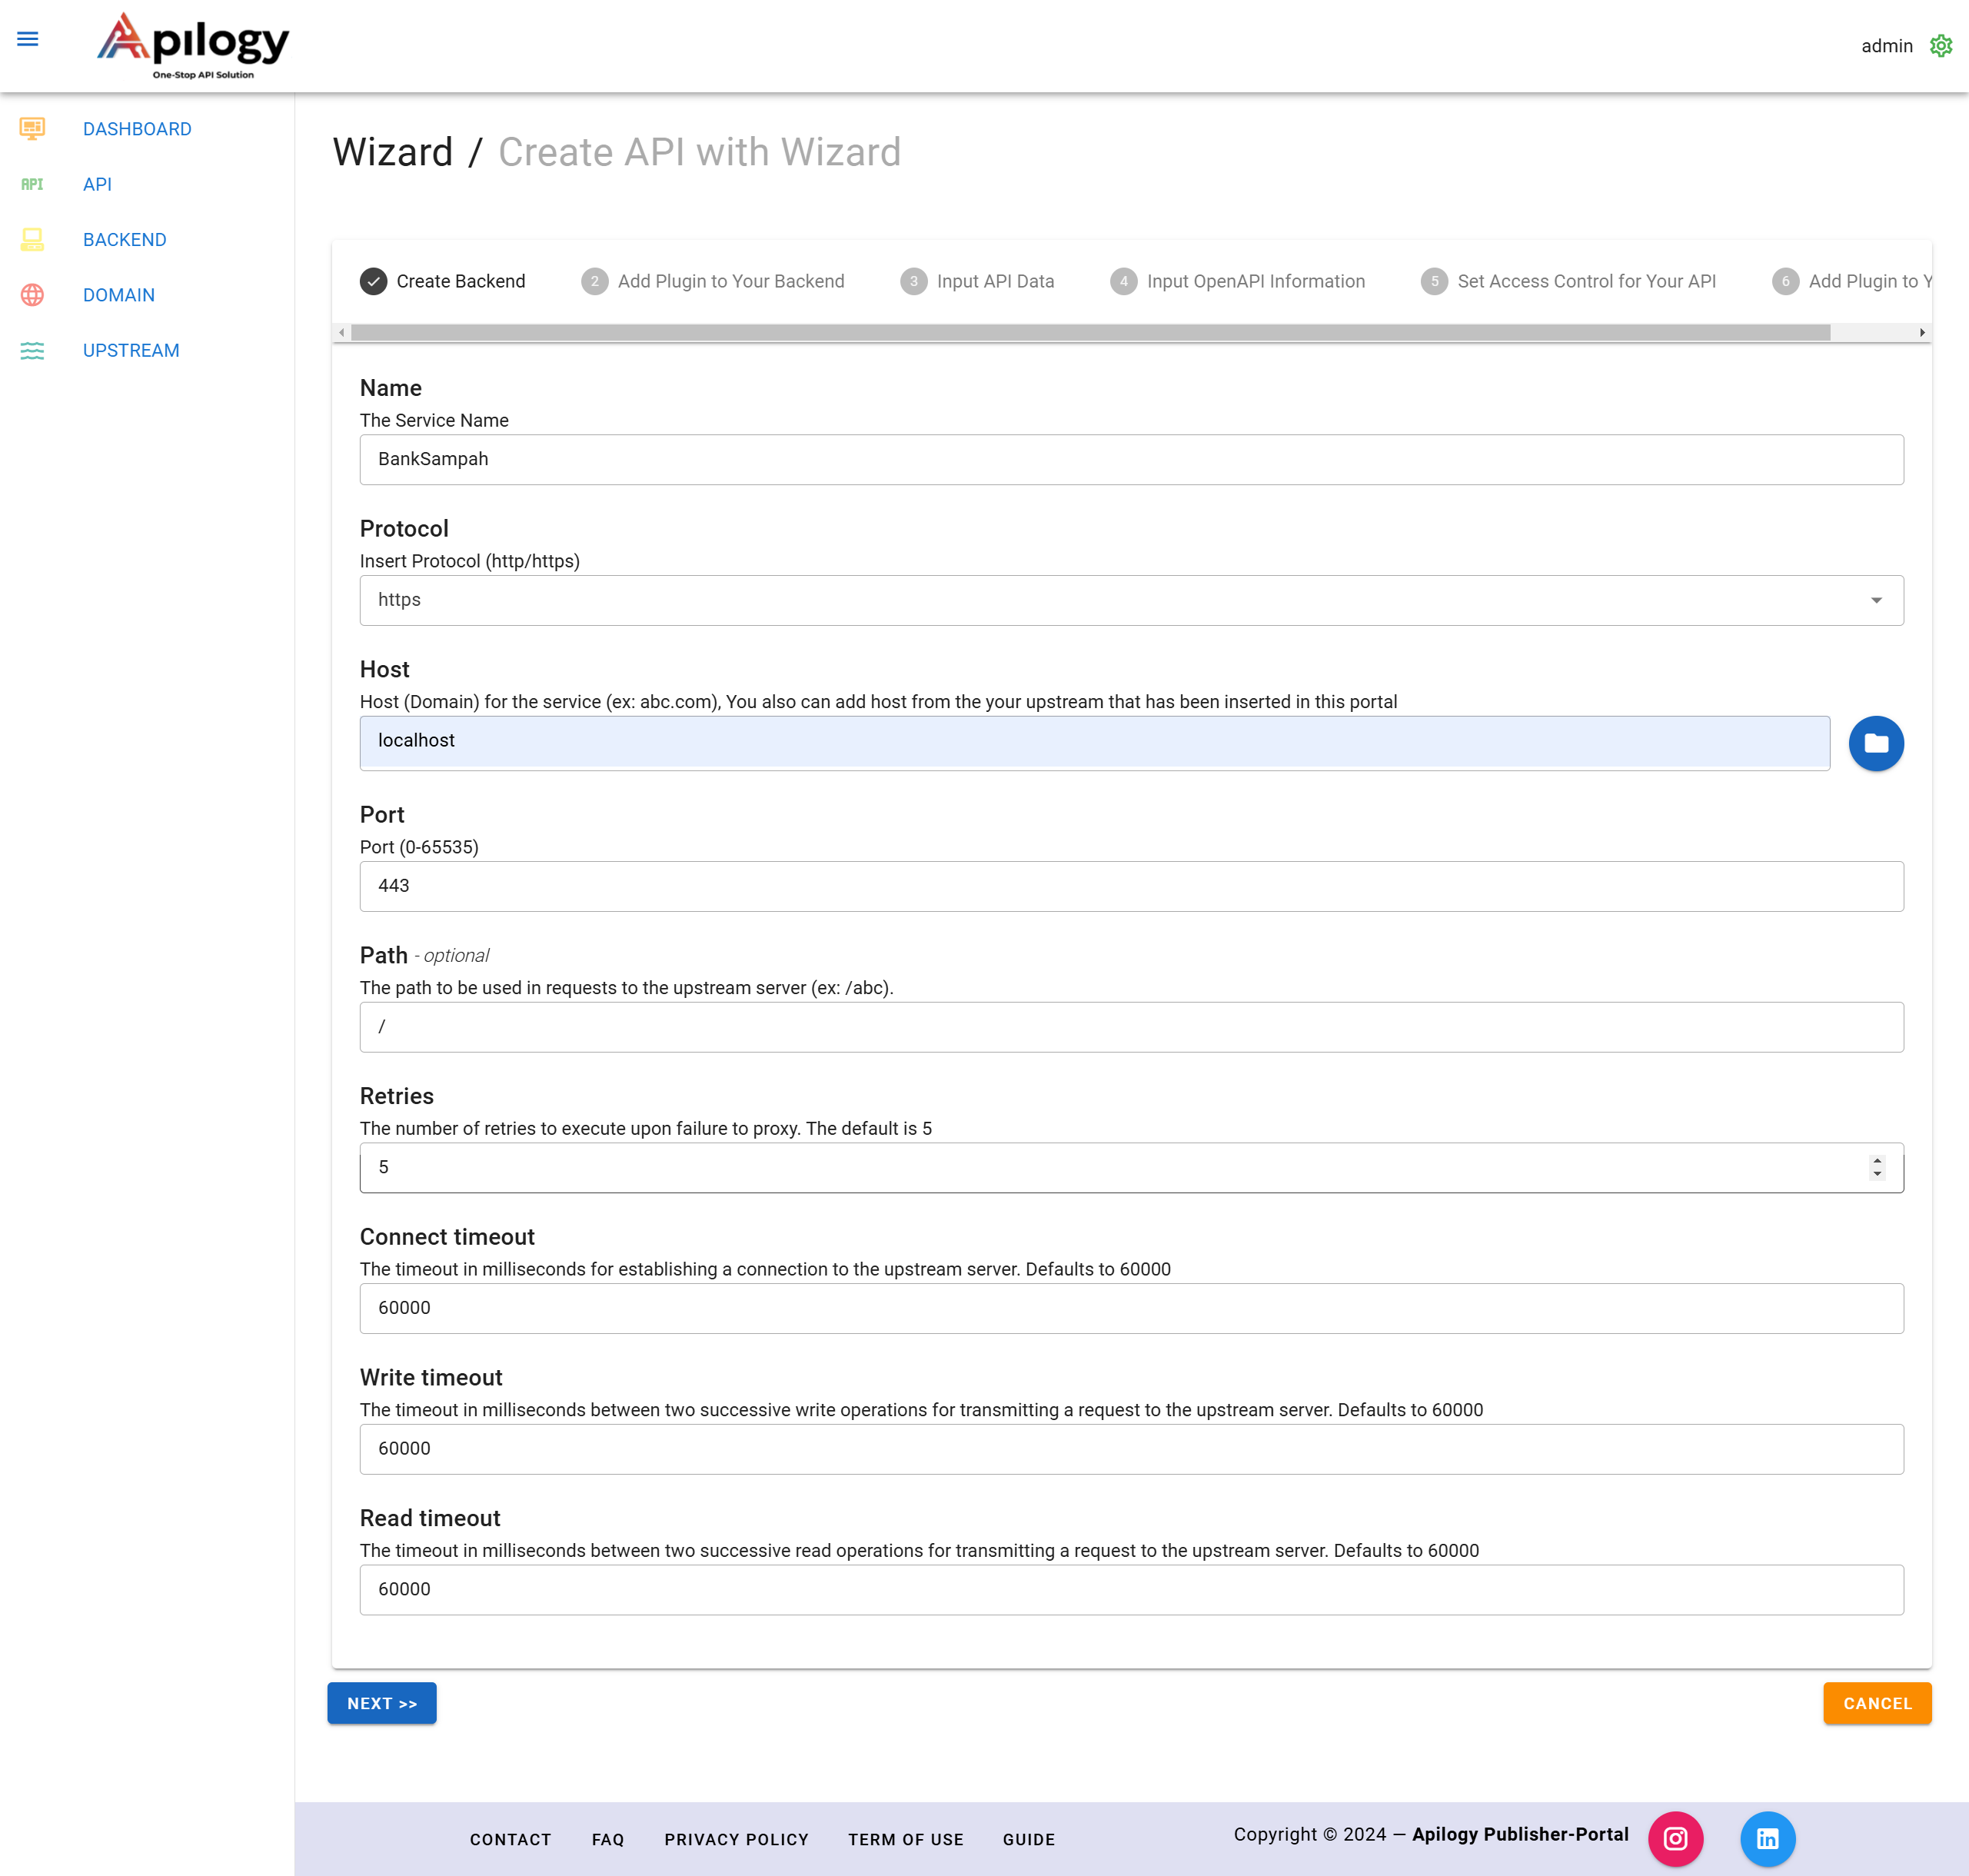
3. Input Step 1 Info Backend Entry form.
Example:

Notes:
- Name: The application name of the service used to be identified
- Protocol: protocol or set of communication rules for client-server communication.
- Http : application layer protocol in the Open Systems Interconnection (OSI) network communications model.
- Https : HTTPS uses SSL/TLS encryption to encrypt data sent between the client and server, so that information such as login data, credit cards, or other personal information is safe from eavesdroppers.
- Host: Hosts (Domains) for services (eg: abc.com), you can also add hosts from your upstream that have been entered into this portal.
- Port: A port on a domain refers to the part of a network address that is used to identify a specific application or service running on a server. Generally (433 or 80) and The port that can be used in this configuration must fall within the range of 1 to 65535.
- Path: The path to use in requests to the upstream server (e.g. /abc).
- Retries: The number of retries to perform if the proxy fails. The default is 5.
- Connection timeout: The timeout in milliseconds for establishing a connection to the upstream server. The default is 60,000.
- Read Timeout: The time limit in milliseconds between two consecutive read operations to send a request to the upstream server. The default is 60,000Write Timeout: The time limit in milliseconds between two consecutive write operations to send a request to the upstream server. The default is 60,000.
4. Click Next.
5. Step 2 Plugin , If there is no need to Add Plugin, Click Submit on Plugin Entry. A detailed guide on plugins will be provided in the next section.
6. Page will direct into Backend menu, and the last Backend entry is saved.

API
This page provides a comprehensive overview of all the APIs you have created. You can easily view, manage, and monitor the status of each API listed, ensuring efficient oversight and control of your published APIs.
1. Visit Publisher Portal APILOGY, after login session user on Dashboard page.
2. Click API menu.
3. Click on Add New API button.
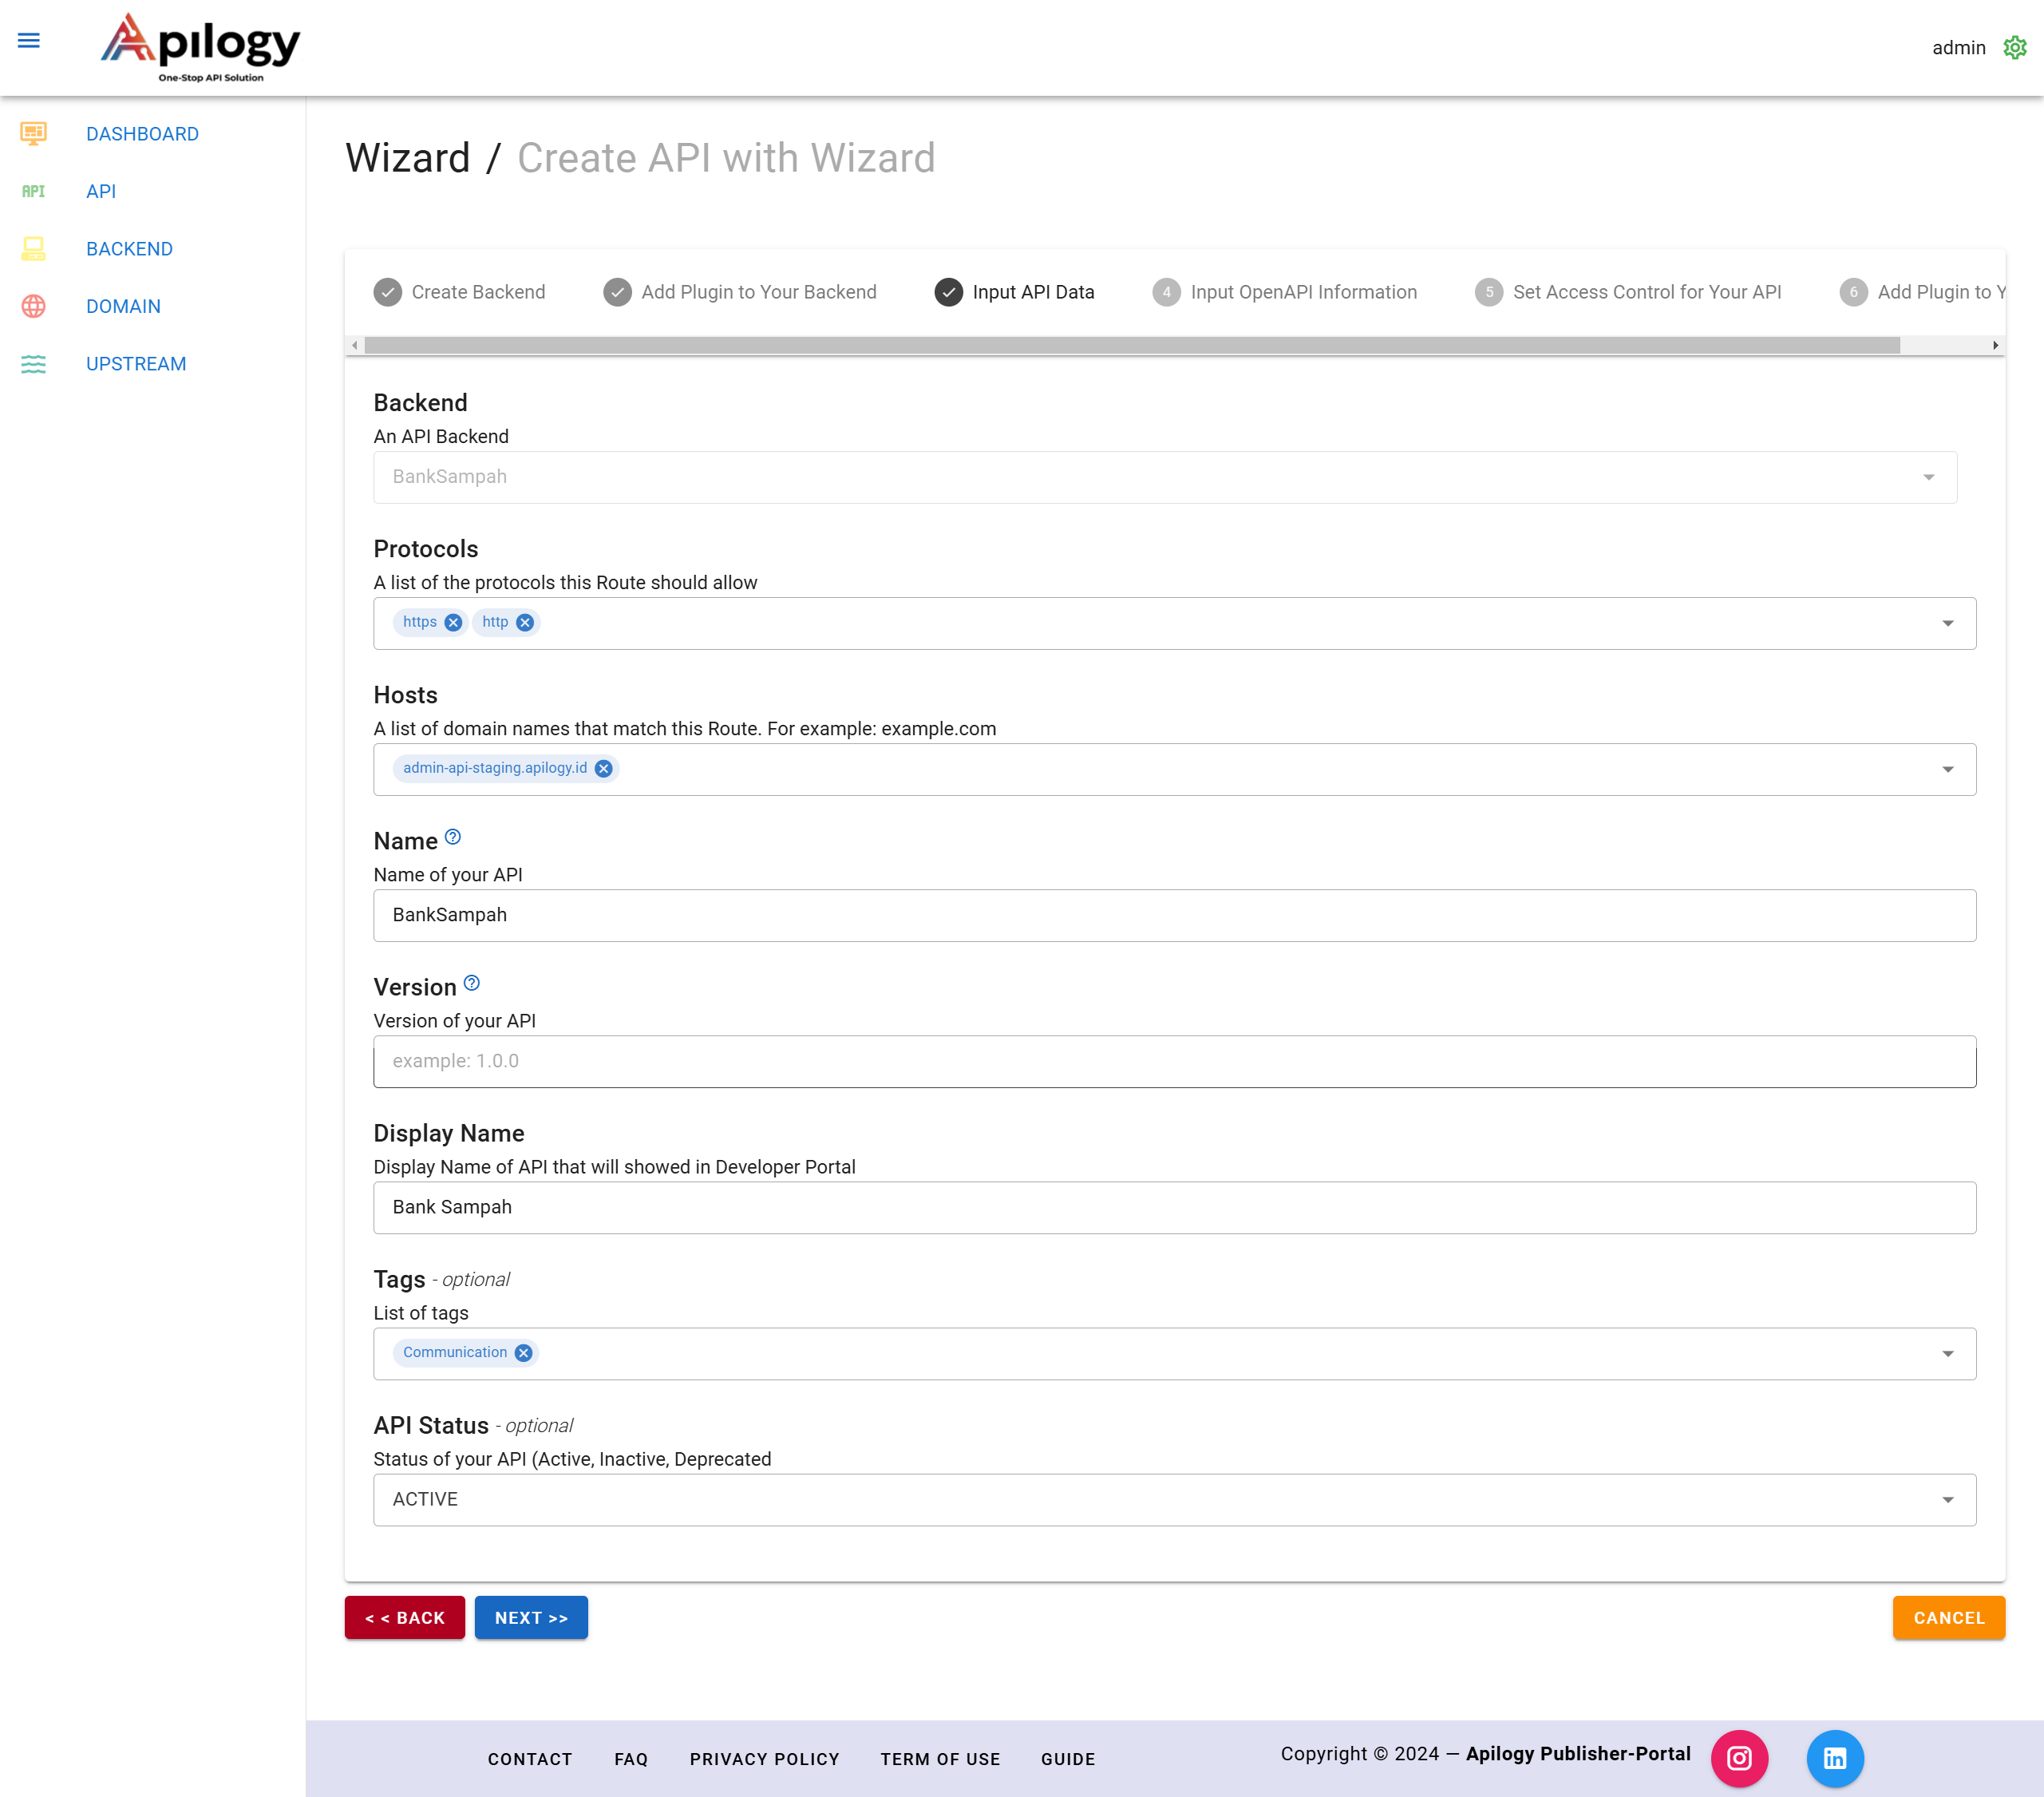
4. Input Step 1 API Info.
Example:

Notes:
- Backend: Backend name to be used by the API.
- Protocols: The apilogy communication protocol used to publish.
- Host: The domain that apilogy uses to publish api.
- Name: Used to provide the name of the api which will later be in the base path of the URL.
- Version: What version of api will be released.
- Display Name: Displays the display name that subscribers can later see.
- Tags: The category chosen is in accordance with the output to be provided.
- Api Status
- Active : API can be active
- Inactive : the API is turned off and cannot be used
- Deprecated: API that will not be updated again.
5. Click Next to go the next Step 2 Swagger Entry.
Swagger helps Apilogy document and simulate RESTful APIs, making it easy for users to understand published API endpoints without needing to manually create documentation or simulations.
With Swagger, a backend published to Apilogy automatically has clear, user-friendly documentation.
- Version 2.x.x
| Name | Description |
|---|---|
|
Info |
Required. Provides metadata about the API. The metadata can be used by the clients if needed. |
|
Host |
The host (name or ip) serving the API. This MUST be the host only and does not include the scheme nor sub-paths. It MAY include a port. If the host is not included, the host serving the documentation is to be used (including the port). |
|
Base Path |
The base path on which the API is served, which is relative to the host. If it is not included, the API is served directly under the host. The value MUST start with a leading slash (/). |
|
Paths |
Required. The available paths and operations for the API. |
|
Schemes |
The transfer protocol of the API. Values MUST be from the list: “http”, “https”, “ws”, “wss”. If the schemes is not included, the default scheme to be used is the one used to access the Swagger definition itself. |
|
Consumes |
A list of MIME types the APIs can consume. This is global to all APIs but can be overridden on specific API calls. |
|
Produces |
A list of MIME types the APIs can produce. This is global to all APIs but can be overridden on specific API calls. |
|
Definitions |
An object to hold data types produced and consumed by operations. |
|
Parameters |
An object to hold parameters that can be used across operations. This property does not define global parameters for all operations. |
|
Responses |
An object to hold responses that can be used across operations. This property does not define global responses for all operations. |
|
Security Definitions |
Security scheme definitions that can be used across the specification. |
|
Security |
The list of values describes alternative security schemes that can be used (that is, there is a logical OR between the security requirements). |
|
Tags |
A list of tags used by the specification with additional metadata. The order of the tags can be used to reflect on their order by the parsing tools. Not all tags that are used by the Operation Object must be declared. The tags that are not declared may be organized randomly or based on the tools’ logic. Each tag name in the list MUST be unique. |
|
External Docs |
Additional external documentation. |
- Version 3.x.x
| Name | Description |
|---|---|
|
Info |
Required. Provides metadata about the API. The metadata can be used by the clients if needed. |
|
Server |
Server where the API is stored. |
|
Paths |
Required. The available paths and operations for the API. |
|
Components |
Supporting components to run the API. |
|
Security |
The list of values describes alternative security schemes that can be used (that is, there is a logical OR between the security requirements). |
|
Tags |
A list of tags used by the specification with additional metadata. The order of the tags can be used to reflect on their order by the parsing tools. Not all tags that are used by the Operation Object must be declared. The tags that are not declared may be organized randomly or based on the tools’ logic. Each tag name in the list MUST be unique. |
|
External Docs |
Additional external documentation. |
Option to add swagger:
Swagger provides several options for adding and customizing API documentation:
- Upload File: Users can upload a documentation file in YAML or JSON format, or import it directly from a URL, making it easy to integrate existing documentation.
- OpenAPI Version Forms: Swagger supports both OpenAPI 3.0.0 and 2.0, allowing users to select the API standard that best fits their needs and version compatibility.
- Editor: Swagger includes an editor for modifying and refining the API documentation, enabling real-time customization directly within the tool.
In this case, will be using API Pet Store to Example. Click Swagger Example and choose Swagger V.2.0. Pet Store.

- Form and Editor will customize your Swagger documentation.
- Click tab View to see the result swagger documentation.
If there is any problem with the swagger documentation, the error information error will be showed at the bottom of the View Tab.
6. On this step, after clicking Save and Continue and closing the popup, the message “New API has been inserted” confirms that your API has been successfully saved and added to the documentation.
7. Set Up the Access Control by click Edit button to add user.
Set Access Control is used to set access control on the API. There are two types of settings, namely whitelist and blacklist. If you use a whitelist, only users who have been registered or included in the user list are permitted to access the API. On the other hand, if you use a blacklist, all users included in the user list will have their access restricted, so that they cannot access the API.
Access Control allows you to restrict or grant access to your API based on a whitelist or blacklist configuration.
- Whitelist: Only users added to the whitelist can access the API. This is ideal for APIs that need to be restricted to certain users.
- Blacklist: Users in the blacklist are blocked from accessing the API, while users not on the list can access it.
This feature ensures that only authorized users can access the API, so that API security and privacy can be well maintained.
- Enter username consumer/developer.
- Once its showed, click checklist. Example : use the ‘admin’ username
- Click Add and user will be on Addes User list.
- Setup is customized between Mode Whitelist or Blacklist.
In this case, the API will be accessed by one user to whitelist mode. It means the user can see and subscribe to the API. Click Checklist to activate the Access Control.
Example:
Imagine an exclusive API that should only be accessible to internal team members (e.g., admin). Set the Whitelist mode so only the admin can view and subscribe to the API. If there’s an unwanted user (e.g., tester), the Blacklist mode can be used to block access for that user, ensuring the API remains accessible only to specific, authorized users.
8. Click Next to go through the step 4 Plugin.
The most important plugin is the Billing Plan, which allows you to create plans for the API. This plugin is part of the existing setup as some plugins are set as defaults. Additionally, adding the Authentication plugin enhances the security of your API access by ensuring that only authorized users can interact with the API.
In this step, you will find various plugins that enhance the functionality and security of your API. Each plugin has a unique purpose, offering different features and configurations. Here are the main plugins available and their functions:
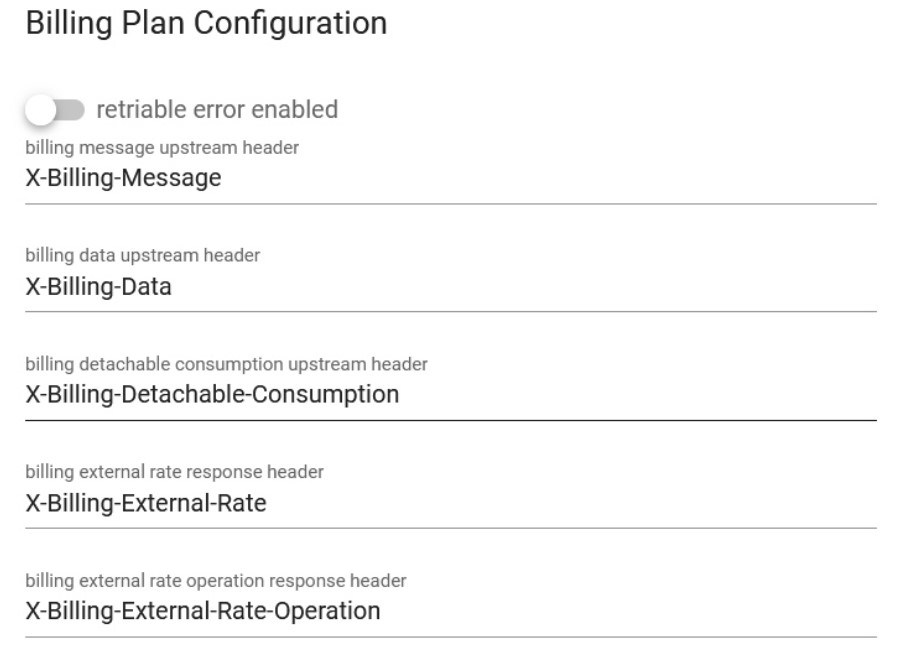
Billing Plan
Purpose: Allows API publishers to monetize APIs by setting consumption-based pricing.
Usage: Add the Billing Plan plugin to your API to define pricing options. You can also customize headers for the API.
Authentication Plugins
Key Authentication:
- Purpose: Secures APIs by requiring a valid API key from clients, providing access control and security.
- Usage: Set parameters such as key_names (default: “apikey”), run_on_preflight, anonymous, and key_in_body to configure behavior.
JWT (JSON Web Token):
- Purpose: Uses JWT for secure access control, supporting claims verification.
- Usage: Configure parameters like uri_param_names, cookie_names, claim_to_verify, secret in base64, and maximum_expiration.
Basic Authentication:
- Purpose: Secures APIs by requiring clients to use username and password in the Authorization header.
- Usage: Set the anonymous parameter to allow unauthenticated requests, if desired.
Upstream HTTP Basic Authentication
- Purpose: Enables APILOGY to secure requests sent to backend services using HTTP Basic Authentication.
- Usage: Configure upstream credentials (username and password). APILOGY will add the appropriate Authorization header when forwarding requests.
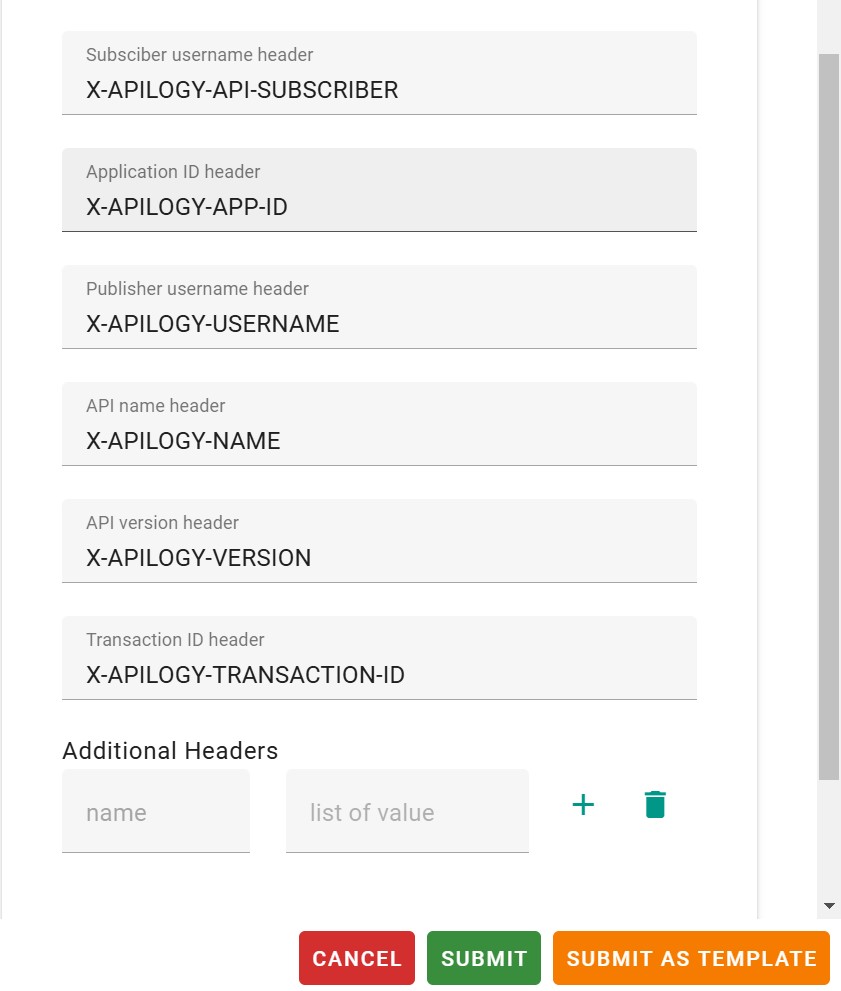
Headers Plugin
- Purpose: Allows the addition of extra headers to HTTP requests and responses for metadata or additional information.
- Usage: Configure headers in both upstream and downstream settings as needed.
JSON Logic
- Purpose: Provides a language to define rules for evaluating and manipulating JSON data, ideal for data transformations and complex logic.
- Usage: Use parameters like request, response_header, and response_body to define transformation and validation rules.
- OAuth2
- Purpose: An authorization framework that enables secure, token-based access to APIs, suitable for protecting sensitive resources.
- Usage: Configure parameters such as scopes, token_expiration, mandatory_scope, anonymous, and grant types (Authorization Code, Password, Implicit, etc.).
Rate Limiting
- Purpose: Controls the number of API requests within a specified time frame to ensure stability and prevent abuse.
- Usage: Configure the plugin to set rate limits per minute, hour, or other time intervals, based on your API’s requirements.
CORS
- Purpose: Control access to resources from different domains, enhancing security by specifying allowed origins, methods, headers, and credentials.
- Usage: Configure in APILOGY with options like config.origin (allowed domains), config.methods (HTTP methods), config.headers (request headers), config.credentials (enable credentials), etc.
IP Restrictions
- Purpose: Restrict API access based on client IP addresses to improve security.
- Usage: Use allow for whitelisting IPs and deny for blacklisting IPs in APILOGY.
OAuth2 Audience
- Purpose: Validate external OAuth2 access tokens, linking authorized clients to Kong consumers for secure access.
- Usage: Configure OAuth2 audience parameters in APILOGY, with support for HTTP/HTTPS and limited DB-less mode compatibility.
To add a billing plan for your API:
- Click Add on the Billing Plan plugin.
- Configure your desired plan options, such as pricing tiers and usage limits.
- Click Submit to save the plan.
To check which plugins have been added:
- Navigate to the Added Plugins tab.
- Review the list of plugins to confirm active and configured plugins for your API.
Each plugin will be discussed in detail in the next section
9. Click Finish to save the API.
10. The API is Saved.

Plan
The main function of the “Plan” feature is to provide flexibility for publishers to offer multiple service options with various payment types to users. Each “Plan” can be configured according to business needs, allowing users to choose the payment method that suits them best.
Key Features:
- Multiple Plans per API: Publishers can offer more than one plan for the same API, allowing different service and payment options for users.
- Plan Types:
- Free: A free plan that allows users to access services at no cost. It is suitable for trial services or limited access without payment.
- Prepaid: In this plan, users must pay upfront, and the balance is deducted based on service usage. This model ensures that payment is received before full access is granted.
- Postpaid: In this plan, users can access services first and pay later. However, note that Apilogy does not provide postpaid payment services, so users and publishers must agree on the payment terms beforehand.
Plan Management:
- Publishers can access the Show Plan option after creating an API to view and manage the available plans.
- A new plan can be added by selecting New Plan and choosing the plan type (Free, Prepaid, or Postpaid).
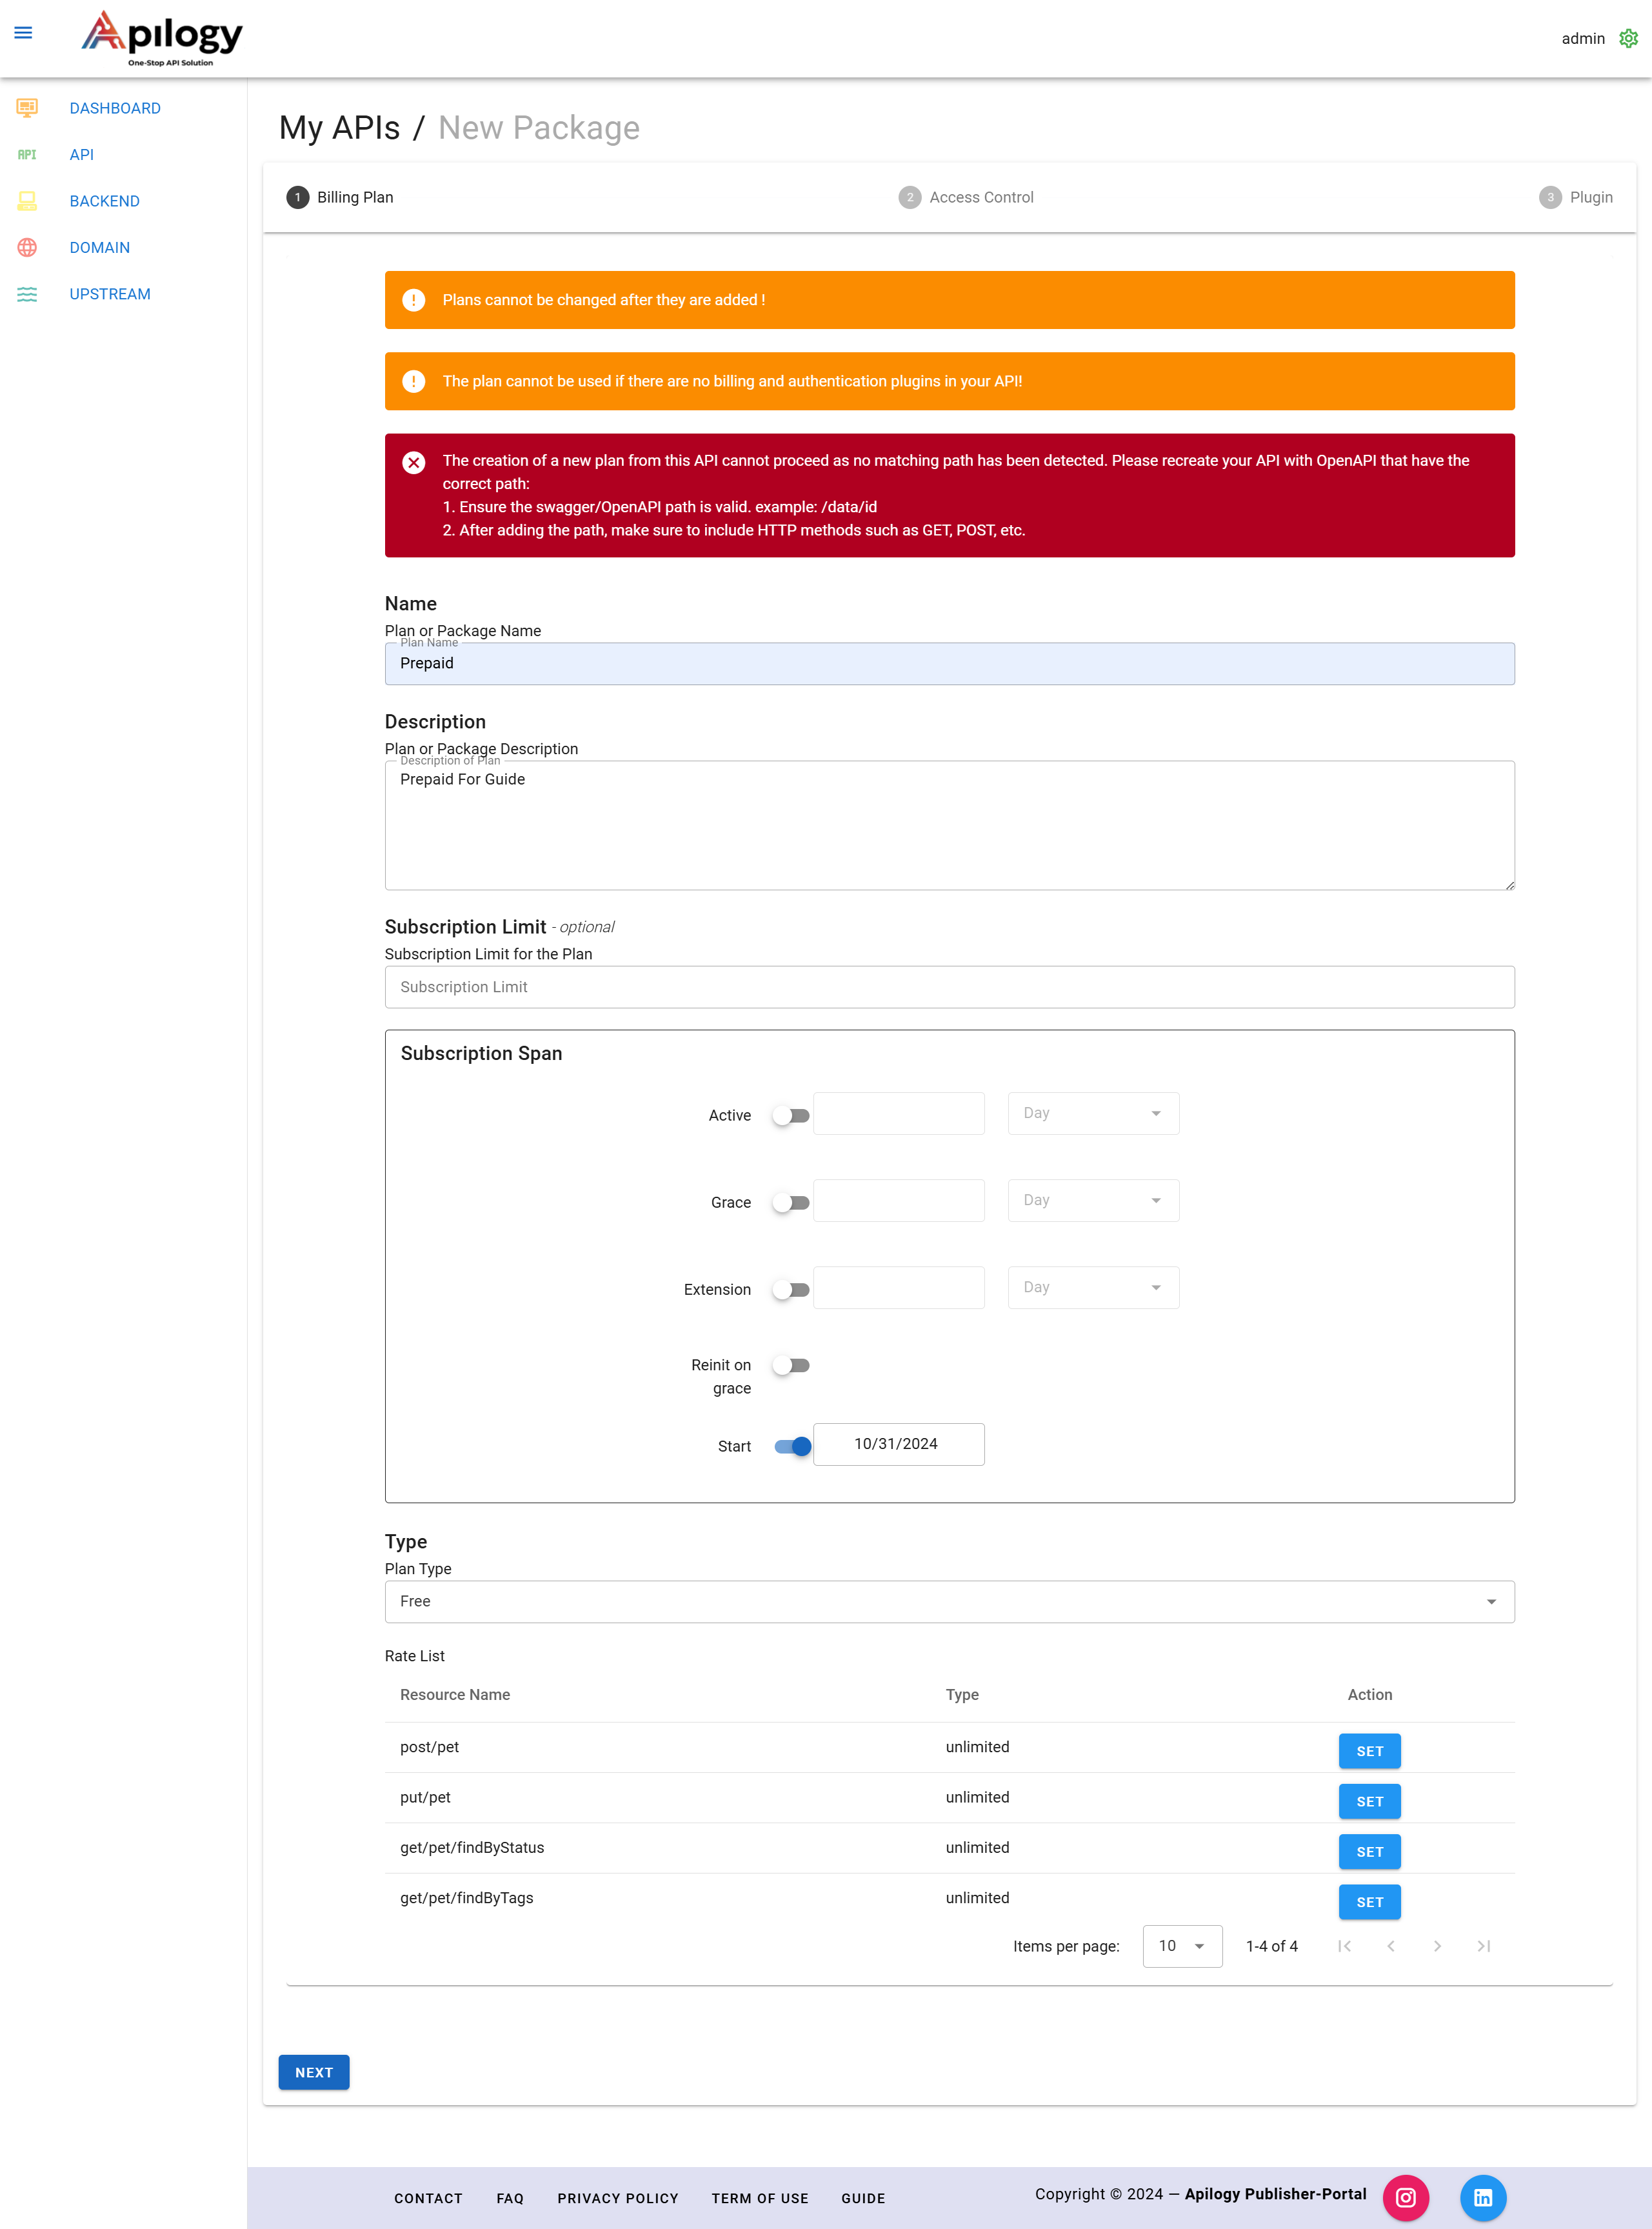
Free Plan

1. After Insert the Plan Information and setup Subscription Span.
Notes :
- Name : determine the name of the plan that will be created later.
- Description : an explanation of the plan that will be made.
- Subscription Limit : provides a limit on the number of users who can subscribe.
- Type :
- Free : the free type allows users to use the service for free.
| Name | Description |
|---|---|
|
Active |
To activate the active plan period. Generally plans have a default that is inactive. So if you don’t give it time, you can always use the plan until the user’s balance runs out. |
|
Grace |
When the active period expires, the publisher can determine whether the user’s plan is still maintained or will be deleted. |
|
Extension |
When you enter the grace period and then renew your subscription again, the time will be increased according to the renewal period minus the idle period (subscription ends). |
|
Reinit on grace |
When the Reinit on Grace subscription period is extended, it will be increased according to the extension period. |
|
Start |
Is the start time when use. |
2. Choose Free on type plan.
3. Click Set to setup each endpoint price. In this free plan, the price is set Rp.0
Notes :
After initializing all the existing data, you need to set all the API created in the plan.
Rate Entry :
- External Rate : calculated from when the backend provides a response. Responses are provided via headers from the backend.
- Price : price every time it takes a hit on API.
- Description: description of each path.
4. Click Change to save change and continue to the next endpoint.
5. Click Next to set up the Access Control on Plan level.
6. Click Next to setup Plugin.
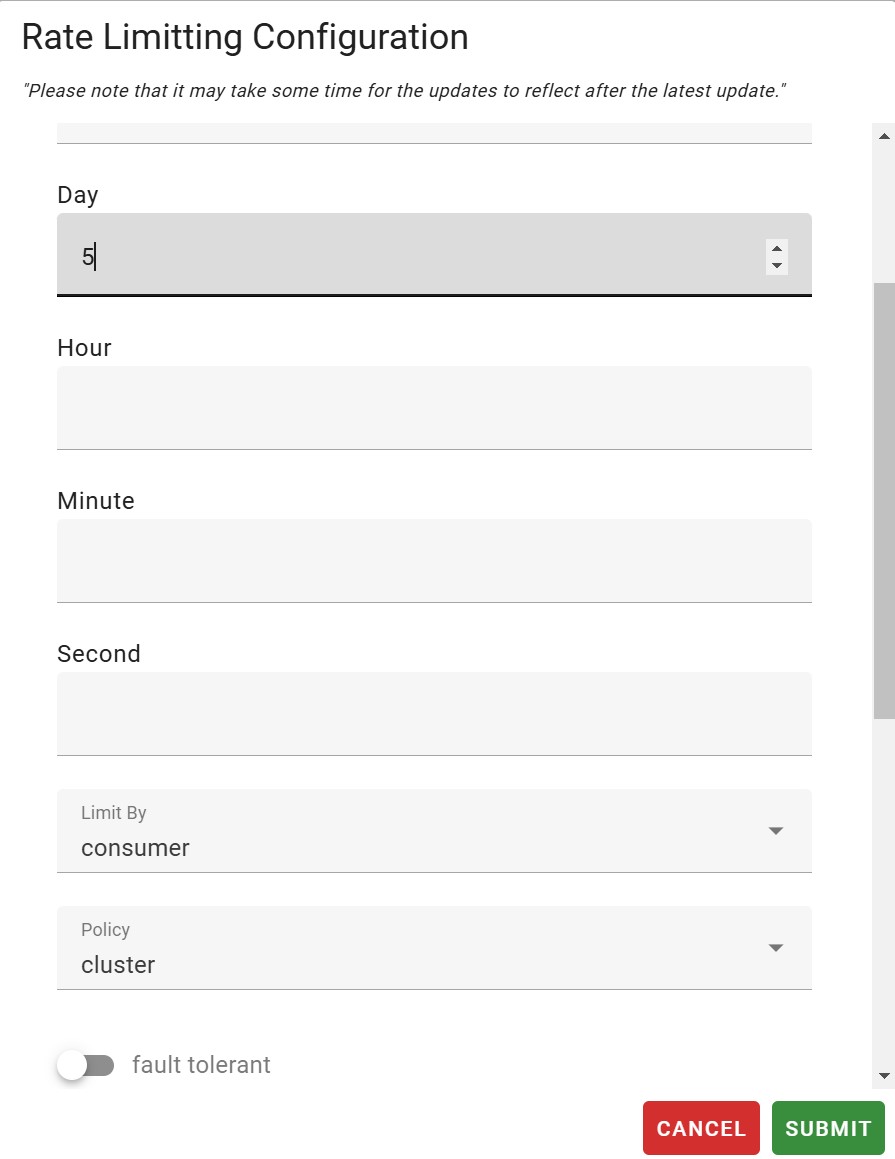
7. In this Free Plan, will be need Plugin Rate Limitting to limit user usage. Example: set ‘5’ call or hit /day if finished then click submit.
8. The Plugin saved on Added Plugin tab.
9. Click Finish and a new Free Plan is created.
10. Check the Free Plan on API Detail in Developer Portal (https://apilogy/id).

Prepaid Plan
Prepaid Plan can be used to the API to be monetized by setting the cost of the API Package. Prepaid requires users to pay a package fee before making an API call.
1. After insert information Plan and setup Subscription Span.
Notes :
- Name : determine the name of the plan that will be created later.
- Description : an explanation of the plan that will be made.
- Subscription Limit : provides a limit on the number of users who can subscribe.
- Type :
- Prepaid : Prepaid type, the user must make payment first until the balance is used up when using the service.
| Name | Description |
|---|---|
|
Active |
To activate the active plan period. Generally plans have a default that is inactive. So if you don’t give it time, you can always use the plan until the user’s balance runs out. |
|
Grace |
When the active period expires, the publisher can determine whether the user’s plan is still maintained or will be deleted. |
|
Extension |
When you enter the grace period and then renew your subscription again, the time will be increased according to the renewal period minus the idle period (subscription ends). |
|
Reinit on grace |
When the Reinit on Grace subscription period is extended, it will be increased according to the extension period. |
|
Start |
Is the start time when use. |
2. Click and choose Prepaid.
3. Insert Minimum Balance, refers to the value of the balance limit.
4. Insert Price package, refers to the value of the package price.
5. Click Set to give each endpoints detail price.

Notes :
After initializing all the existing data, you need to set all the API created in the plan.
Rate Entry :
- External Rate : calculated from when the backend provides a response. Responses are provided via headers from the backend.
- Price : price every time it takes a hit on API.
- Description : description of each path.
6. Click Next to continue Set Up Access Control Plan.
7. Click Next to continue Plugin Set Up.
8. Click Finish to save and a new prepaid plan is created.
9. Check the Prepaid Plan on API Detail in Developer Portal (https://apilogy/id).

PostPaid Plan
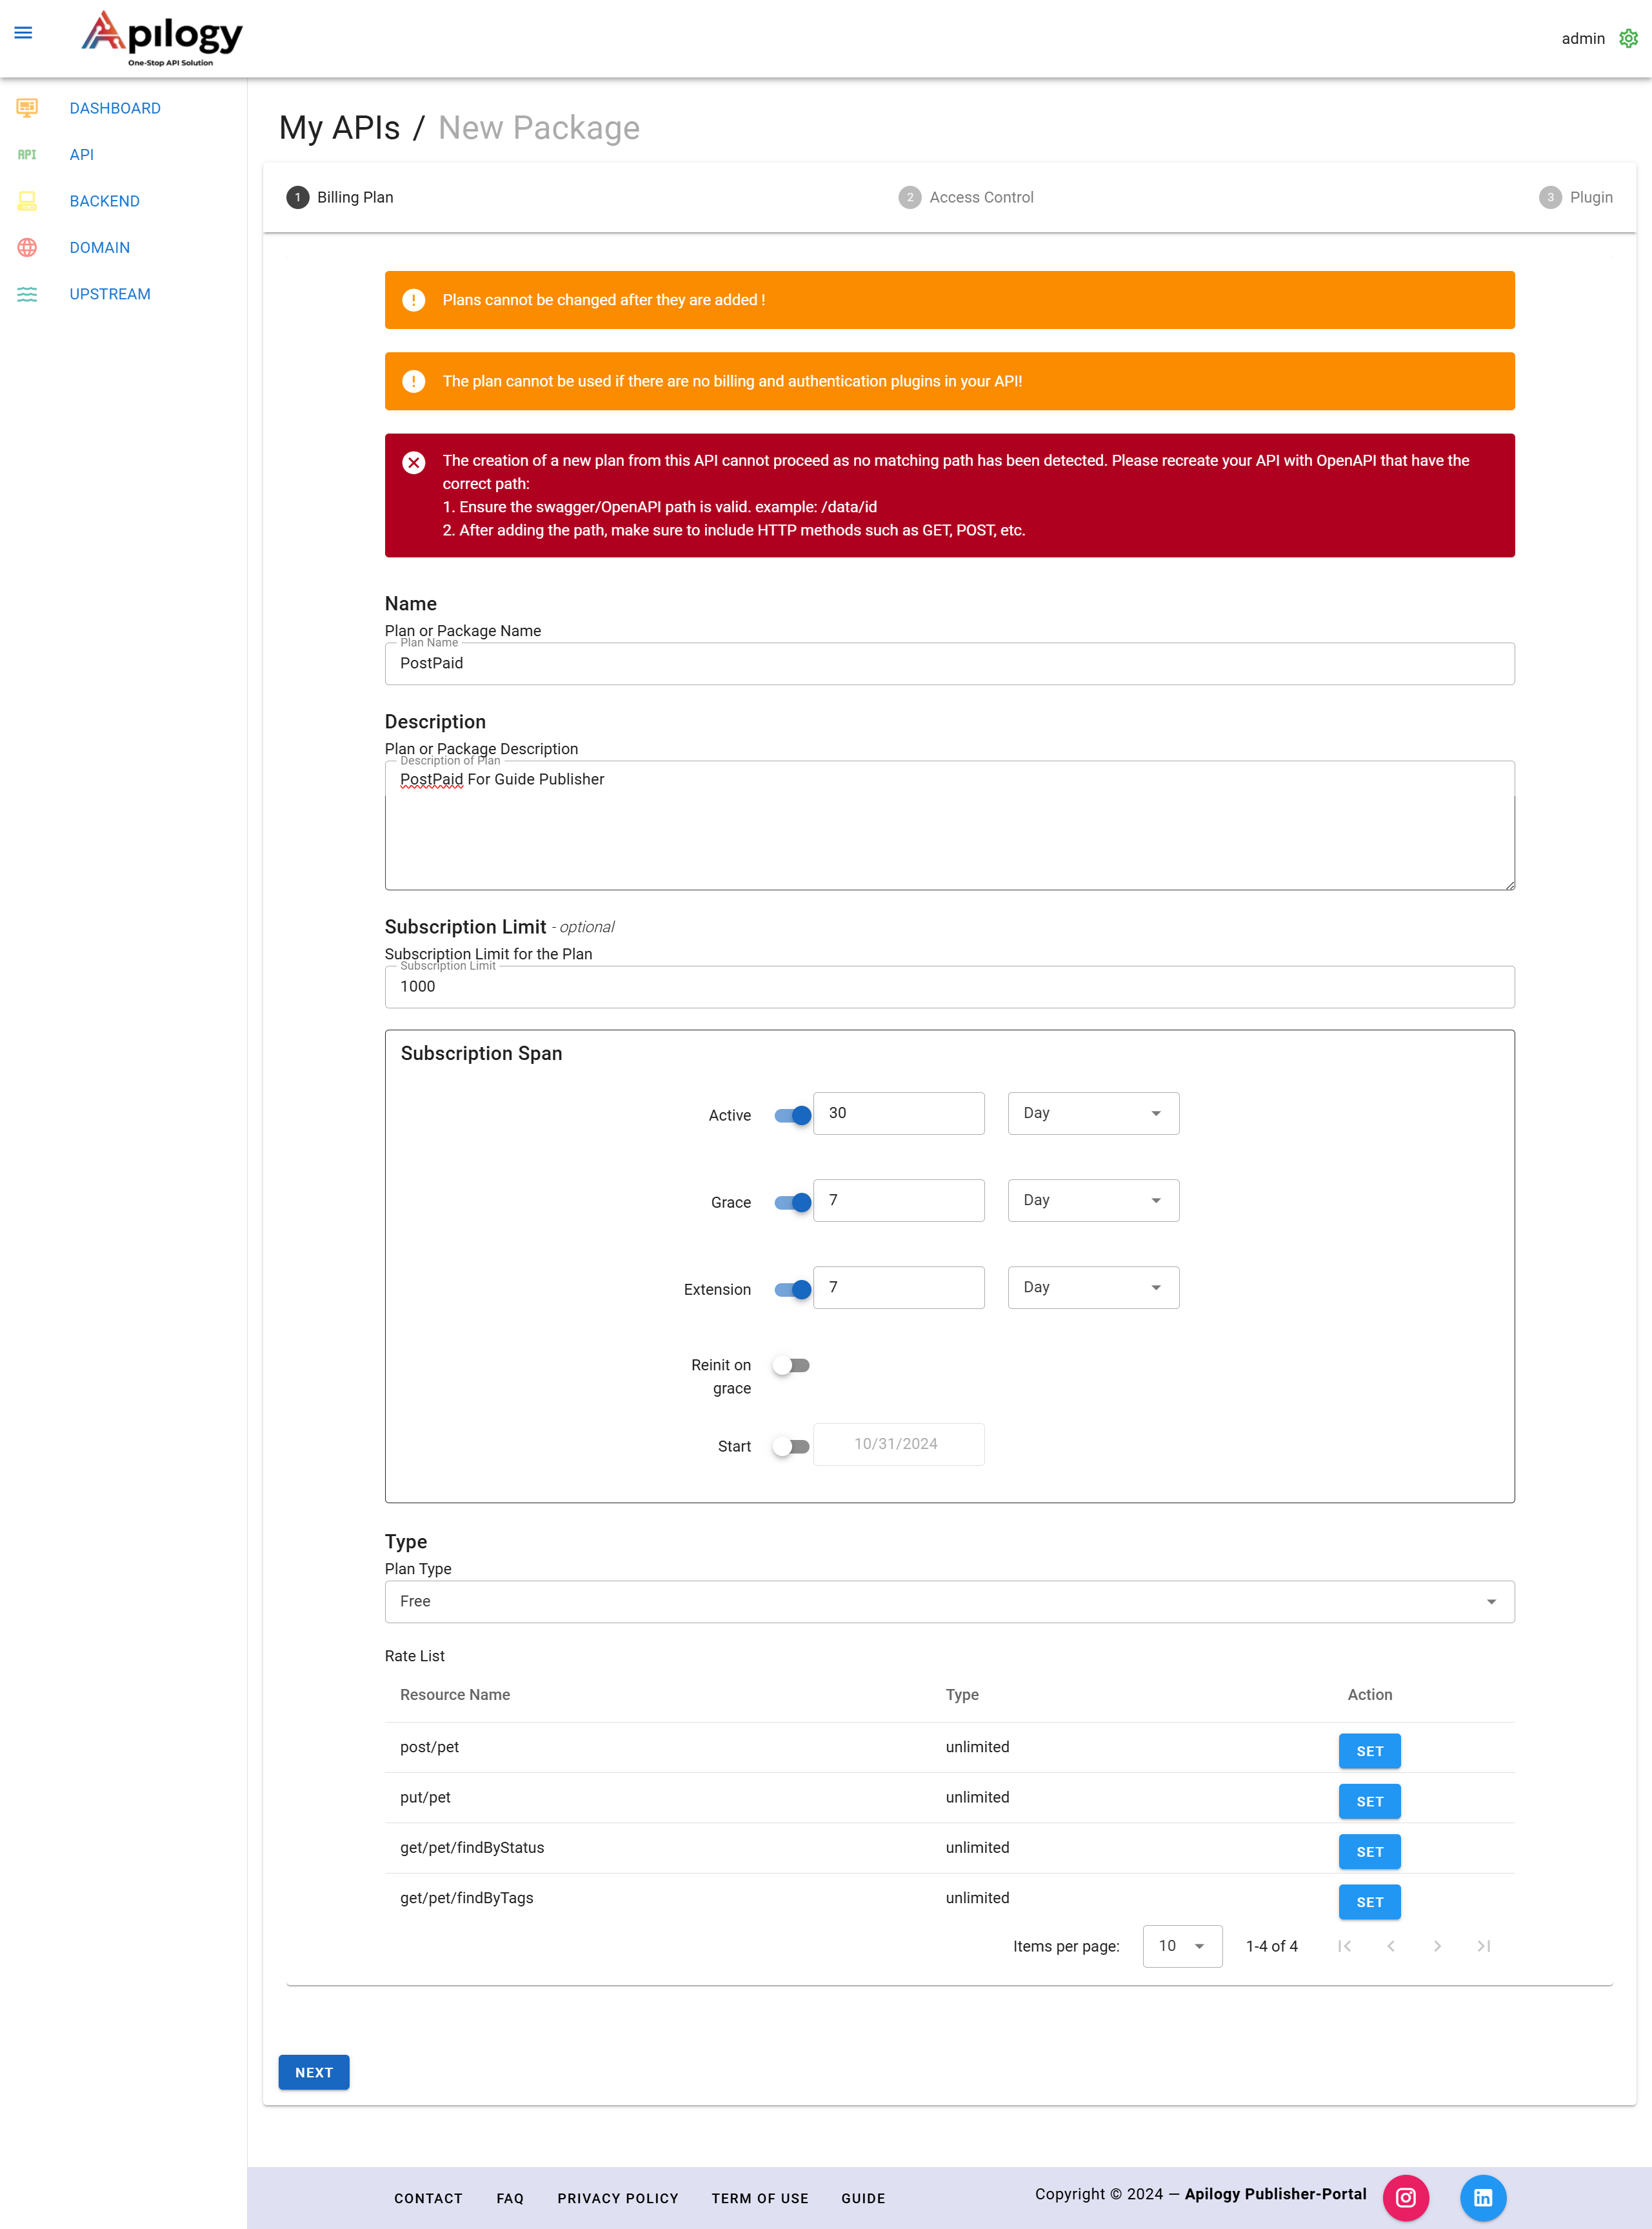
Postpaid Plan can be used to the API that will be monetized specifically for Developers who require bill payments or invoicing within a certain period after their usage.
- After insert information Plan and setup Subscription Span.
Notes :
- Name : determine the name of the plan that will be created later.
- Description : an explanation of the plan that will be made.
- Subscription Limit : provides a limit on the number of users who can subscribe.
- Type :
- Postpaid : Postpaid type so users can use it first but pay afterward. However, remember, Apilogy does not provide postpaid payment services, so users and publishers must have an agreement at the beginning when doing business.
2. Click and Choose Postpaid.
3. Insert Minimum Balance, refers to the balance limit.
4. Insert Price, refers to the package price.
5. Click Set Rate List.

Notes :
After initializing all the existing data, you need to set all the API created in the plan.
Rate Entry :
- External Rate : calculated from when the backend provides a response. Responses are provided via headers from the backend.
- Price : price every time it takes a hit on API.
- Description: description of each path.
- Type :
- Default, this type will set the price until API Call transaction reaches the minimum balance limit.
- Unlimited, this type will allow API Call transaction even if Minimum Balance is exceeded.
6. Click Change to save the Rate Entry.
7. Click Next to setup Access Control.
8. Click Next to Setup Plugin.
9. Click Finish to save and a new Postpaid plan is created.
10. Check the Prepaid Plan on API Detail in Developer Portal (https://apilogy/id).

Customize Subscription Span
To customize the subscription span, you can adjust the following settings for the subscription duration and user management in each plan:
1.Active
- This defines the period when the plan is active. By default, plans are inactive unless an activation period is specified.
- If you do not set an active period, the plan will remain available for use until the user’s balance is exhausted
2. Grace
- The grace period starts once the active period ends. This allows the publisher to determine whether the plan will be maintained (user can continue using it) or will be deleted (user loses access).
- The grace period ensures that users who might need extra time to pay or renew their subscription still have temporary access.
3. Extension
- If a user enters the grace period and then renews their subscription, the extension period will be added to the original active period, minus any idle time (i.e., the time between the end of the previous subscription period and the renewal).
- This allows for a seamless continuation of the subscription without losing time from the previous period.
4. Reinit on Grace
- If the subscription is extended during the grace period, this setting will extend the period according to the renewal period. It essentially resets the subscription period based on the extension time, allowing users to continue using the service without interruption.
5. Start
- This defines the start time of the subscription when the user first activates the plan. The “start” date sets the beginning of the plan’s validity.
By customizing these parameters, publishers can control how long users can access their services, offer additional time if needed, and manage renewal cycles more effectively.
Plugin
Using plugins, you can add various additional features that can improve the performance, security, and manageability of the API.
Billing Plan
This plugin is used to monetize the API so that you as a publisher can provide the price of the API that has been consumed. Use this Plugin if you want to monetize your API and market it through the APILOGY developer portal.
USAGE
To use this plugin, you just need to add this plugin to your API. You can also add headers to your API.
Key Auth
The Key Authentication plugin is a popular plugin that enables API key-based authentication for API. It allows you to control access to your APIs by requiring clients to provide a valid API key in their requests. By using the Key Authentication plugin, you can enforce access control and security for your APIs by requiring clients to authenticate with valid API keys. It’s a flexible and widely used authentication mechanism in Apilogy for managing API access.
USAGE
The “key-auth” plugin in APILOGY is used to authenticate API requests using an API key. It allows you to secure your APIs by requiring clients to include an API key in their requests. The plugin provides several parameters to configure its behavior. Here are the main parameters used with the “key-auth” plugin in APILOGY:

key_names: This parameter specifies the name of the header or query parameter where the API key should be included. By default, it is set to “apikey”.run_on_preflight: When set to true, the Kong CORS plugin will execute the plugin’s logic for preflight requests. When set to false, the Kong CORS plugin will skip executing the plugin’s logic for preflight requests.anonymous: This parameter allows you to specify a consumer (user) that should be treated as anonymous if no valid API key is provided. You can set this to a consumer ID, or use the value “true” to create an anonymous consumer on the fly.key_in_body: When set to true, this parameter enables sending the API key in the request body instead of headers or query parameters. Note that this may require modifying the client code to include the API key in the request body.
JWT
In APILOGY, JWT (JSON Web Token) can be handled using the “jwt” plugin. The JWT plugin allows you to verify, authenticate, and authorize requests based on JSON Web Tokens. JSON Web Tokens are a popular format for representing claims between two parties, commonly used for authentication and authorization purposes. By utilizing the “jwt” plugin in APILOGY, you can incorporate JWT-based authentication and authorization into your API gateway infrastructure, allowing you to secure and control access to your APIs using JSON Web Tokens.
USAGE
In the APILOGY “jwt” plugin, there are several parameters that can be configured to customize the behavior of the plugin. Here are the used parameters:
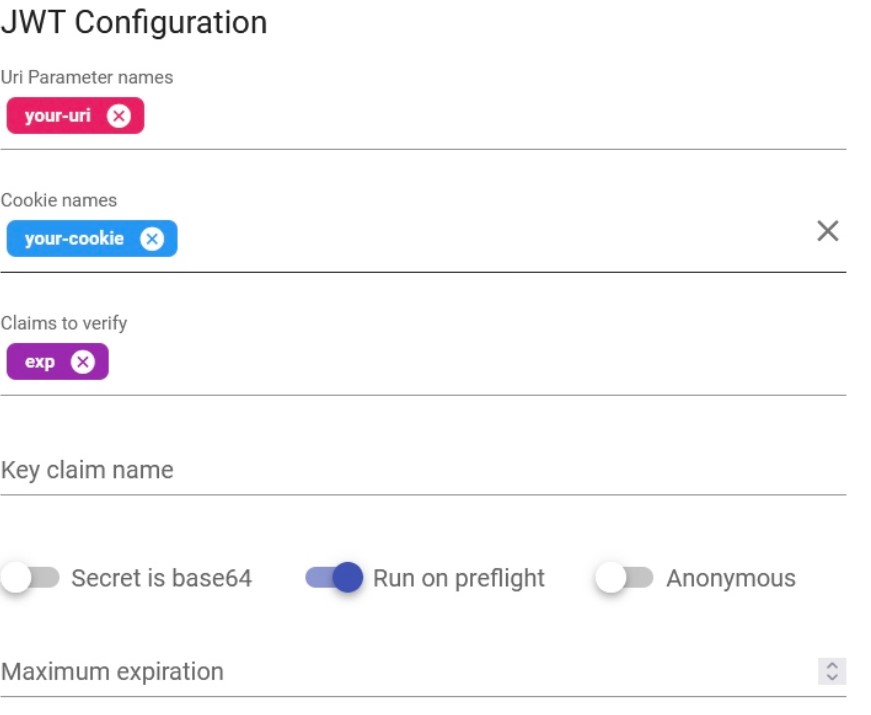
uri_param_names: An optional array of parameter names to look for JWTs in the query parameters of the request. If the JWT is passed as a query parameter, you can specify the parameter name(s) here.cookie_names: A list of cookie names to extract JWTs from. APILOGY will look for JWTs in the specified cookies.claim_to_verify: A list of claims that APILOGY should verify in the JWT. For example, you can specify that the plugin should verify the “iss” (issuer) and “exp” (expiration time) claims.secret in base64: used to specify the secret key for verifying the signature of JSON Web Tokens (JWTs) in Base64-encoded format.run_on_preflight: the parameter run_on_preflight controls whether the plugin should execute on preflight requests. Preflight requests are a part of the CORS (Cross-Origin Resource Sharing) mechanism in web browsers. The run_on_preflight parameter in the JWT plugin determines whether the plugin’s logic should be executed on these preflight requests. It accepts a boolean value and controls whether the JWT plugin will process the preflight request to validate the JWT or not.anonymous: By configuring the anonymous parameter, you can associate a specific consumer with requests that do not provide a valid JWT or fail JWT validation. This can be useful in scenarios where you want to allow certain unauthenticated or anonymous access to your APIs.maximum_expiration: the maximum_expiration parameter is used to set the maximum allowed expiration time (in seconds) for JSON Web Tokens (JWTs).
Basic Auth
The Basic-Auth plugin is a popular plugin in APILOGY that provides simple username/password authentication for API endpoints. It allows you to secure your API by requiring clients to include valid credentials in the form of a username and password in the Authorization header of their requests.
USAGE
To use the plugin, you only need to set the Anonymous field.
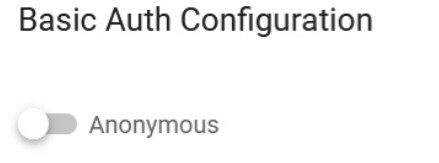
In the above example, anonymous allowing unauthenticated requests. You can customize this behavior according to your needs.
Apilogy Upstream Http Basic Authentification
Upstream HTTP Basic Authentication in APILOGY refers to a feature provided by the APILOGY API gateway that allows you to secure requests sent from APILOGY to upstream (backend) services using HTTP Basic Authentication.
HTTP Basic Authentication is a simple authentication scheme where the client includes a username and password in the “Authorization” header of the request. The credentials are encoded in Base64 format, although it is important to note that Basic Authentication does not provide strong security as the credentials are sent in plain text.
In the context of APILOGY, when you configure Upstream HTTP Basic Authentication, it means that APILOGY will add the necessary “Authorization” header with the encoded credentials to the requests it proxies to the upstream services. This enables you to protect your backend services by requiring valid credentials to access them.
To enable Upstream HTTP Basic Authentication in APILOGY, you need to configure the authentication credentials (username and password) for the upstream service. APILOGY will then automatically add the appropriate “Authorization” header to the requests it forwards to the upstream service, providing the necessary authentication.
It’s worth mentioning that while Upstream HTTP Basic Authentication can add a layer of protection for your upstream services, it is essential to ensure secure transmission of credentials over HTTPS and consider stronger authentication mechanisms when dealing with sensitive information or higher security requirements.
USAGE

Apilogy Header
Apilogy headers are additional pieces of information sent along with an HTTP request or response. They provide metadata about the message, enabling the client and server to exchange information beyond the main content of the request or response.
USAGE To use the plugin in APILOGY you can set the parameters in the upstream and downstream settings.
- Upstream : Header data will be sent from apilogy to Backend
- Downstream : Header data will be sent from apilogy to Developer
JSON Logic
JSON Logic is a lightweight, expressive language used for evaluating and manipulating JSON data structures. It provides a way to describe and reason about data transformations and conditions in a concise and declarative manner. JSON Logic is often used in scenarios where you need to define complex rules or calculations that operate on JSON objects. JSON Logic provides a versatile and flexible way to work with JSON data, making it useful in scenarios such as data validation, decision-making, filtering, and data transformation. It allows you to express complex rules and transformations concisely, enhancing the maintainability and readability of your code or configurations.
USAGE
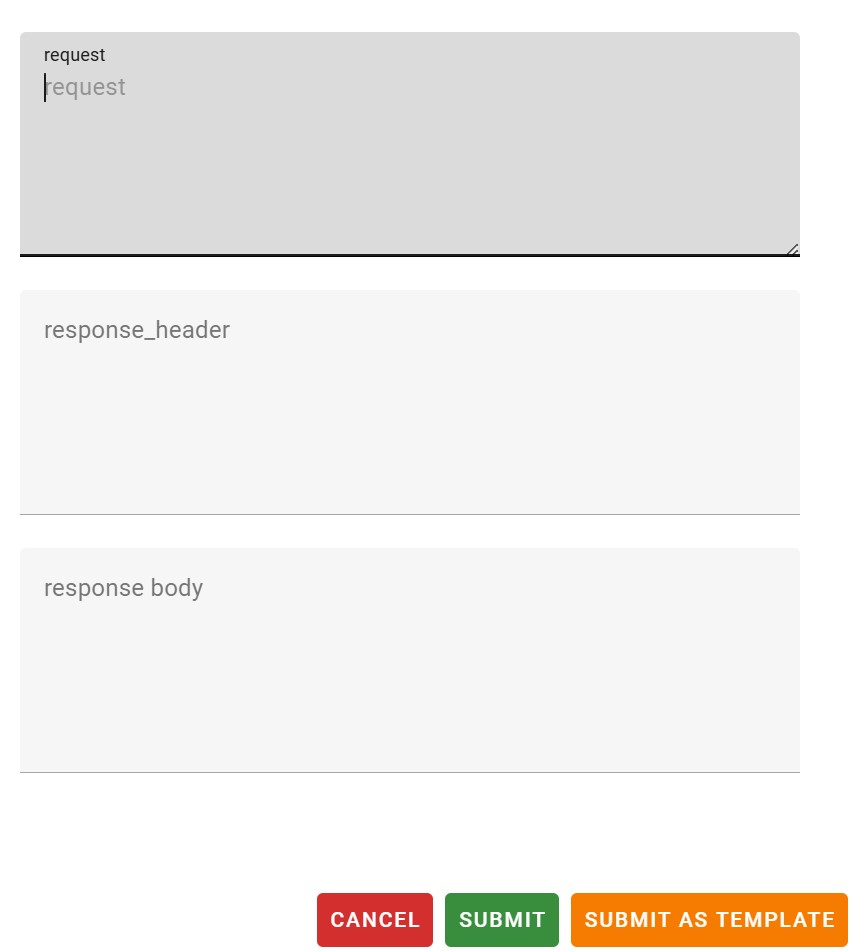
-
request: This parameter represents the incoming HTTP request and provides access to various properties of the request, such as headers, URL, HTTP method, query parameters, and more. You can use the request parameter to extract information from the request and use it in your JSON Logic expressions. response_header: This parameter represents the headers of the outgoing HTTP response. It allows you to access and modify the response headers using JSON Logic expressions. You can set or modify specific response headers based on certain conditions or transformations.response_body: This parameter represents the body of the outgoing HTTP response. It provides a way to access and modify the response body using JSON Logic expressions. You can perform transformations, extract data, or apply conditions to modify the response body before it is sent back to the client.
Oauth2
OAuth2 is an authorization framework that enables third-party applications to obtain limited access to an HTTP service on behalf of a resource owner, without exposing the owner’s credentials. It is commonly used to provide secure access to APIs and protect sensitive resources. The OAuth2 plugin in APILOGY allows you to secure your APIs using the OAuth2 protocol. It can act as an OAuth2 provider, enabling you to issue access tokens to clients and enforce authorization rules. Alternatively, it can act as an OAuth2 consumer, allowing you to protect your APIs by validating access tokens issued by an external OAuth2 provider. By configuring the OAuth2 plugin in APILOGY, you can define scopes, grant types, and other OAuth2-related parameters. It handles the authentication and authorization flow, validates access tokens, and enforces security policies on incoming requests to your API. This way, you can ensure that only authorized clients with valid access tokens can access your protected resources.
USAGE
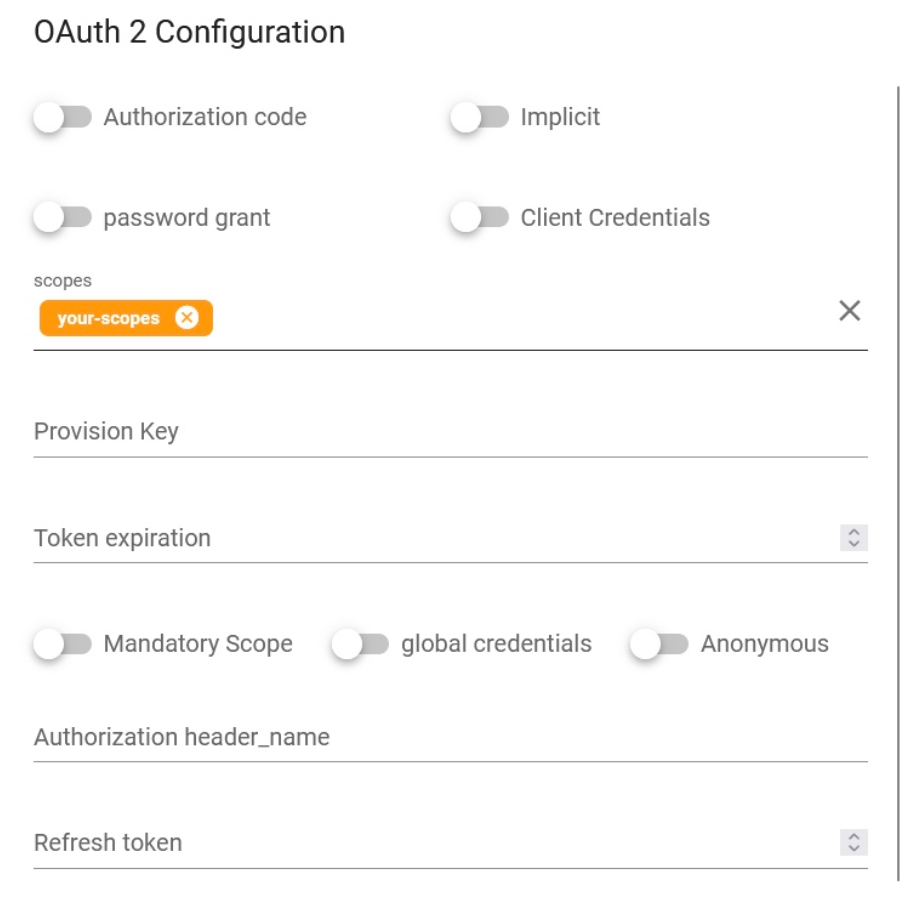
Authorization Code: It is an OAuth2 grant type where the client obtains an authorization code from the authorization server by redirecting the user to a login page. The authorization code is then exchanged for an access token and optionally a refresh token, allowing the client to access protected resources on behalf of the user.Password Grant: The password grant type allows the client to directly exchange the user’s credentials (username and password) with the authorization server for an access token. This grant type is typically used for trusted applications or in cases where the client is the resource owner.Implicit Grant: The implicit grant type is a simplified flow where the access token is directly returned to the client as part of the authorization response, without the need for an intermediate authorization code. This grant type is suitable for clients implemented in a web browser using JavaScript.enable_client_credentials: Enables or disables the client credentials grant type, allowing clients to obtain access tokens using only their client credentials (client ID and client secret).scopes: Defines the scopes that can be requested by clients when obtaining access tokens. Scopes represent specific permissions or privileges associated with the access token.Provision Key: The provision key is a feature provided by the OAuth2 plugin in APILOGY. It allows you to provision and manage OAuth2 clients programmatically through the APILOGY Admin API. It is used to securely create and manage client credentials (client ID and client secret) without exposing them in configuration files.token_expiration: Sets the expiration time for the access token in seconds. After this time period, the access token becomes invalid and clients need to request a new one.mandatory_scope: Specifies whether a scope is required or optional when requesting access tokens. If set to true, the “scope” parameter becomes mandatory in the OAuth2 token request.global_credentials: Specifies whether the client credentials should be shared among all APIs in APILOGY. If set to true, the same client credentials can be used to obtain access tokens for different APIs registered in APILOGY.Anonymous: The anonymous parameter is an option in the OAuth2 plugin configuration that allows unauthenticated requests to access protected resources. When enabled, it bypasses OAuth2 authentication for specific routes or APIs, allowing anonymous access without requiring an access token.Authorization Header Name: The authorization_header_name parameter specifies the name of the header used to pass the access token in requests. By default, the header name is “Authorization,” but you can customize it if necessary.Refresh Token: A refresh token is a long-lived token that can be used to obtain a new access token without requiring the user to re-enter their credentials. It is commonly used in OAuth2 to extend the validity of access tokens. The refresh token grant type allows the client to exchange a refresh token for a new access token when the current one expires.
Rate Limitting
Rate limiting in APILOGY refers to the ability to control and restrict the number of API requests or transactions that can be made within a given time period. It is a crucial feature in API management and helps to ensure the availability, stability, and security of APIs. APILOGY provides rate limiting capabilities through its Rate Limiting plugin. This plugin allows you to define rate limiting rules and policies that regulate the traffic to your APIs. By configuring the plugin, you can set limits on the number of requests that can be made per minute, per hour, or any other time period you specify.
USAGE
In APILOGY, the parameter rate_limiting refers to the configuration options available for the Rate Limiting plugin. This plugin allows you to implement rate limiting policies to control the number of API requests that can be made within a specified time period. When configuring the Rate Limiting plugin in APILOGY, you can set several parameters to define the rate limiting behavior. Here are the used parameters:

second: The maximum number of requests allowed per second.minute: The maximum number of requests allowed per minute.hour: The maximum number of requests allowed per hour.day: The maximum number of requests allowed per day.month: The maximum number of requests allowed per month.year: The maximum number of requests allowed per year.policy: The algorithm used for rate limiting. Kong supports different policies, such as cluster, local, redis, or redis-cluster, which determine how rate limits are enforced.limit_by: This parameter determines how the rate limit is applied. It can have the following values:consumer: Rate limits are applied based on the consumer making the API requests.credential: Rate limits are applied based on the credentials associated with the consumer.ip: Rate limits are applied based on the client’s IP address.header: Rate limits are applied based on a custom header value in the request.
fault_tolerant: This parameter determines the behavior of the Rate Limiting plugin in case of errors while communicating with Redis. If set to true, Kong will allow requests to proceed even if there are issues with the Redis connection. If set to false, Kong will respond with an error if it encounters Redis connection problems.hide_client_headers: When set to true, this parameter instructs Kong to remove client-specific headers (such as X-Consumer-ID and X-Consumer-Username) from the request before forwarding it to the upstream service. This can help improve security by preventing the exposure of internal Kong headers to the upstream service.redis_host,redis_port,redis_password,redis_timeout,redis_database: These parameters configure the connection details for the Redis server used for storing rate limit counters. You can specify the host address, port number, password (if applicable), connection timeout duration, and the Redis database number to be used.
Cors
CORS (Cross-Origin Resource Sharing) is a mechanism used by web browsers to enforce security policies regarding cross-origin requests. It allows a web application running in one domain to access resources from another domain. APILOGY provides built-in support for handling CORS requests.
USAGE
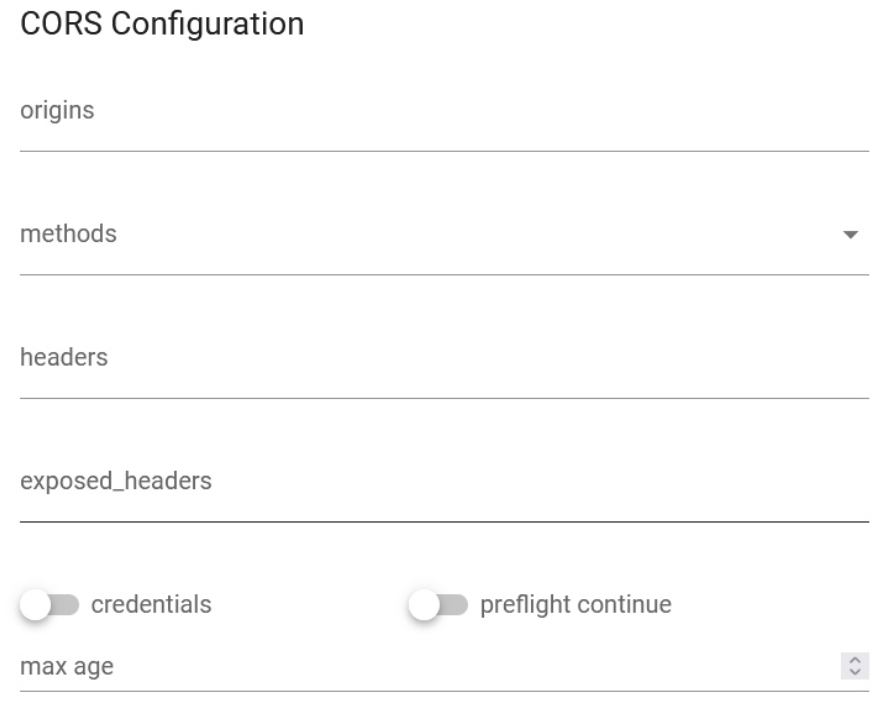
config.origin: Specifies the allowed origins for cross-origin requests. You can set it to a specific domain or use “*” to allow requests from any origin. For example, if you set it to “example.com”, only requests from that domain will be allowed.config.methods: Defines the allowed HTTP methods (verbs) for cross-origin requests. It should be an array of HTTP methods. For example, [“GET”, “POST”, “PUT”] specifies that GET, POST, and PUT methods are allowed.config.headers: Specifies the allowed request headers for cross-origin requests. It should be an array of header names. For example, [“Content-Type”, “Authorization”] allows the “Content-Type” and “Authorization” headers to be included in the requests.config.exposed_headers: Defines the headers that can be exposed to the browser in the response. It should be an array of header names. Exposed headers are additional headers that the server allows the client to access. For example, [“X-Custom-Header”] allows the “X-Custom-Header” to be exposed in the response.config.credentials: Specifies whether the browser should include credentials (e.g., cookies, HTTP authentication) in cross-origin requests. It can be set to true or false. If set to true, the server must respond with the appropriate CORS headers to allow credentials. If set to false, credentials will not be sent. Note that when using true, the origin cannot be set to “*” and must be a specific domain.config.max_age: Sets the maximum time (in seconds) that the browser should cache the preflight response. The preflight request is an additional request sent by the browser to check if the server allows the actual request. The max_age value indicates how long the browser can cache the preflight response. After this time, the browser will send a new preflight request. For example, 3600 sets the cache time to 1 hour.
IP Restrictions
IP restrictions in APILOGY allow you to control access to your APIs based on the IP addresses of the clients making the requests. With IP restrictions, you can whitelist or blacklist specific IP addresses or ranges to either allow or deny access to your APIs through APILOGY. This feature helps in enforcing security measures and protecting your APIs from unauthorized or malicious access.
USAGE
Once IP restrictions are set up, APILOGY will enforce the configured whitelist and blacklist rules for incoming requests to your API. Requests from whitelisted IP addresses will be allowed, while requests from blacklisted IP addresses will be denied.

allow: An array of IP addresses or CIDR ranges that are allowed to access the API. Requests originating from IP addresses or ranges specified in the whitelist will be permitted.deny: An array of IP addresses or CIDR ranges that are denied access to the API. Requests originating from IP addresses or ranges specified in the blacklist will be rejected.
Outh2 Audience
I. Kong Plugin OAuth2 Audience
Validate access tokens from a third-party OAuth 2.0 Authorization Server (including OpenID Connect) by leveraging JWT verification [RFC7519] and/or OAuth2 Introspection [RFC7662] and associate the external OAuth2 client with an existing Kong consumer based on the audience parameter [](). Each consumer can have multiple audiences. At the same time, each registered audience can only be associated with a specific issuer (`iss` claim) and client id (`client_id` claim). This allow for complete control over the list of extenal OAuth2 Client that can be associated with the consumer.
II. Configuration Reference
This plugin is compatible with requests with the following protocols:
- http
- https
This plugin is partially compatible with DB-less mode. In DB-less mode, Kong does not have an Admin API. If using this mode, configure the plugin using declarative configuration. Consumers and Credentials can be created with declarative configuration. Admin API endpoints which do POST, PUT, PATCH or DELETE on Credentials are not available on DB-less mode.
III. Parameters
Here’s a list of all the parameters which can be used in this plugin’s configuration:

| Form Parameter | Description |
|---|---|
|
name
Type: string |
The name of the plugin to use, in this case oauth2-audience. |
|
service.id Type: string |
The ID of the Service the plugin targets. |
|
route.id Type: string |
The ID of the Route the plugin targets. |
|
enabled Type: boolean Default value:true |
Whether this plugin will be applied. |
|
config.issuer required |
OAuth2 issuer identifier that needs to be present in is claim on the OAuth2 token. |
|
config.oidc_conf_discovery optional Default value:true |
A boolean value that indicates whether the plugin should send OpenID Connect Discovery request to obtain information regarding JWT Verfication or OAuth2 Token Instropection. If set to false then appropriate jwt_* or introspection_* settings are required. |
|
config.required_scope optional |
Describes an array of scope names that must be available on the OAuth2 token. |
|
config.required_audiences optional |
Describes an array of audience value that must be available in the OAuth2 token auth claim. |
|
config.audience_prefix optional |
Prefix string that must be added in the aud claim to be recognized as kong credential. For example if the audience associated with a consumer is nCztu5Jrz18YAWmkwOGJkQe9T8lB99l4 and the prefix is kong:, then aud claim should contains kong:nCztu5Jrz18YAWmkwOGJkQe9T8lB99l4 |
|
config.jwt_signature_secret semi-optional |
Secret key used in Symmetric JWT verification. |
|
config.jwt_signature_public_key semi-optional |
Public key used in Asymmetric JWT verification. If left empty and oidc_conf_discovery is not false, then this plugin will try to extract it from endpoint specified in jwks_uri metadata in OpenID Connect Discovery response. |
|
config.jwt_signature_algorithm optional Default value: [“HS256”, “HS512”, “RS256”] |
A list of allowed JWT signature algorithm. This plugin only support HS256, HS512, and RS256 algorithm. |
|
config.jwt_introspection optional Default value:false |
If true and introspection_endpoint is available, then verified JWT will also be introspected. |
|
config.introspection_endpoint semi-optional |
Oauth2 Instrospection Endpoint for introspecting non-JWT token or if jwt_introspection is set to true. If left empty and oidc_conf_discovery is not false, then this plugin will use introspection_endpoint metadata in OpenID Connect Discovery response. |
|
config.introspection_auth_method semi-optional Default value: client_secret_basic |
Authentication method used to contact the introspection endpoint. The valid value is one of
|
|
config.introspection_client_id semi-optional |
Client ID information to be used in introspection request. Depending on introspection_auth_method, it will be used as basic auth username, client_id form param, or iss JWT claim. |
|
config.introspection_client_secret semi-optional |
Client Secret information to be used in introspection request when using client_secret_basic, client_secret_post, or client_secret_jwt authentication method. |
|
config.introspection_client_rsa_private_key semi-optional |
Client Secret information to be used in introspection request when using private_key_jwt authentication method. |
|
config.introspection_client_rsa_private_key_id semi-optional |
The value of kid JWT Header when using private_key_jwt authentication method. |
|
config.introspection_param_name_token
optional Default value: token |
URL-Encoded Form parameter name to contain the OAuth2 token to be introspected. |
|
config.introspection_params optional |
Additional parameter to be included in OAuth2 Token Introspection request. |
|
config.introspection_claim_expiry optional Default value:exp |
OAuth2 Token expiry claim. The value will be used in caching mechanism. |
|
config.introspection_cache_max_ttl optional Default value: 900 |
Maximum TTL to cache introspection result. |
|
config.auth_header_map optional Default value: {“consumer_id”:”X-Consumer-ID”,”consumer_custom_id”:”X-Consumer-Custom-ID”,”consumer_username”:”X-Consumer-Username”,”credential”:”x-authenticated-audience”,”anonymous”:”X-Anonymous-Consumer”} |
Map containing upstream header name to be passed to upstream server. |
|
config.claim_header_map optional Default value: {“iss”:”x-oauth2-issuer”,”client_id”:”x-oauth2-client”,”sub”:”x-oauth2-subject”} |
Mapping of OAuth2 Token claim to upstream header. |
|
config.auth_header_name optional Default value: authorization |
The name of the header supposed to carry the access token. |
|
config.hide_credentials optional Default value: false |
An optional boolean value telling the plugin to show or hide the credential from the upstream service. If true, the plugin will strip the credential from the request (i.e. the header or querystring containing the key) before proxying it. |
|
config.anonymous optional |
An optional string (consumer uuid) value to use as an “anonymous” consumer if authentication fails. If empty (default), the request will fail with an authentication failure 4xx. Please note that this value must refer to the Consumer id attribute which is internal to Kong, and not its custom_id. |
|
config.run_on_preflight optional Default value: true |
Default value: true A boolean value that indicates whether the plugin should run (and try to authenticate) on OPTIONS preflight requests, if set to false then OPTIONS requests will always be allowed. |
|
config.ssl_verify optional Default value: true |
A boolean value that indicates whether the plugin should do SSL/TLS verification when sending OAuth2 Token Instrospection or OpenID Connect Discovery request |
Additional Feature
Domain
Visit APILOGY Publisher Portal, after authentication login on Dashboard page Click ‘Domain’ menu.

The domain on Apilogy Publisher acts as the main host that allows this platform to publish APIs directly from the backend to the public. With this special domain, Apilogy is able to manage API services and present them in a format that is ready to be used by application developers. This process supports efficient integration between backend applications and parties who need access, whether they are external developers, third-party applications, or end users consuming data via APIs. In addition, this domain ensures that every published API can be accessed stably and securely, thus strengthening the connectivity and existence of the API services provided by Apilogy.
In the apilogy domain there are 2 options, namely
1. {user}-api-staging.apilogy.id
This domain is owned only by that user. {user} shows the user name of the account so that each user has their own unique domain. Therefore, it is recommended that users use a unique domain.
2. api-staging.apilogy.id
This domain is owned globally. So anyone can use it. Therefore, global domains are not recommended for users.
Upstream
The upstream object represents a virtual hostname and can be used to load balance incoming requests over multiple services (targets). Example, an upstream named service.v1.xyz for a Service object whose host is service.v1.xyz. Requests for this Service would be proxied to the targets defined within the upstream. An upstream also includes a health checker, which enables and disables targets based on their ability or inability to serve requests. The health checker configuration is stored in the upstream object and applies to all its targets. Upstream can be both tagged and filtered by tags. Docs.
1. Visit APILOGY Publisher Portal, after authentication login on Dashboard page Click Upstream menu.
2. Click Add New Upstream.
3. Enter Upstream Basic Info.
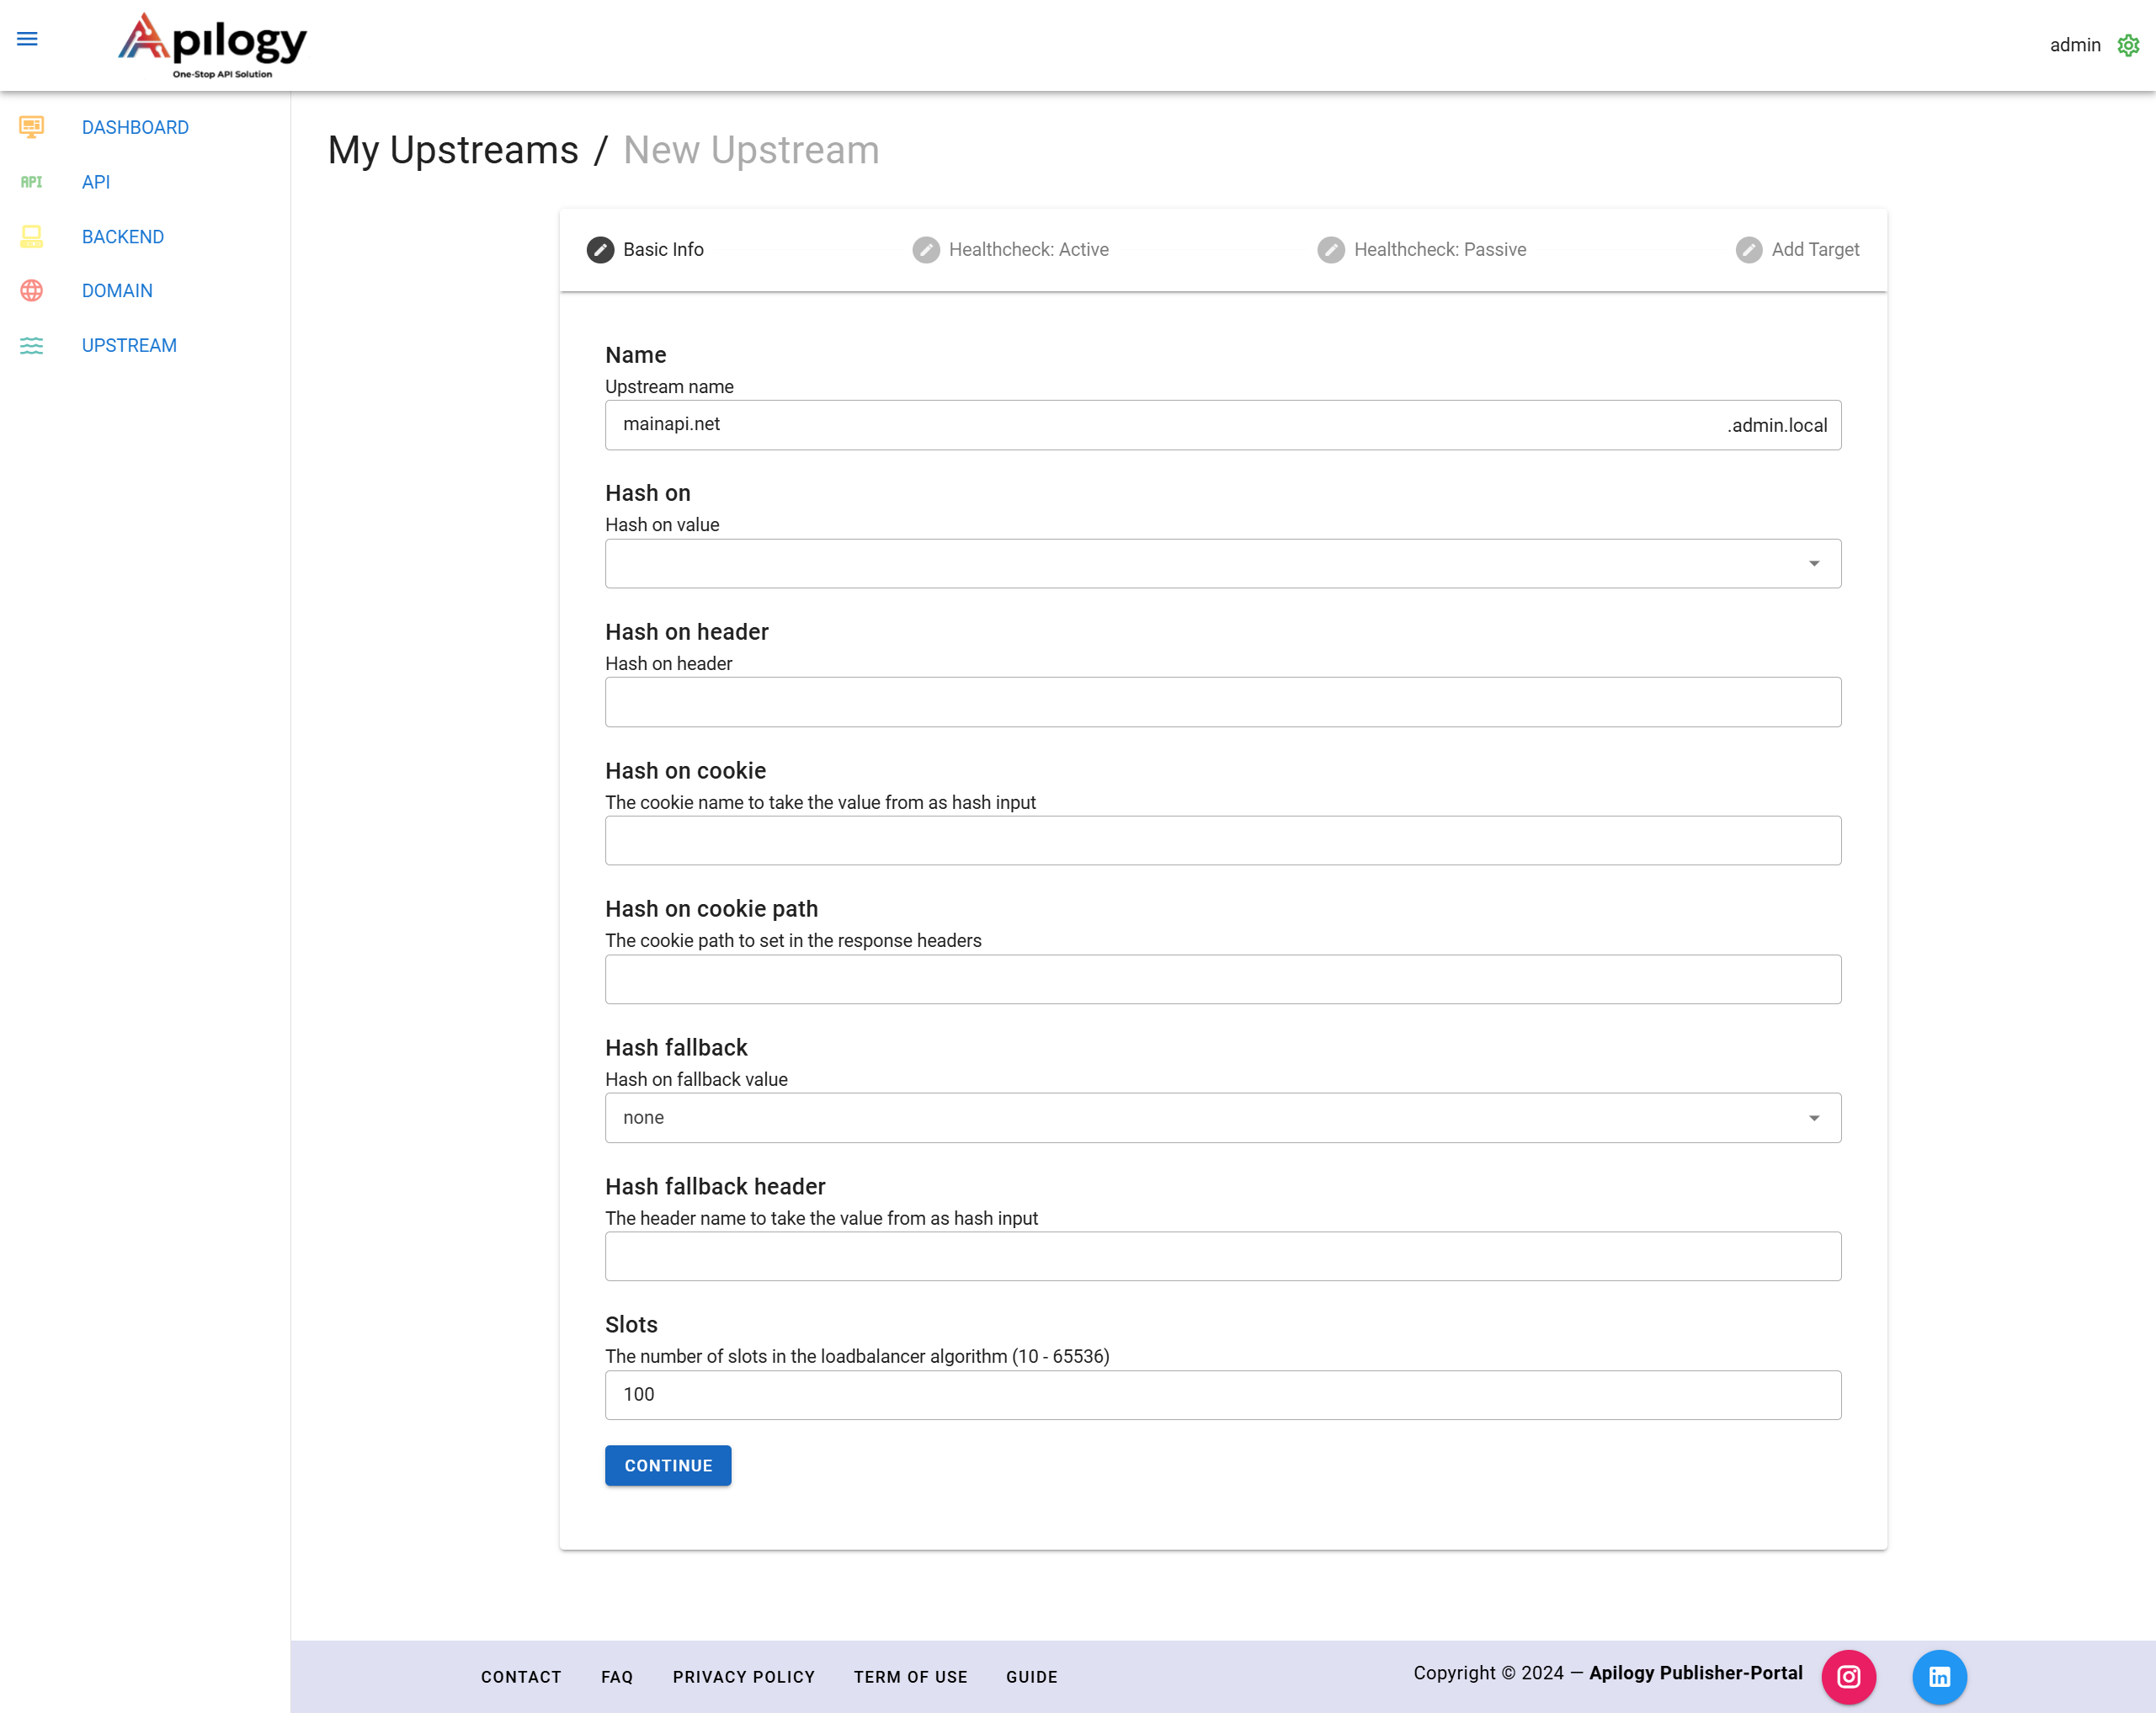
Notes:
Name: Upstream Name
Hash On: Hash on value
Hash on Cookie: Hash on cookie
Hash on Cookie Path: The cookie path to set in the response headers
Hash fallback: Hash on fallback value
Hash fallback header: The header name to take the value from as a hash input
Slots: The number of slots in the load balancer algorithm (10-65536)
4. Click Continue to next step HealthCheck: Active.
5. Enter HealthCheck: Active.
6. Click Continue to next step HealthCheck: Passive.
7. Enter HealthCheck: Passive.
8. Click Continue to next step Add Target.
9. Click Finish.

Dashboard Monitoring
The monitoring dashboard provides various features to help manage and track API performance, including Create API With Wizard, Create API With Template, Quick Information, Statistics Subscriptions, Statistics Consumption Count, and Export Data. These features will be explained in detail in the following section.
Create API With Wizard
This wizard will guide the steps for creating an API from start until your API can be displayed on the Developer Portal.
1. Go to dashboard and click create api with wizard.
2. Input Step 1 Info Backend Entry form.
Example :
xample :
3. Click next.
4. Step 2 Plugin , If there is no need to Add Plugin, Click Submit on Plugin Entry.
5. The next step is to enter Api info.
Example :
6. Click Next to go the next Step 2 Swagger Entry.
7. Set Up the Access Control by click Edit button to add user.
- Enter username consumer/developer.
- Once its showed, click checklist. Example : use the ‘admin’ username
- Click ‘Add’ and user will be on Addes User list
- Setup is customized between Mode Whitelist or Blacklist. If you use “Blacklist” it means the username you input will not be able to see or subscribe to your API.
8. In this case, the API will be accessed by one user to whitelist mode. It means the user can see and subscribe to the API. Click Checklist to activate the Access Control.
9. Click Next to go through the step 4 Plugin.
10. If you don’t need to Add a Plugin, Click Save All Data on the Plugin Entry. You will move to the plan page.
11. In this case we will use the free plan. you have to insert the Plan Information and setup Subscription Span.
12. Click Set to setup each endpoint price. In this free plan, the price is set ’Rp.0’
13. Click Change to save change and continue to the next endpoint.
14. Click Next to set up the Access Control on Plan level.
15. Click Next to setup Plugin.
16. In this Free Plan, will be need Plugin Rate Limitting to limit user usage.
Example: set ‘5’ call or hit /day, then klik submit.
17. Click Finish and a new Free Plan is created.
18. Check the Free Plan on API Detail in Developer Portal (https://apilogy/id).
Create Api With Template
This template helps you make fire in simpler steps. There are two options, namely minimum and basic that you can try.
Minimum
1. Fill in the backend information.
2. Upload OpenApi File.
- Upload a json file that is compatible with openApi. or
- Enter a json URL that is compatible with OpenApi. This case example uses https://petstore.swagger.io/v2/swagger.json
3. Click view OpenApi to see the files that have been uploaded.
4. Click Submit.
Basic
1. Input information.
2. Upload OpenApi File.
- Upload a json file that is compatible with openApi.
- Enter a json URL that is compatible with OpenApi. This case example uses https://petstore.swagger.io/v2/swagger.json
3. Click Submit.
Quick Information
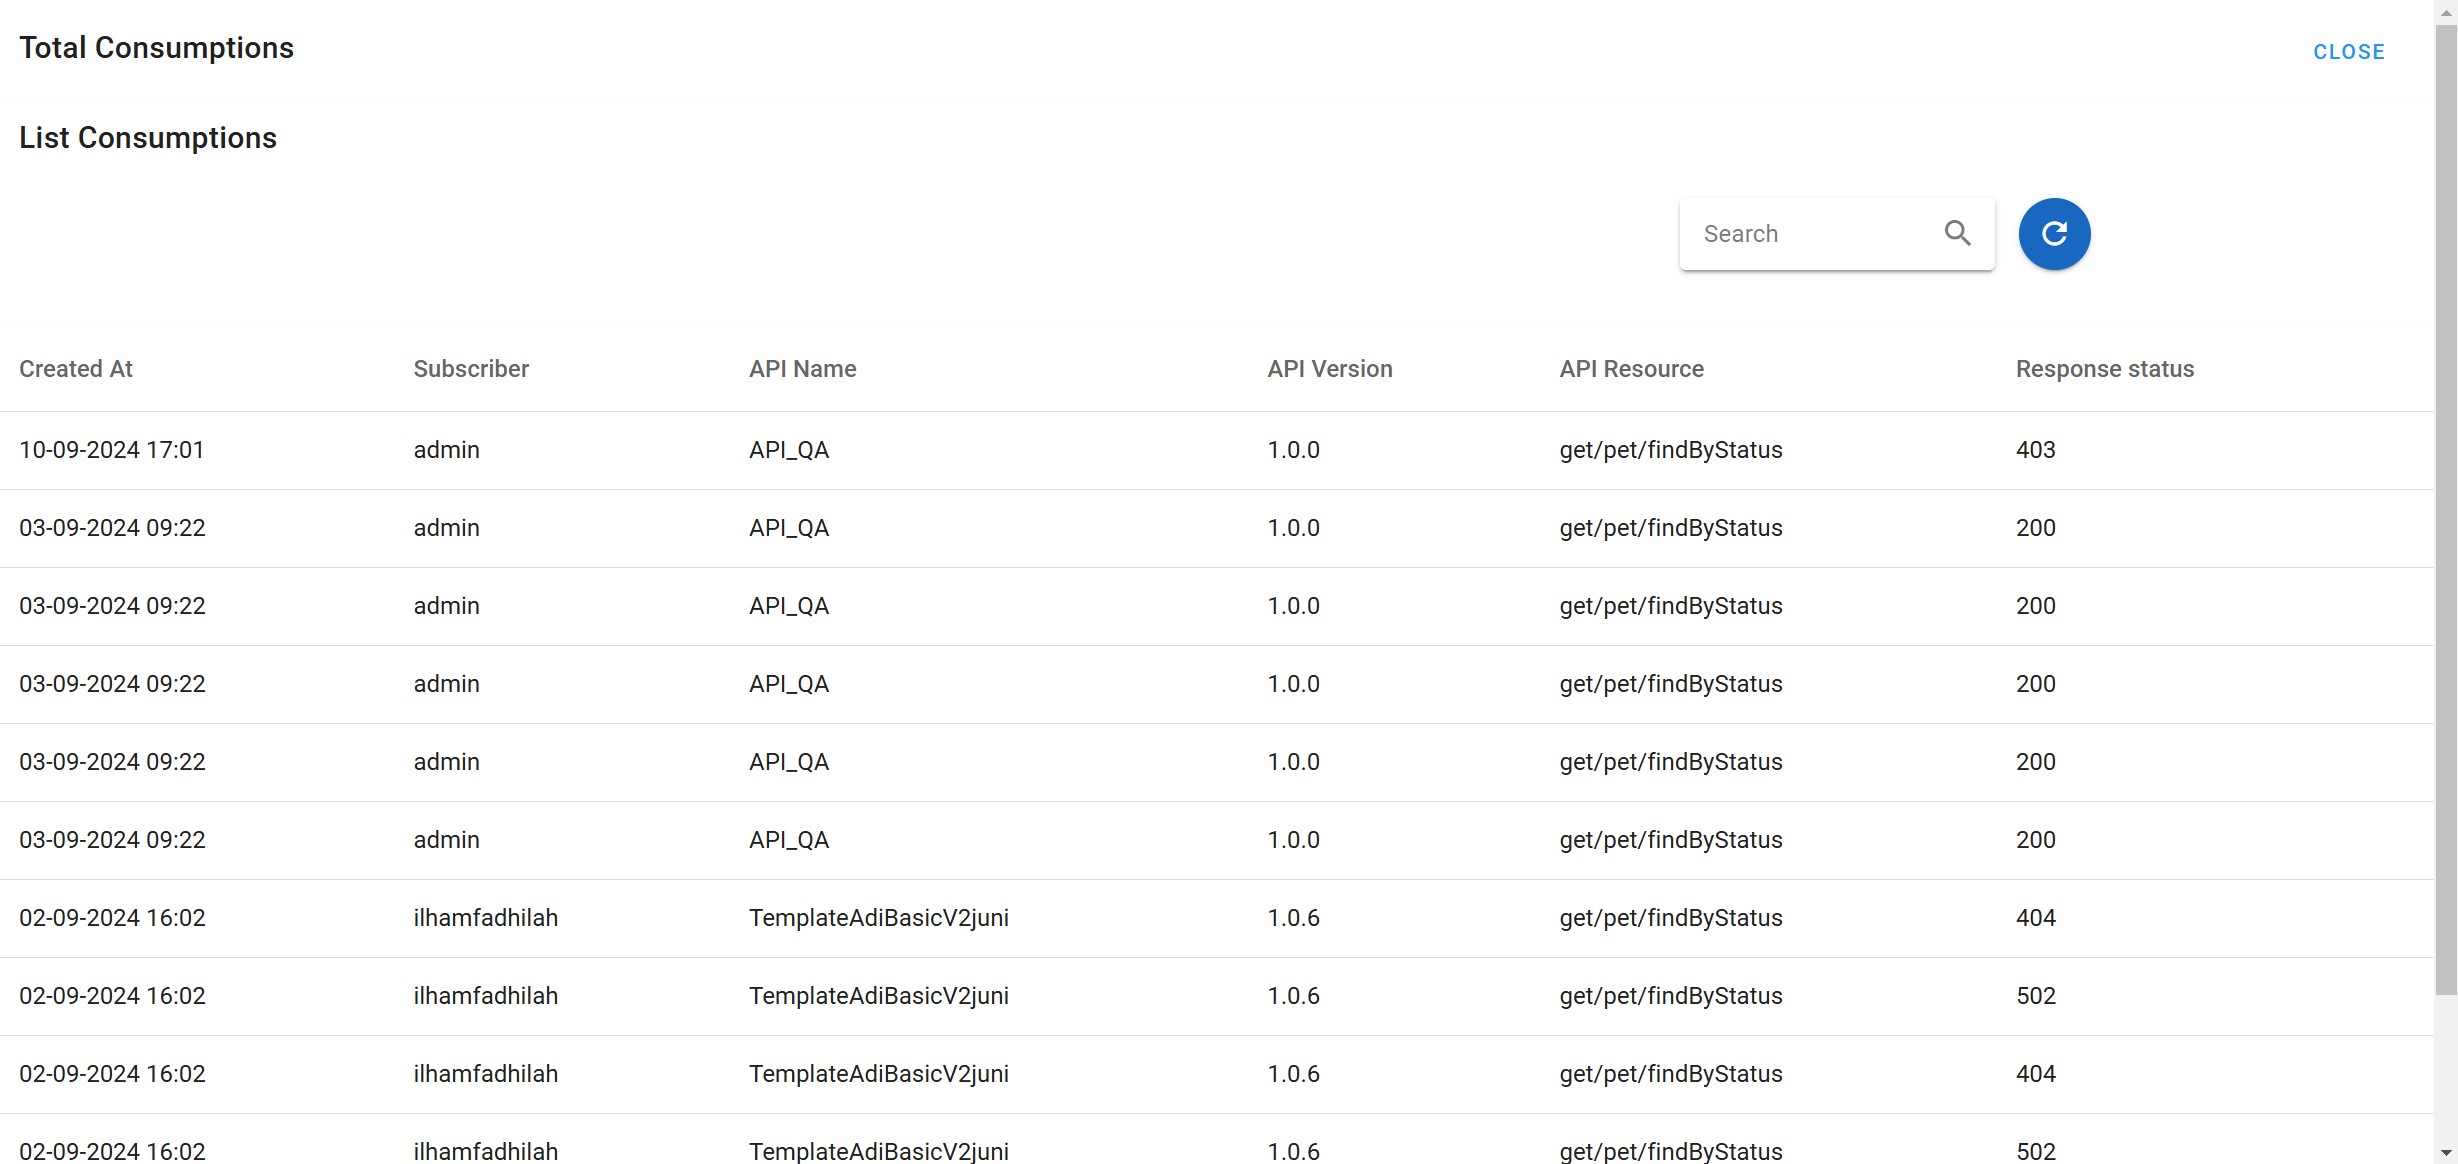
Quick Information provides an important summary of your API management, including the API List to view a list of APIs that have been created, the Backend List which displays connected backends, the Subscription List to monitor user subscriptions to APIs, and the Total consumption which provides detailed information regarding subscriptions and API consumption. This feature makes it easier for you to manage and monitor APIs and their subscriptions efficiently.

1. Api List

2. Backend

3. Subscription

4. Total Consumption
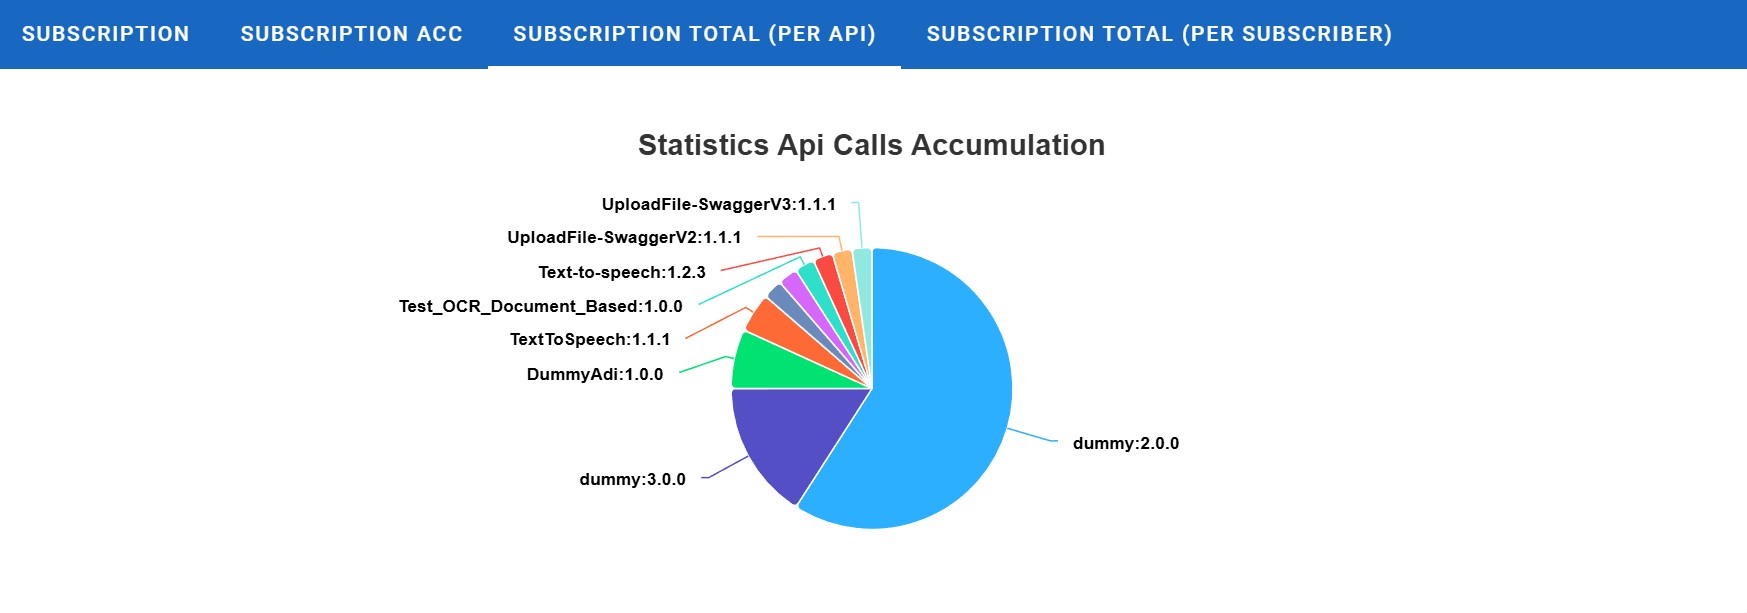
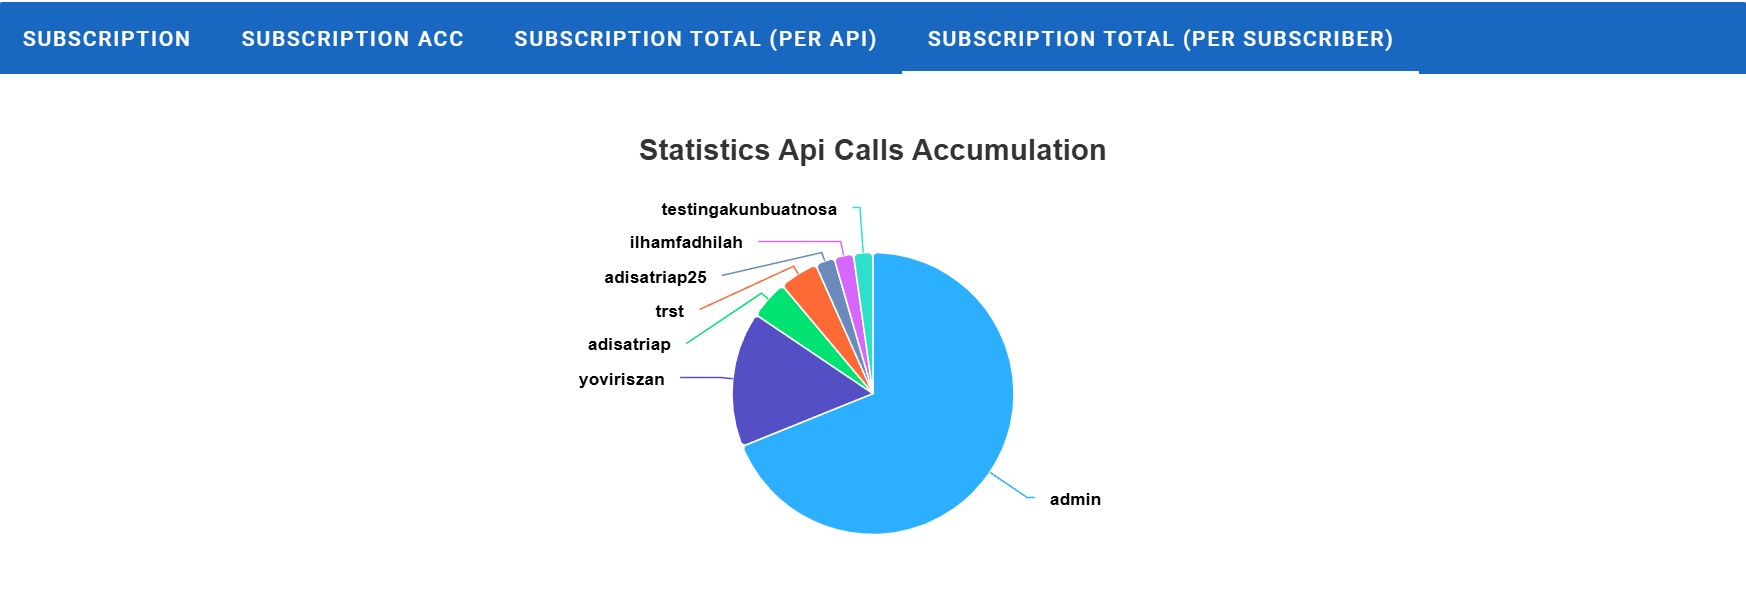
Statistics Subscriptions
Statistics Subscriptions informs how many users developers have subscribed to your APIs.
1. Subscription

2. Subscription Accumulative

3. Subscription Total (per API)
4. Subscription Total (per Subscriber)
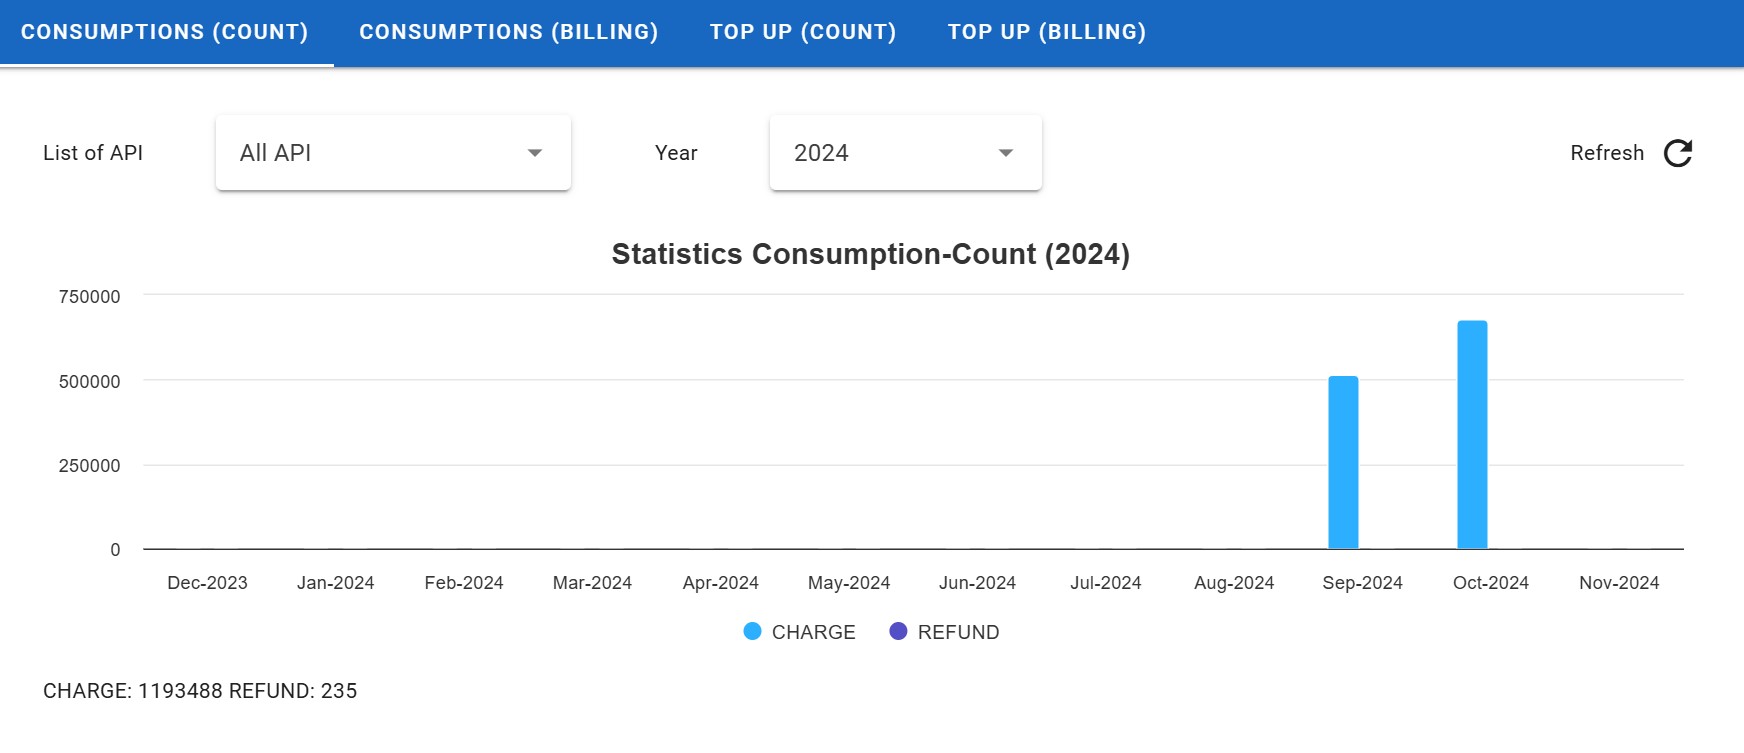
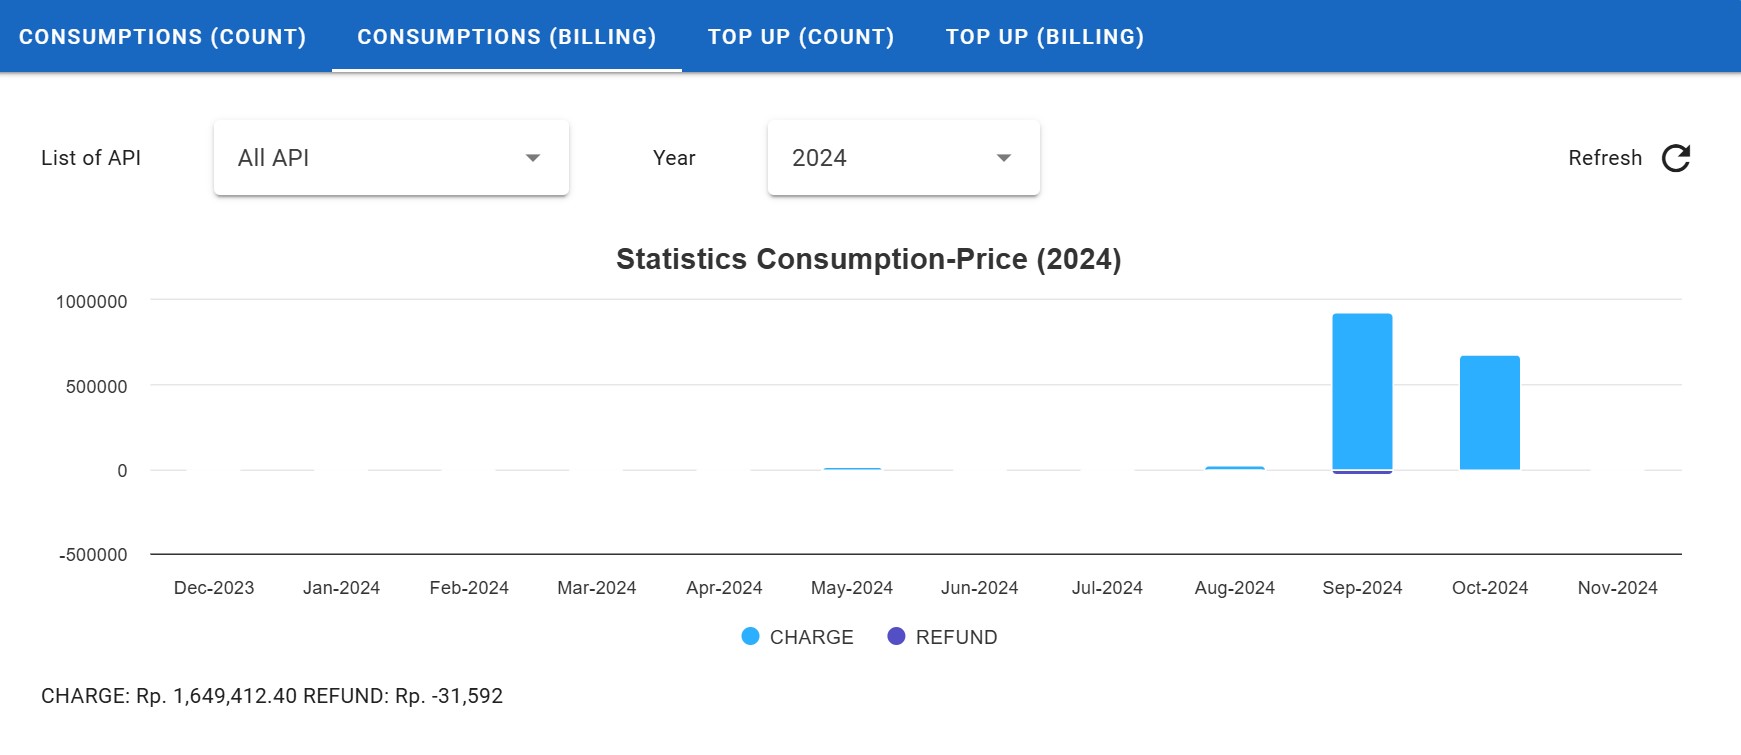
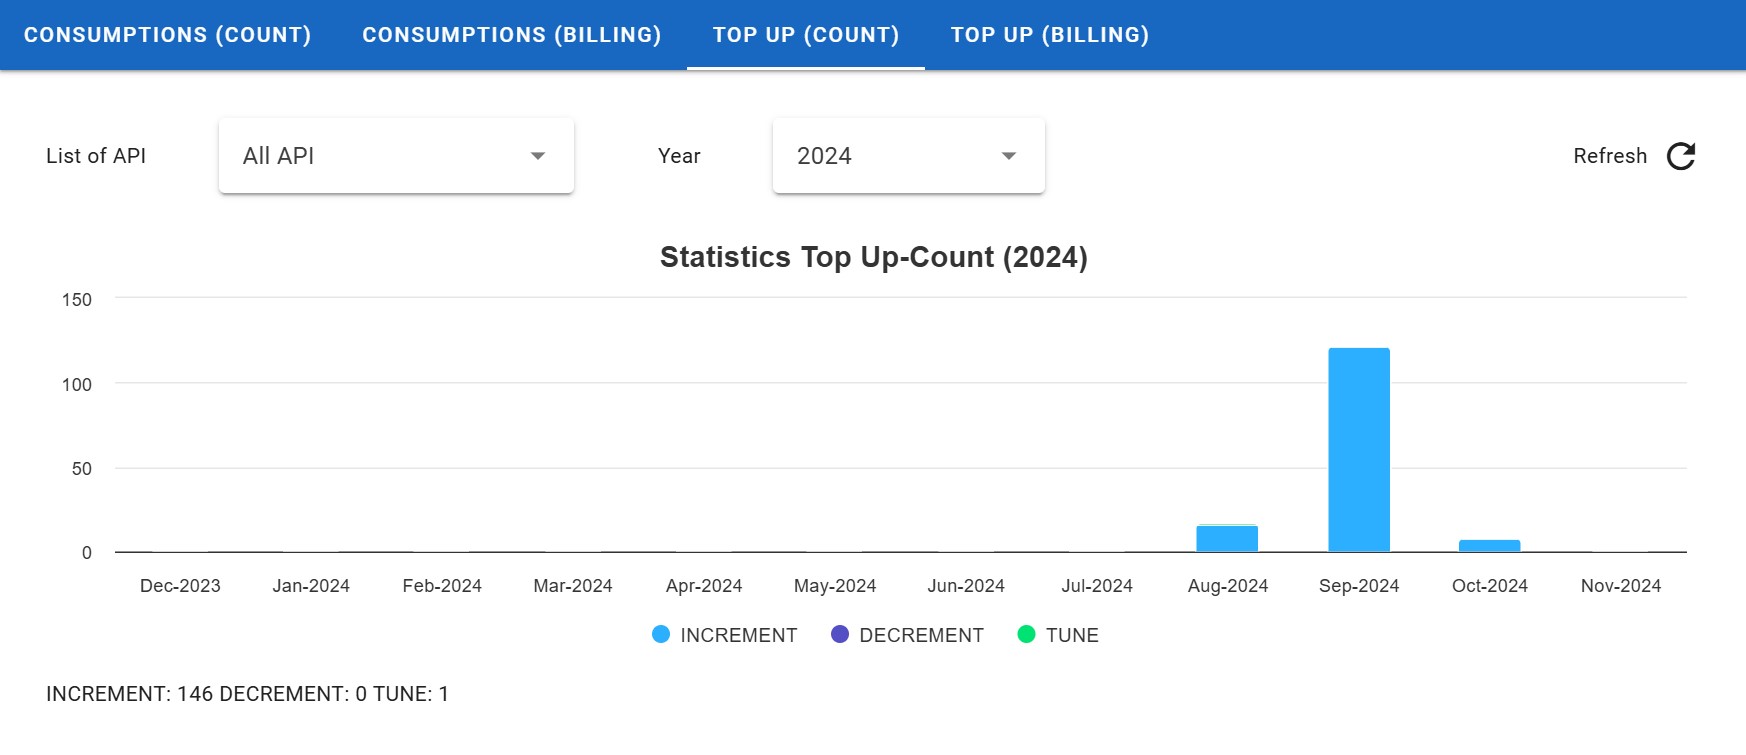
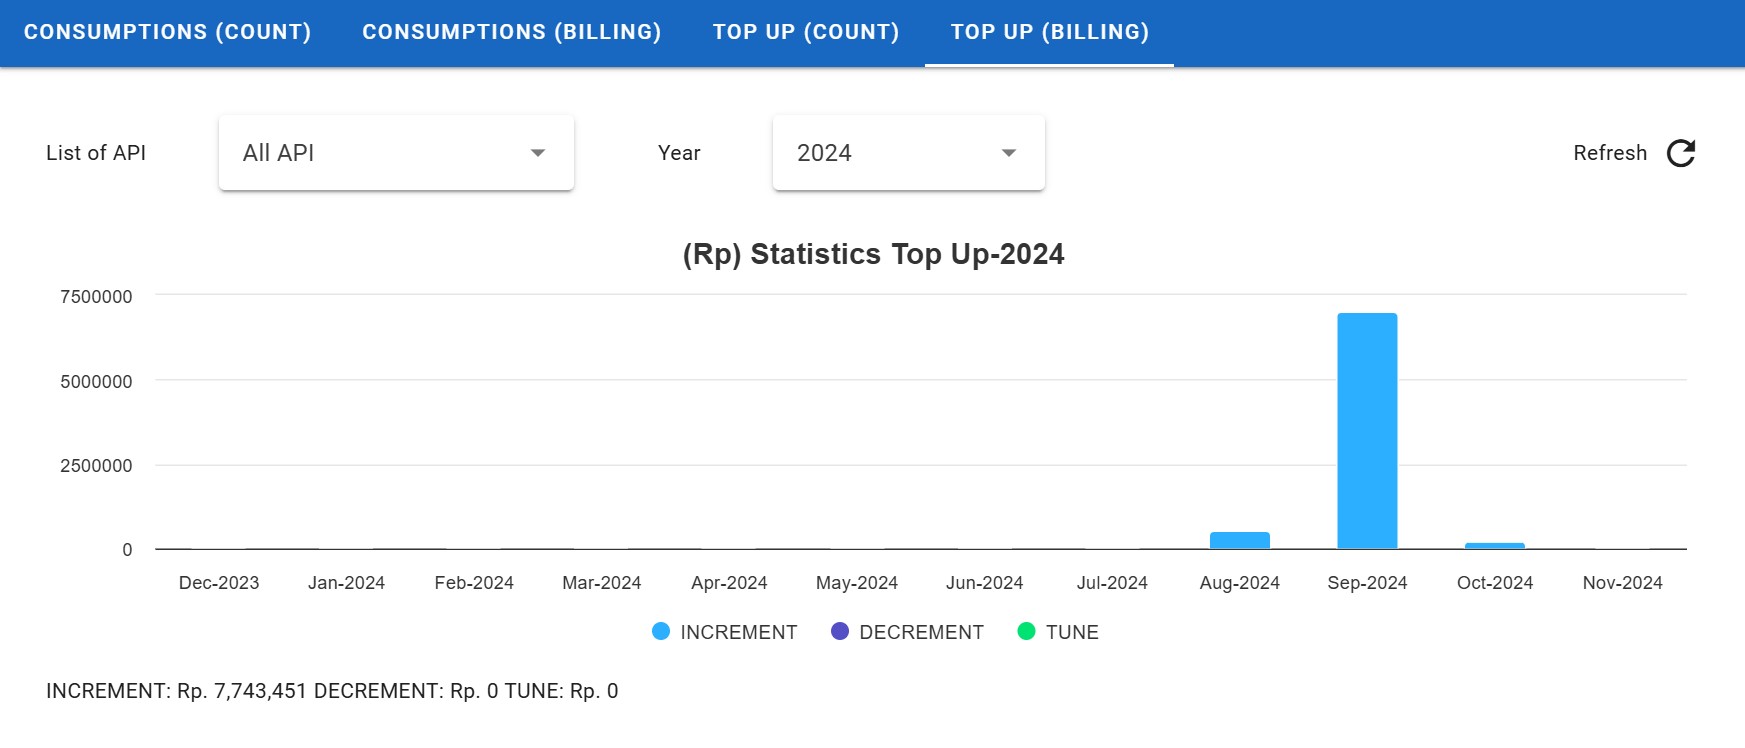
Statistics Consumption Count
Statistics Consumption Count informs how many user developers use your API.
1. Consumption (Count)
2. Consumption (Billing)
3. Top Up (Count)
4. Top Up (Billing)
Statistics API Call
API Count statistics provide important data about your API performance, including the number of responses sent, the number of subscribers or developers who subscribe, and how often your API is used. This information helps you understand API usage patterns, measure their popularity, and identify opportunities for further improvement.
1. Api Calls

2. Api Calls Accumulative

3. Api Calls Total (Per API)

4. Api Calls Total (Per Subscriber)

Export Data
Data export allows you to retrieve API-related to your API data.
1. User on Export Data section.
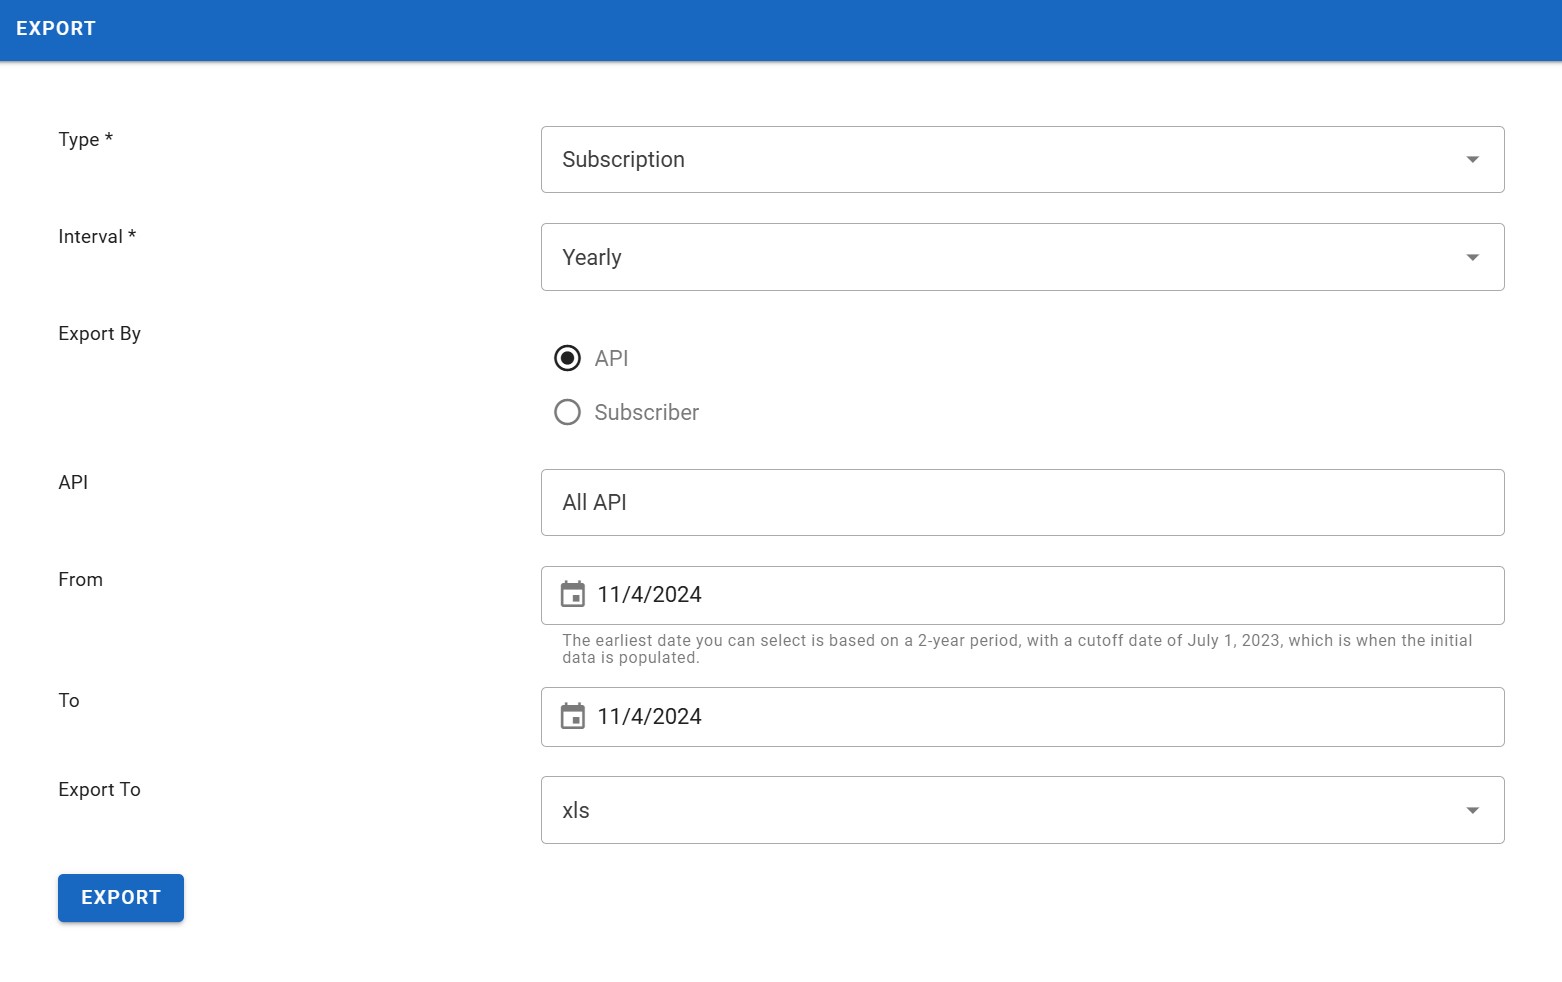
2. Choose Type.
3. Choose Interval.
4. Choose Report By.
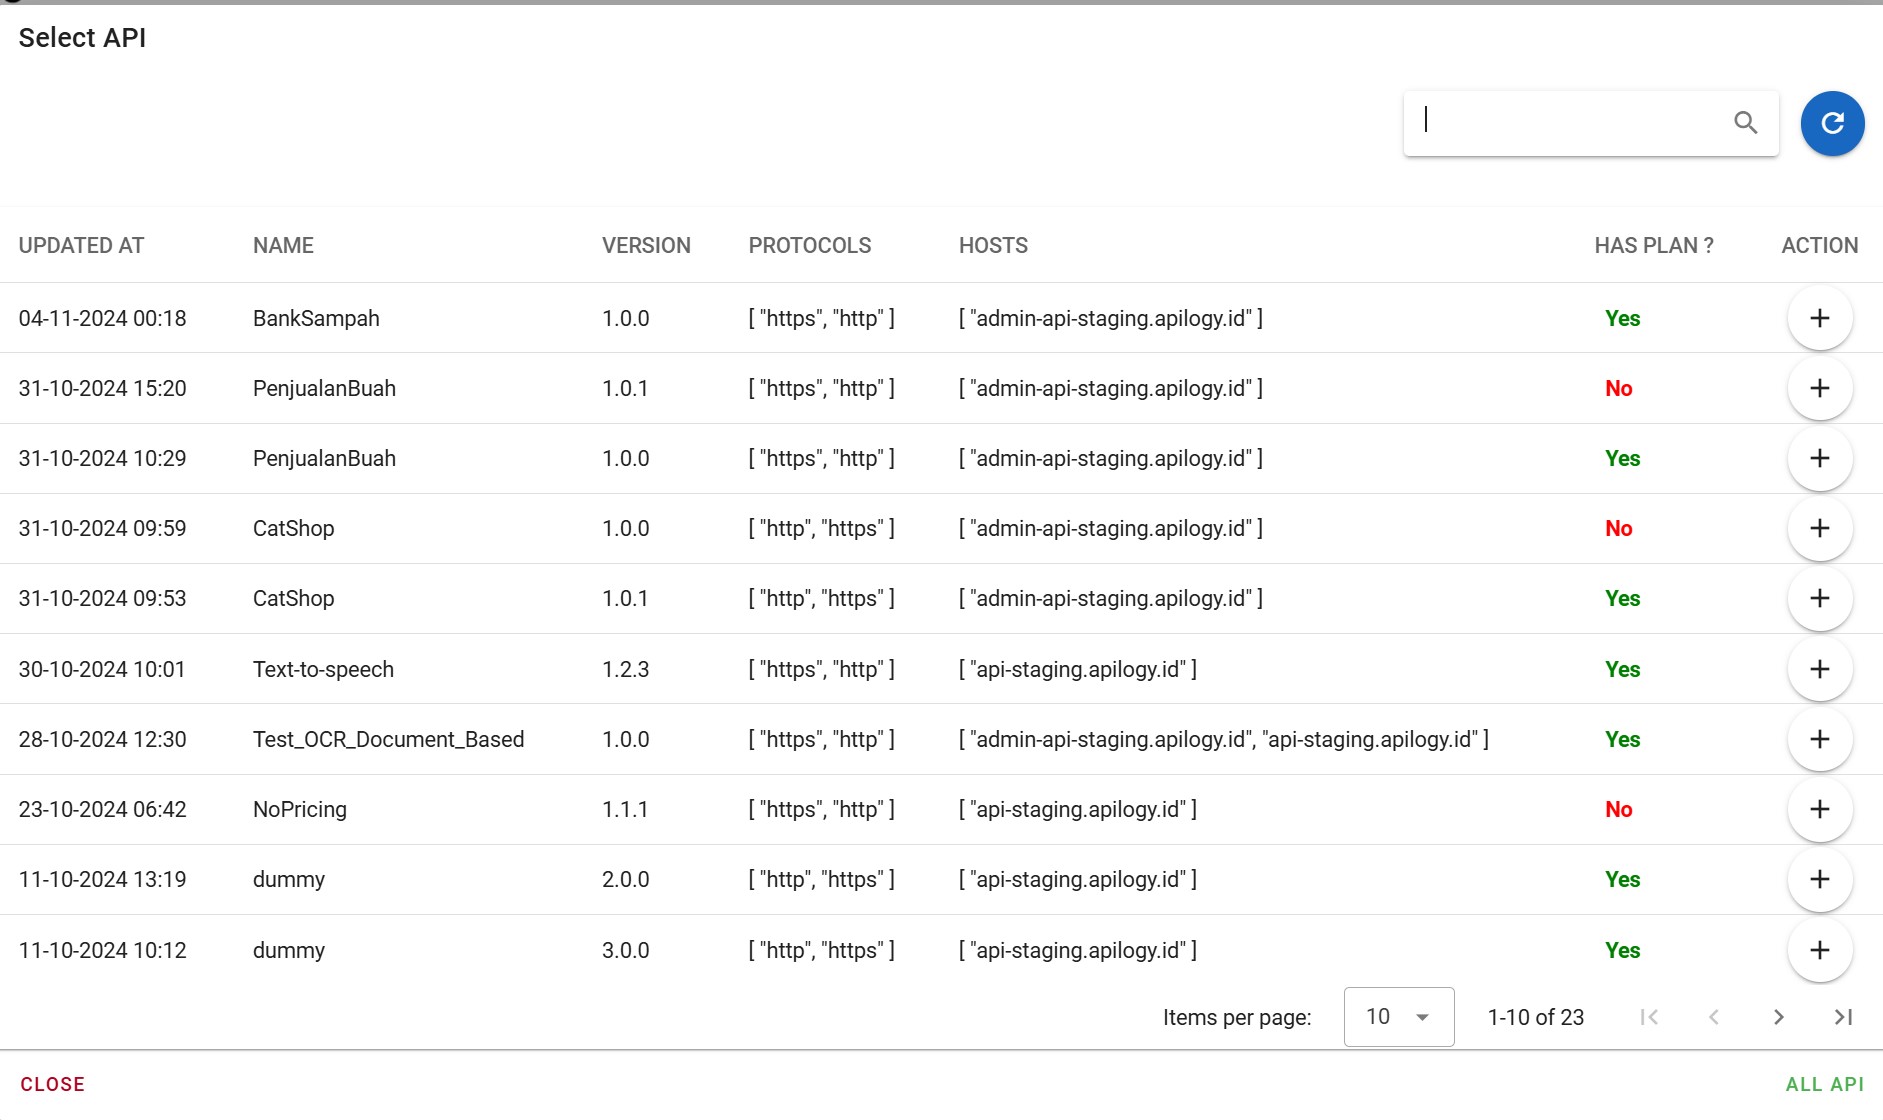
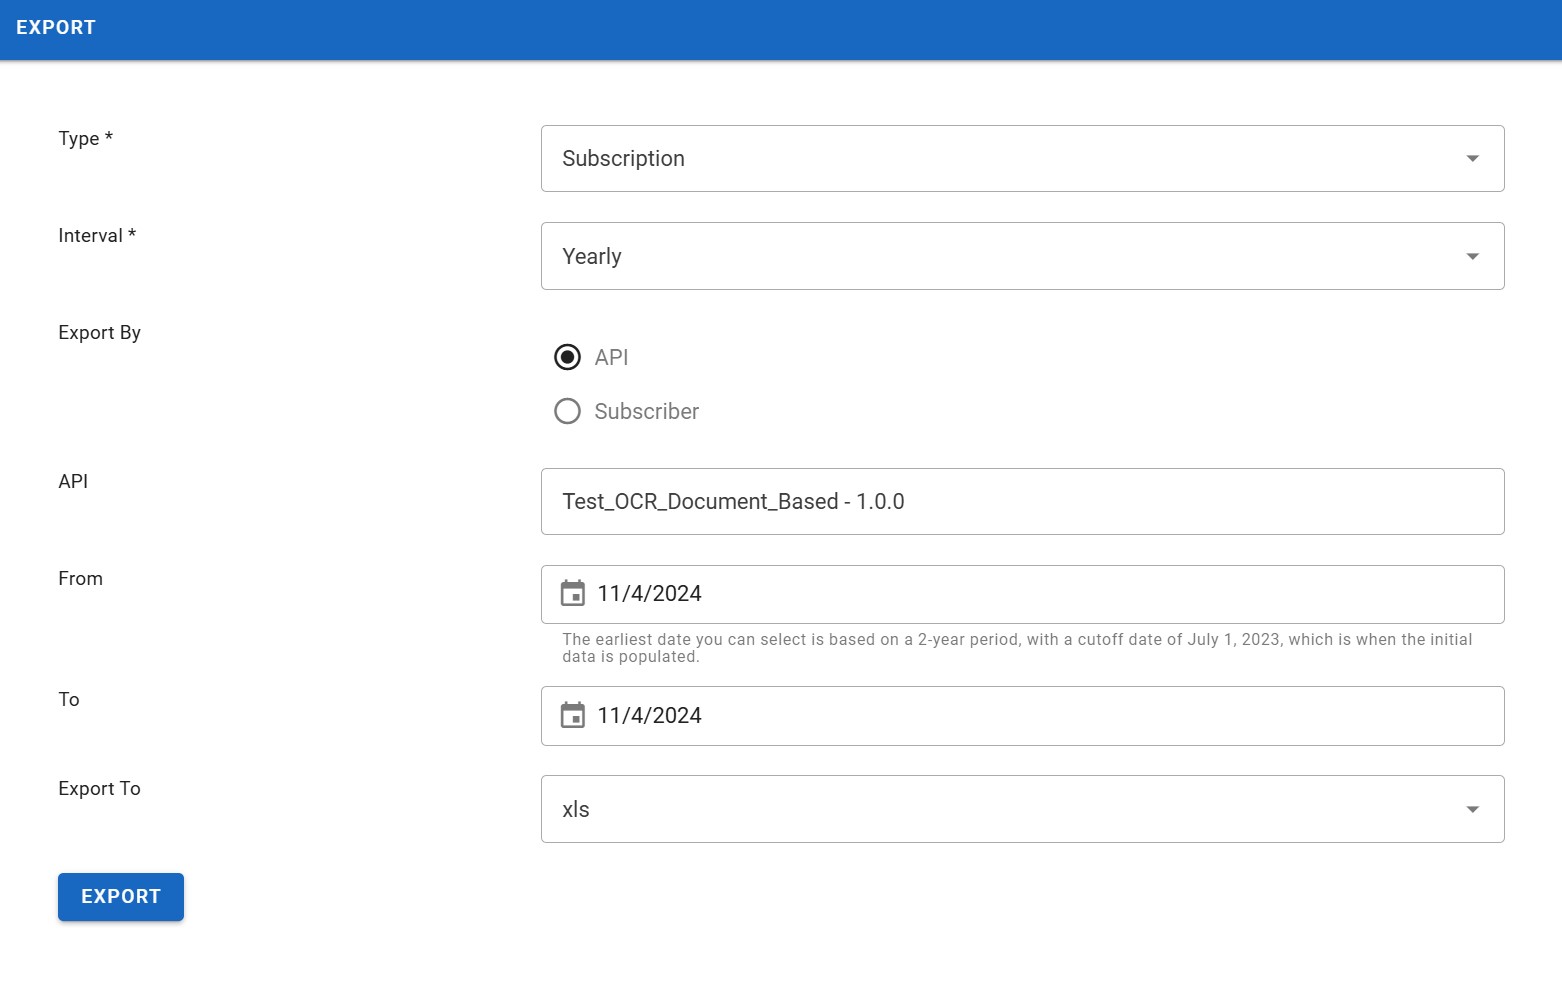
5. Choose API.
6. Set up date From and To.
7. Choose Export To.
8. Click Export button.
9. Once File is downloaded, you can save and use the data according to your needs.

Exploring APIs in Apilogy Developer Portal
Once you’ve made updates or added a new API, these changes will be reflected automatically in the Apilogy Developer Portal. Here’s how you can access and explore your API:
1. Go to the Explore APIs menu on the Developer Portal to browse or search for any APIs that have been created.
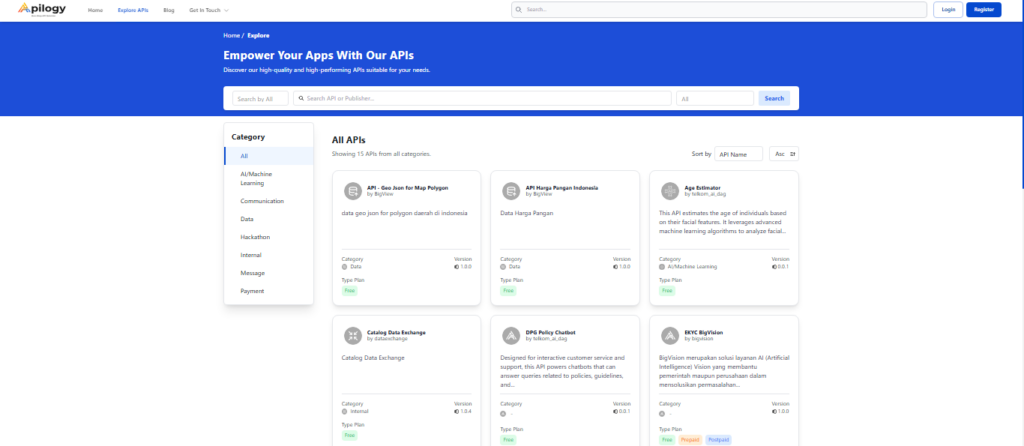
2. Use the search bar to locate your API quickly by entering API name or publisher. This helps streamline the process of finding specific APIs among multiple entries.
3. Once you find your API, several options will be available.
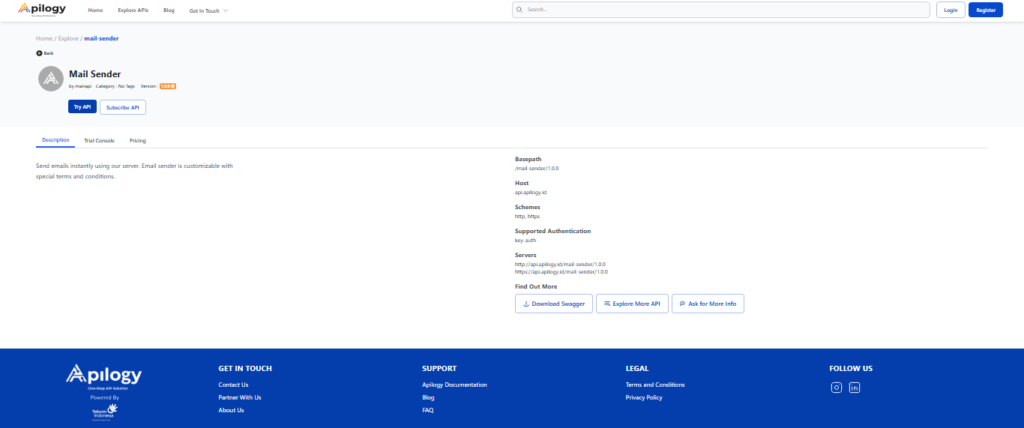
Notes:
- Description: Provides an overview and detailed information about the API.
- Trial Console: Allows testing of the API endpoints to ensure functionality and understand its responses.
- Pricing: Displays available plans and pricing options for potential subscribers.
- Download Swagger: Enables you to download the Swagger documentation for the API, making it easy for developers to integrate and test it directly.
These options allow you to review the API’s setup and ensure that the published details are accurate and ready for user access.


