
Table of Contents
Upstream
In Apilogy, the upstream function of the Publisher API is to distribute requests coming from users to the most appropriate backend server. When a user accesses the API to view a list of products, the request first goes to the Publisher API. The Publisher API then uses upstream to determine which backend server the request should be sent to for processing.
Upstream is responsible for ensuring the distribution of requests to backend servers that are healthy or have the lowest workload, using load balancing techniques. Upstream also performs health checks on backend servers, both actively and passively, to ensure only servers that are in good condition receive requests. Once the backend server receives the request, it will process the requested product data and send the results back to the Publisher API, which then forwards it to the user.

So, In Apilogy upstream ensures that user requests are processed quickly and efficiently, while maintaining the availability and performance of the backend servers.
When the Publisher API in the Apilogy system wants to add a new upstream, there are several steps that must be taken. Here are the steps and an explanation of how to fill in each section:
Upstream Detail – Basic Info
1. Upstream Name (Upstream Name is a unique name used to identify this upstream in the system). example : apilogy.id
2. Hash On, In Kong, the hash_on configuration is used to define how load balancing will be done across upstream services. It specifies which data field will be used to generate the hash that determines which upstream server handles a particular request. Here’s an explanation of the available options:
- None
No hashing will be applied. Load balancing is done in a round-robin fashion or according to any other load-balancing policy without considering a specific field in the request.
- Consumer
Hashing is done based on the authenticated consumer (if authentication is enabled). This ensures that requests from the same authenticated consumer are routed to the same upstream server consistently. Useful for maintaining session stickiness for individual users.
- IP
The client’s IP address is used to generate the hash. This ensures that requests from the same IP address are consistently routed to the same upstream server. It’s useful for cases where session stickiness is desired based on the client’s network.
- Header
You can specify a custom request header for hashing. For example, if you have a header like X-User-Id, the value of that header can be used to route requests consistently to the same upstream server. This is useful if your API has custom identifiers for requests that should maintain stickiness.
- Cookie
Hashing is done based on a specific cookie value. This ensures that requests containing the same cookie are routed to the same upstream server. This is typically used to maintain session stickiness based on client cookies.
Each of these options is used to define how requests are distributed across upstream servers, and they are particularly useful when you want to ensure that certain types of requests consistently go to the same backend server (for session stickiness or other purposes).
3. Hash Fallback, If the selected hashing method cannot find a suitable server, this is the fallback value used. You can set this to none if no fallback is desired. The same goes for the others consumer, ip, header, cookie or cookie path.
4. Slots, refer to the number of units or space allocated in the load balancing algorithm to manage the distribution of requests to various servers. For example, if you set Slots to 100, it means that the load balancer will divide the request into 100 parts. If all 100 slots are occupied, new requests will wait until one of the slots is empty to be processed. This helps prevent the server from overloading and keeps the application performing well.
Healthcheck: Active
Healthcheck is a mechanism used to monitor and ensure that backend servers are functioning properly. Active Healthcheck is more proactive, by performing health checks regularly and independently. Indicates that the system will perform an active (periodic) health check on the backend server by sending an HTTP request. If the server does not respond properly, the system may consider it as unhealthy and will not redirect requests to it.
1. HTTP PATH
If the server is accessed via the URL http://apilogy.com, then the health request will be sent to.
2. Timeout
If the timeout is set to 1 second, and the server does not respond within that time, the system will consider the server unhealthy.
3. Concurrency
If set to 10, the system will check 10 backend servers at the same time.
4. Unhealthy HTTP Statuses
Status codes 100, 102, and 103 exemplified here will be considered as a sign of failure. TCP failures, Timeouts, HTTP failures, Interval are used to be the benchmarks that we fill in if the server is unhealthy, so we can determine the indicators.
5. Healthy HTTP statuses
The 200 and 202 status codes exemplified here will be considered a sign of success. Interval, Successes Interval is used to be the benchmark that we fill in if the server is healthy, so we can determine the indicator.
Healthcheck: Passive
Passive Healthcheck is more reactive, based on the response results generated by user interaction with the server. Passive health checks only monitor responses from existing requests, i.e. requests coming from clients, so they do not require additional configuration such as HTTP Path, Timeout, or Concurrency. Since the check is based on real client traffic, no split testing is performed. This means that wait times and specific URLs for checking do not need to be set. The monitoring process follows the flow of requests received by the server naturally. Simply put, passive health check assesses the service status based on actual response results without the need for additional configuration as required in active health check.
1. Unhealthy HTTP Statuses
Status codes 100, 102, and 103 exemplified here will be considered as signs of failure. TCP failures, Timeouts, HTTP failures, are used to be the benchmarks that we fill in if the server is unhealthy, so we can determine the indicators.
2. Healthy HTTP statuses
The 200 and 202 status codes exemplified here will be considered as a sign of success. Interval, Successes is used to be the benchmark that we fill in if the server is healthy, so we can determine the indicator.
Add Target
Target Name provides identification for each server involved in the upstream, while Weight determines how much each server contributes in handling the request. By setting the target name and weight, it can effectively manage traffic distribution to maximize system performance.
Adding more than one target in the upstream is highly recommended to improve application performance, availability, and scalability. By configuring multiple targets, it can ensure that the load balancer can distribute requests efficiently, keeping the application responsive and available to users.
Domain
The domain on Apilogy Publisher acts as the main host that allows this platform to publish APIs directly from the backend to the public. With this special domain, Apilogy is able to manage API services and present them in a format that is ready to be used by application developers. This process supports efficient integration between backend applications and parties who need access, whether they are external developers, third-party applications, or end users consuming data via APIs. In addition, this domain ensures that every published API can be accessed stably and securely, thus strengthening the connectivity and existence of the API services provided by Apilogy.
In the apilogy domain there are 2 options, namely
1. {user}-api-staging.apilogy.id
This domain is owned only by that user. {user} shows the user name of the account so that each user has their own unique domain. Therefore, it is recommended that users use a unique domain.
2. api-staging.apilogy.id
This domain is owned globally. So anyone can use it. Therefore, global domains are not recommended for users.
Backend
The backend is the server side of an application. It handles most of the logic and data storage. The relationship between the Backend and the API includes:
- The backend uses APIs to integrate with external services and data sources.
- The backend provides APIs that allow the front-end to communicate with them.
So in Apilogy when a publisher publishes an API, a backend is also needed as the main component to support API functions. To add an API in Apilogy, there are several things that need to be filled in, including the following:
Backend Detail
1. The upstream name that will be used to identify the backend server. Example: my-backend
2. Protocol
- HTTP uses a protocol that does not use SSL/TLS, so the transmitted data is not encrypted. Meanwhile,
- HTTPS uses SSL/TLS to encrypt the data transmitted between the web browser and the server. Thus, sensitive information such as passwords or credit card numbers will be difficult to intercept.
3. Host
If the service is hosted on abc.com, fill this section with abc.com. It can also refer to other existing upstreams, such as apilogy.id, or choose from upstream data. You can also use an IP address instead of the domain name.
4. Port
The port that can be used in this configuration must fall within the range of 1 to 65535.
5. Path – opsional
Fill this section with the exact API endpoint path. If the backend has a path, include it when accessing the backend.
6. Retries
The number of retries made in case of failure while trying to forward the request to the backend. This helps in maintaining system reliability. If set to 5, the system will retry 5 times in case of failure before reporting the error to the client.
7. Connect Timeout
The wait time in milliseconds to establish a connection to the upstream server. This determines how long the system will wait before assuming that the connection has failed. If set to 60000, the system will wait up to 60 seconds to establish a connection before reporting an error.
Retries refer to the number of attempts made to forward a request to the backend in case of a failure. Connect Timeout is the maximum wait time, in milliseconds, to establish a connection to the upstream server. If the connection cannot be established within the specified Connect Timeout, the system will treat it as a failure. In this scenario, the system will then proceed to retry the connection based on the number of retries set. If the Connect Timeout is exceeded, the system will retry the connection according to the specified number of retries before ultimately reporting an error.
8. Write Timeout
The wait time in milliseconds between two consecutive write operations to transmit the request to the upstream server. This is important to maintain the smooth flow of data. If set to 60000, the system will allow 60 seconds between two write operations.
9. Add Plugin
Using plugins, you can add various additional features that can improve the performance, security, and manageability of the API. However, adding plugins is optional and can be done based on specific needs.
My APIs
This page displays a complete list of the APIs you have created, making it easy for you to view, manage, and monitor the status of each API listed.
| Name | Decription |
|---|---|
|
Updated AT |
Date when to update the API. |
|
name |
The name of the given API. |
|
Version |
A version made at a API. |
|
Protokol |
protocol used to transmit data on the World Wide Web. |
|
Hosts |
Domain or IP address used to access certain API services. |
|
Status |
Status of the API (Active or Inactive) |
|
Has Plan |
The types of payments that can be accessed include free, postpaid and prepaid. |
Add New Plan
When adding a plan, the publisher can provide more than one plan so that each plan can be given a different payment type.
1. Name : determine the name of the plan that will be created later.
2. Description : an explanation of the plan that will be made.
3. Subscription Limit : provides a limit on the number of users who can subscribe.
4. Type :
- Free : the free type allows users to use the service for free.
- Pre Paid : Pre Paid type, the user must make payment first until the balance is used up when using the service.
- Post Paid : Post Paid type so users can use it first but pay afterward. However, remember, Apilogy does not provide postpaid payment services, so users and publishers must have an agreement at the beginning when doing business.
5. Subscriber span
| Name | Description |
|---|---|
|
Active |
To activate the active plan period. Generally plans have a default that is inactive. So if you don’t give it time, you can always use the plan until the user’s balance runs out. |
|
Grace |
When the active period expires, the publisher can determine whether the user’s plan is still maintained or will be deleted. |
|
Extension |
When you enter the grace period and then renew your subscription again, the time will be increased according to the renewal period minus the idle period (subscription ends). |
|
Reinit on grace |
When the Reinit on Grace subscription period is extended, it will be increased according to the extension period. |
|
Start |
Is the start time when use. |
6. Rate List
After initializing all the existing data, you need to set all the API created in the plan.
Rate Entry :
- External Rate : calculated from when the backend provides a response. Responses are provided via headers from the backend.
- Price : price every time it takes a hit on API.
- Description: description of each path.
7. Access Control
Set Access Control is used to set access control on the API. There are two types of settings, namely whitelist and blacklist. If you use a whitelist, only users who have been registered or included in the user list are permitted to access the API. On the other hand, if you use a blacklist, all users included in the user list will have their access restricted, so that they cannot access the API. This feature ensures that only authorized users can access the API, so that API security and privacy can be well maintained.
8. Plugin
The main function of a plugin is to make a site more functional by providing several supporting features that are needed when accessed. The application of plugins can also be adjusted to suit your needs. At this stage the Plugin will be applied to the Plan.
Dashboard
Apilogy Publisher Portal is a platform designed to make it easier to manage and monitor APIs in one dashboard. As part of the Apilogy API Marketplace, this portal provides a variety of features for API management, including comprehensive usage statistics and other important features. This dashboard provides deep insight into API management, making it easy for users to efficiently combine, manage, and optimize APIs published on the marketplace.
Advantages of Publish in apilogy
1. API Publish : Confused about how the API you created can be published? Dont worry, Publisher-portal can help you publish APIs in an easy and fast way. So dont wait any longer, come and join us.
2. OpenApi Support : Do you have openAPI specification? Publisher-portal supports the OpenAPI, you can input it in many ways, such as via the url, upload file, form, or editor that provided by us
3. Make Profit : Confused about taking profit of the API you created? Dont worry, Publisher-portal can help you create packages and price lists for your API so you can be more profitable fast!
4. Many Features : Confused about taking profit of the API you created? Dont worry, Publisher-portal can help you create packages and price lists for your API so you can be more profitable fast!
Quick To Create API Publisher
1. Create Api With Wizard
This wizard is designed to guide you through the steps of creating an API from scratch until your API is ready to be displayed in the Developer Portal. There are six main steps in this process, namely:
- Create Backend.
- Adding Plugins to Your Backend,
- Input Api Data,
- Input OpenApi Information,
- Set Access Control for Your Api.
- Add Plugin to Your Api
With this step-by-step guide, you can easily configure and publish APIs on the Apilogy platform.
1. Create Backend
Creating a backend is very important for registering our machine with the publisher portal. because with an integrated backend, it will be easier for users to manage and monitor through the portal. This backend functions as a link between the machine and the portal, ensuring the data synchronization process runs smoothly and making it easier for users to manage various operational tasks.
| Name | Description |
|---|---|
|
Name |
The application name of the service used to be identified |
|
Protocol |
protocol or set of communication rules for client-server communication.
|
|
Host |
Hosts (Domains) for services (eg: abc.com), you can also add hosts from your upstream that have been entered into this portal. |
|
Port |
A port on a domain refers to the part of a network address that is used to identify a specific application or service running on a server. Generally (433 or 80) and The port that can be used in this configuration must fall within the range of 1 to 65535. |
|
Path |
The path to use in requests to the upstream server (e.g. /abc). |
|
Retries |
The number of retries to perform if the proxy fails. The default is 5. |
|
Connection timeout |
The timeout in milliseconds for establishing a connection to the upstream server. The default is 60,000. |
|
Write Timeout |
The time limit in milliseconds between two consecutive write operations to send a request to the upstream server. The default is 60,000. |
|
Read Timeout |
The time limit in milliseconds between two consecutive read operations to send a request to the upstream server. The default is 60,000. |
2. Add Plugin to Your Backend
The main function of a plugin is to make a site more functional by providing several supporting features that are needed when accessed. The application of plugins can also be adjusted to suit your needs. At this stage the Plugin will be applied to the backend.
3. Input Api Data
This Api Data input serves as the first step in the API registration process into the Apilogy domain. By using this input, the registered API will be connected to the Apilogy backend system via Apilogy Publisher. This process allows the API to be published and managed centrally on the Apilogy platform. In addition, through integration with Apilogy Publisher, APIs can be monitored, version managed, and distributed to users in a more efficient and structured manner. This step is important to ensure that the uploaded API meets established standards and is ready to be used by other developers or parties who need access.
| Name | Description |
|---|---|
|
Backend |
Backend name to be used by the API. |
|
Protocols |
The apilogy communication protocol used to publish. |
|
Host |
The domain that apilogy uses to publish api. |
|
Name |
Used to provide the name of the api which will later be in the base path of the URL. |
|
Version |
What version of api will be released. |
|
Display Name |
Displays the display name that subscribers can later see. |
|
Tags |
The category chosen is in accordance with the output to be provided. |
|
Api Status |
|
4. Input OpenAPI
The Open API input here is used to upload an API, such as Swagger, and allows the user to select options on the OpenAPI menu. With this feature, users can enter API specifications in a complete and structured manner, ensuring that the API complies with OpenAPI standards. This upload process is important for documenting and validating the API, so that the registered API can be accessed and used correctly by other developers. Additionally, the OpenAPI menu provides flexibility for users to manage and customize their API as needed. For more details, you can see the standard documentation at OpenAPI.
5. Set Access Control Your Api
Set Access Control is used to set access control on the API. There are two types of settings, namely whitelist and blacklist. If you use a whitelist, only users who have been registered or included in the user list are permitted to access the API. On the other hand, if you use a blacklist, all users included in the user list will have their access restricted, so that they cannot access the API. This feature ensures that only authorized users can access the API, so that API security and privacy can be well maintained.
6. Add Plugin to Your Api
The main function of a plugin is to make a site more functional by providing several supporting features that are needed when accessed. The application of plugins can also be adjusted to suit your needs. At this stage the Plugin will be applied to the API.
2. Create Api With Template
Creating an API with a template makes it easier for you to create an API in simpler and more efficient steps. There are two template options that you can use, namely minimum and basic, which are designed to meet your API development needs. With this template, you can start creating APIs quickly and structured according to the desired level of complexity.
1. Minimum
Provides a very minimum template so that users only need to enter the backend domain and the OpenApi that has been created.
2. Basic
Provides a basic template like a creation wizard, only there is no need to create a manual. In this template, users need to enter the backend domain, Api Name, Api Version and OpenApi.
Plugin Exploration
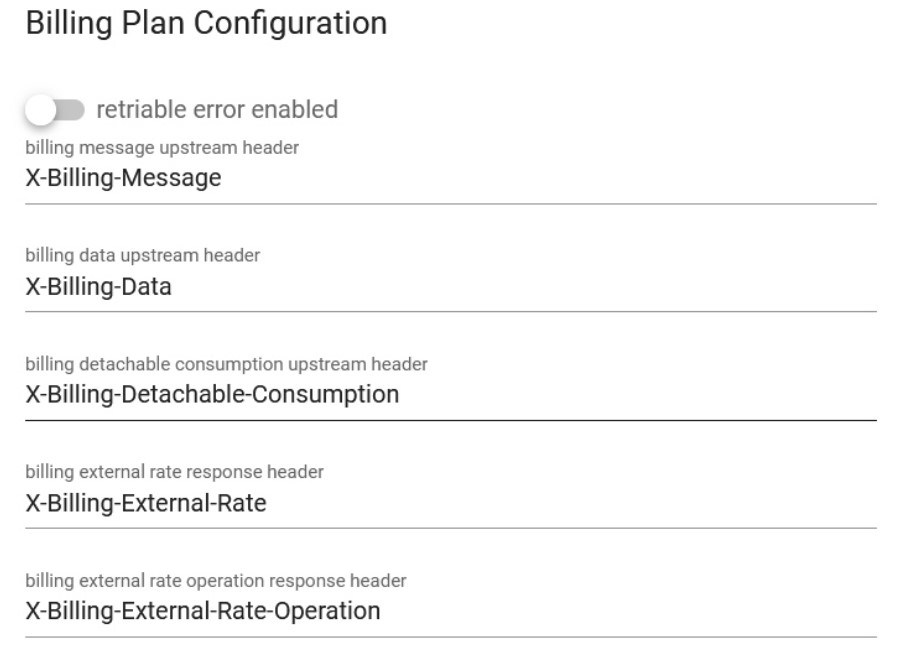
1. Billing Plan
This plugin is used to monetize the API so that you as a publisher can provide the price of the API that has been consumed. Use this Plugin if you want to monetize your API and market it through the APILOGY developer portal.
USAGE
To use this plugin, you just need to add this plugin to your API. You can also add headers to your API.
2. AUTH
- KEY AUTH
The Key Authentication plugin is a popular plugin that enables API key-based authentication for API. It allows you to control access to your APIs by requiring clients to provide a valid API key in their requests. By using the Key Authentication plugin, you can enforce access control and security for your APIs by requiring clients to authenticate with valid API keys. It’s a flexible and widely used authentication mechanism in Apilogy for managing API access.
USAGE
The “key-auth” plugin in APILOGY is used to authenticate API requests using an API key. It allows you to secure your APIs by requiring clients to include an API key in their requests. The plugin provides several parameters to configure its behavior. Here are the main parameters used with the “key-auth” plugin in APILOGY:

key_names: This parameter specifies the name of the header or query parameter where the API key should be included. By default, it is set to “apikey”.run_on_preflight: When set to true, the Kong CORS plugin will execute the plugin’s logic for preflight requests. When set to false, the Kong CORS plugin will skip executing the plugin’s logic for preflight requests.anonymous: This parameter allows you to specify a consumer (user) that should be treated as anonymous if no valid API key is provided. You can set this to a consumer ID, or use the value “true” to create an anonymous consumer on the fly.key_in_body: When set to true, this parameter enables sending the API key in the request body instead of headers or query parameters. Note that this may require modifying the client code to include the API key in the request body.
- JWT
In APILOGY, JWT (JSON Web Token) can be handled using the “jwt” plugin. The JWT plugin allows you to verify, authenticate, and authorize requests based on JSON Web Tokens. JSON Web Tokens are a popular format for representing claims between two parties, commonly used for authentication and authorization purposes. By utilizing the “jwt” plugin in APILOGY, you can incorporate JWT-based authentication and authorization into your API gateway infrastructure, allowing you to secure and control access to your APIs using JSON Web Tokens.
USAGE
In the APILOGY “jwt” plugin, there are several parameters that can be configured to customize the behavior of the plugin. Here are the used parameters:
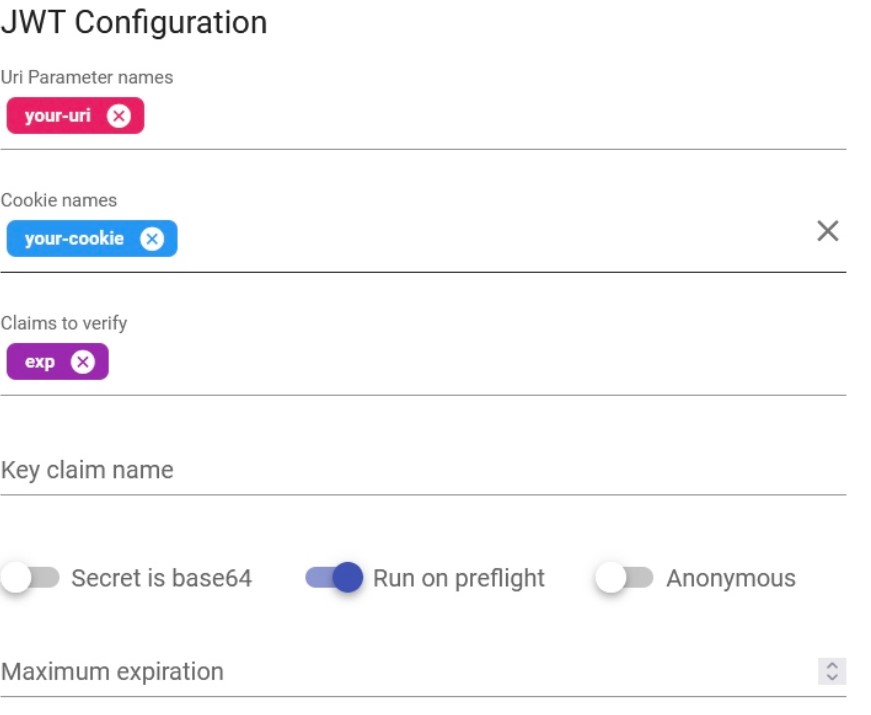
uri_param_names: An optional array of parameter names to look for JWTs in the query parameters of the request. If the JWT is passed as a query parameter, you can specify the parameter name(s) here.cookie_names: A list of cookie names to extract JWTs from. APILOGY will look for JWTs in the specified cookies.claim_to_verify: A list of claims that APILOGY should verify in the JWT. For example, you can specify that the plugin should verify the “iss” (issuer) and “exp” (expiration time) claims.secret in base64: used to specify the secret key for verifying the signature of JSON Web Tokens (JWTs) in Base64-encoded format.run_on_preflight: the parameter run_on_preflight controls whether the plugin should execute on preflight requests. Preflight requests are a part of the CORS (Cross-Origin Resource Sharing) mechanism in web browsers. The run_on_preflight parameter in the JWT plugin determines whether the plugin’s logic should be executed on these preflight requests. It accepts a boolean value and controls whether the JWT plugin will process the preflight request to validate the JWT or not.anonymous: By configuring the anonymous parameter, you can associate a specific consumer with requests that do not provide a valid JWT or fail JWT validation. This can be useful in scenarios where you want to allow certain unauthenticated or anonymous access to your APIs.maximum_expiration: the maximum_expiration parameter is used to set the maximum allowed expiration time (in seconds) for JSON Web Tokens (JWTs).
- BASIC AUTH
The Basic-Auth plugin is a popular plugin in APILOGY that provides simple username/password authentication for API endpoints. It allows you to secure your API by requiring clients to include valid credentials in the form of a username and password in the Authorization header of their requests.
USAGE
To use the plugin, you only need to set the Anonymous field.
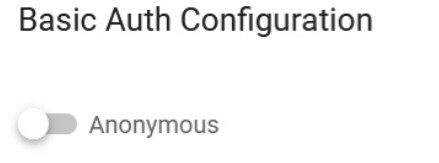
In the above example, anonymous allowing unauthenticated requests. You can customize this behavior according to your needs.
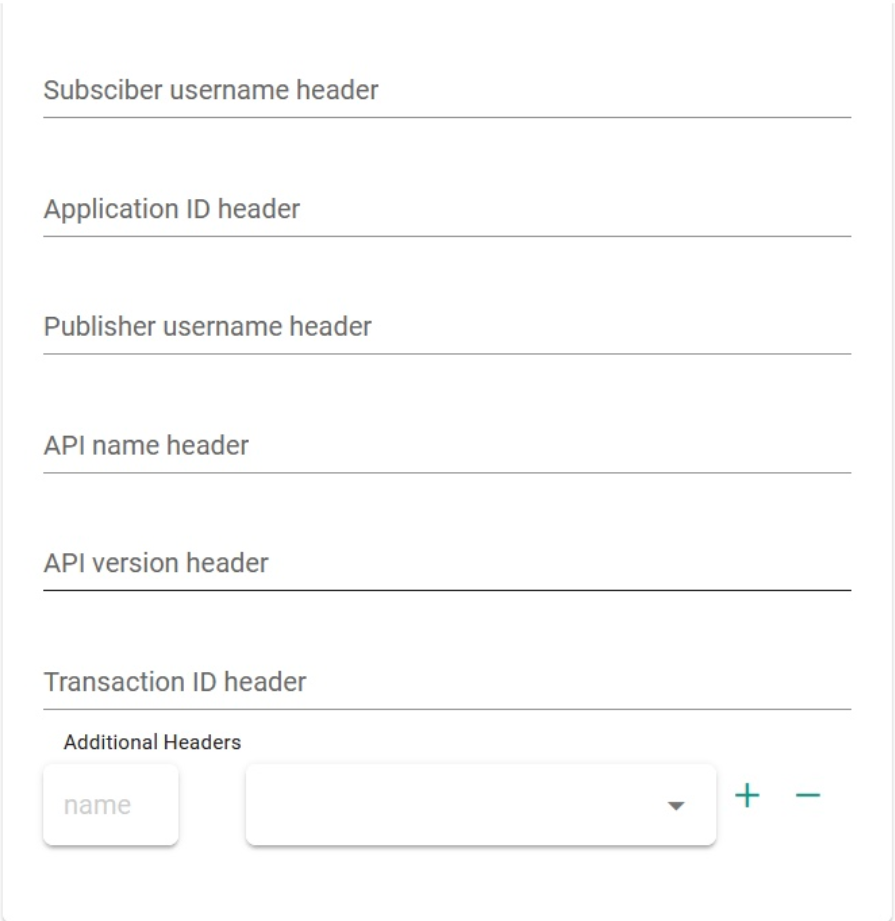
3. APILOGY UPSTREAM HTTP BASIC AUTHENTIFICATION
Upstream HTTP Basic Authentication in APILOGY refers to a feature provided by the APILOGY API gateway that allows you to secure requests sent from APILOGY to upstream (backend) services using HTTP Basic Authentication. HTTP Basic Authentication is a simple authentication scheme where the client includes a username and password in the “Authorization” header of the request. The credentials are encoded in Base64 format, although it is important to note that Basic Authentication does not provide strong security as the credentials are sent in plain text. In the context of APILOGY, when you configure Upstream HTTP Basic Authentication, it means that APILOGY will add the necessary “Authorization” header with the encoded credentials to the requests it proxies to the upstream services. This enables you to protect your backend services by requiring valid credentials to access them. To enable Upstream HTTP Basic Authentication in APILOGY, you need to configure the authentication credentials (username and password) for the upstream service. APILOGY will then automatically add the appropriate “Authorization” header to the requests it forwards to the upstream service, providing the necessary authentication. It’s worth mentioning that while Upstream HTTP Basic Authentication can add a layer of protection for your upstream services, it is essential to ensure secure transmission of credentials over HTTPS and consider stronger authentication mechanisms when dealing with sensitive information or higher security requirements.
USAGE

4. APILOGY HEADER
Apilogy headers are additional pieces of information sent along with an HTTP request or response. They provide metadata about the message, enabling the client and server to exchange information beyond the main content of the request or response.
USAGE To use the plugin in APILOGY you can set the parameters in the upstream and downstream settings.
5. JSON LOGIC
JSON Logic is a lightweight, expressive language used for evaluating and manipulating JSON data structures. It provides a way to describe and reason about data transformations and conditions in a concise and declarative manner. JSON Logic is often used in scenarios where you need to define complex rules or calculations that operate on JSON objects. JSON Logic provides a versatile and flexible way to work with JSON data, making it useful in scenarios such as data validation, decision-making, filtering, and data transformation. It allows you to express complex rules and transformations concisely, enhancing the maintainability and readability of your code or configurations.
USAGE

-
request: This parameter represents the incoming HTTP request and provides access to various properties of the request, such as headers, URL, HTTP method, query parameters, and more. You can use the request parameter to extract information from the request and use it in your JSON Logic expressions. response_header: This parameter represents the headers of the outgoing HTTP response. It allows you to access and modify the response headers using JSON Logic expressions. You can set or modify specific response headers based on certain conditions or transformations.response_body: This parameter represents the body of the outgoing HTTP response. It provides a way to access and modify the response body using JSON Logic expressions. You can perform transformations, extract data, or apply conditions to modify the response body before it is sent back to the client.
6. OAUTH2
OAuth2 is an authorization framework that enables third-party applications to obtain limited access to an HTTP service on behalf of a resource owner, without exposing the owner’s credentials. It is commonly used to provide secure access to APIs and protect sensitive resources. The OAuth2 plugin in APILOGY allows you to secure your APIs using the OAuth2 protocol. It can act as an OAuth2 provider, enabling you to issue access tokens to clients and enforce authorization rules. Alternatively, it can act as an OAuth2 consumer, allowing you to protect your APIs by validating access tokens issued by an external OAuth2 provider. By configuring the OAuth2 plugin in APILOGY, you can define scopes, grant types, and other OAuth2-related parameters. It handles the authentication and authorization flow, validates access tokens, and enforces security policies on incoming requests to your API. This way, you can ensure that only authorized clients with valid access tokens can access your protected resources.
USAGE
Authorization Code: It is an OAuth2 grant type where the client obtains an authorization code from the authorization server by redirecting the user to a login page. The authorization code is then exchanged for an access token and optionally a refresh token, allowing the client to access protected resources on behalf of the user.Password Grant: The password grant type allows the client to directly exchange the user’s credentials (username and password) with the authorization server for an access token. This grant type is typically used for trusted applications or in cases where the client is the resource owner.Implicit Grant: The implicit grant type is a simplified flow where the access token is directly returned to the client as part of the authorization response, without the need for an intermediate authorization code. This grant type is suitable for clients implemented in a web browser using JavaScript.enable_client_credentials: Enables or disables the client credentials grant type, allowing clients to obtain access tokens using only their client credentials (client ID and client secret).scopes: Defines the scopes that can be requested by clients when obtaining access tokens. Scopes represent specific permissions or privileges associated with the access token.Provision Key: The provision key is a feature provided by the OAuth2 plugin in APILOGY. It allows you to provision and manage OAuth2 clients programmatically through the APILOGY Admin API. It is used to securely create and manage client credentials (client ID and client secret) without exposing them in configuration files.token_expiration: Sets the expiration time for the access token in seconds. After this time period, the access token becomes invalid and clients need to request a new one.mandatory_scope: Specifies whether a scope is required or optional when requesting access tokens. If set to true, the “scope” parameter becomes mandatory in the OAuth2 token request.global_credentials: Specifies whether the client credentials should be shared among all APIs in APILOGY. If set to true, the same client credentials can be used to obtain access tokens for different APIs registered in APILOGY.Anonymous: The anonymous parameter is an option in the OAuth2 plugin configuration that allows unauthenticated requests to access protected resources. When enabled, it bypasses OAuth2 authentication for specific routes or APIs, allowing anonymous access without requiring an access token.Authorization Header Name: The authorization_header_name parameter specifies the name of the header used to pass the access token in requests. By default, the header name is “Authorization,” but you can customize it if necessary.Refresh Token: A refresh token is a long-lived token that can be used to obtain a new access token without requiring the user to re-enter their credentials. It is commonly used in OAuth2 to extend the validity of access tokens. The refresh token grant type allows the client to exchange a refresh token for a new access token when the current one expires.
7. RATE LIMITING
Rate limiting in APILOGY refers to the ability to control and restrict the number of API requests or transactions that can be made within a given time period. It is a crucial feature in API management and helps to ensure the availability, stability, and security of APIs. APILOGY provides rate limiting capabilities through its Rate Limiting plugin. This plugin allows you to define rate limiting rules and policies that regulate the traffic to your APIs. By configuring the plugin, you can set limits on the number of requests that can be made per minute, per hour, or any other time period you specify.
USAGE
In APILOGY, the parameter rate_limiting refers to the configuration options available for the Rate Limiting plugin. This plugin allows you to implement rate limiting policies to control the number of API requests that can be made within a specified time period. When configuring the Rate Limiting plugin in APILOGY, you can set several parameters to define the rate limiting behavior. Here are the used parameters:

second: The maximum number of requests allowed per second.minute: The maximum number of requests allowed per minute.hour: The maximum number of requests allowed per hour.day: The maximum number of requests allowed per day.month: The maximum number of requests allowed per month.year: The maximum number of requests allowed per year.policy: The algorithm used for rate limiting. Kong supports different policies, such as cluster, local, redis, or redis-cluster, which determine how rate limits are enforced.limit_by: This parameter determines how the rate limit is applied. It can have the following values:consumer: Rate limits are applied based on the consumer making the API requests.credential: Rate limits are applied based on the credentials associated with the consumer.ip: Rate limits are applied based on the client’s IP address.header: Rate limits are applied based on a custom header value in the request.
fault_tolerant: This parameter determines the behavior of the Rate Limiting plugin in case of errors while communicating with Redis. If set to true, Kong will allow requests to proceed even if there are issues with the Redis connection. If set to false, Kong will respond with an error if it encounters Redis connection problems.hide_client_headers: When set to true, this parameter instructs Kong to remove client-specific headers (such as X-Consumer-ID and X-Consumer-Username) from the request before forwarding it to the upstream service. This can help improve security by preventing the exposure of internal Kong headers to the upstream service.redis_host,redis_port,redis_password,redis_timeout,redis_database: These parameters configure the connection details for the Redis server used for storing rate limit counters. You can specify the host address, port number, password (if applicable), connection timeout duration, and the Redis database number to be used
8. Cors
CORS (Cross-Origin Resource Sharing) is a mechanism used by web browsers to enforce security policies regarding cross-origin requests. It allows a web application running in one domain to access resources from another domain. APILOGY provides built-in support for handling CORS requests.
USAGE
config.origin: Specifies the allowed origins for cross-origin requests. You can set it to a specific domain or use “*” to allow requests from any origin. For example, if you set it to “example.com”, only requests from that domain will be allowed.config.methods: Defines the allowed HTTP methods (verbs) for cross-origin requests. It should be an array of HTTP methods. For example, [“GET”, “POST”, “PUT”] specifies that GET, POST, and PUT methods are allowed.config.headers: Specifies the allowed request headers for cross-origin requests. It should be an array of header names. For example, [“Content-Type”, “Authorization”] allows the “Content-Type” and “Authorization” headers to be included in the requests.config.exposed_headers: Defines the headers that can be exposed to the browser in the response. It should be an array of header names. Exposed headers are additional headers that the server allows the client to access. For example, [“X-Custom-Header”] allows the “X-Custom-Header” to be exposed in the response.config.credentials: Specifies whether the browser should include credentials (e.g., cookies, HTTP authentication) in cross-origin requests. It can be set to true or false. If set to true, the server must respond with the appropriate CORS headers to allow credentials. If set to false, credentials will not be sent. Note that when using true, the origin cannot be set to “*” and must be a specific domain.config.max_age: Sets the maximum time (in seconds) that the browser should cache the preflight response. The preflight request is an additional request sent by the browser to check if the server allows the actual request. The max_age value indicates how long the browser can cache the preflight response. After this time, the browser will send a new preflight request. For example, 3600 sets the cache time to 1 hour.
9. IP RESTRICTIONS
IP restrictions in APILOGY allow you to control access to your APIs based on the IP addresses of the clients making the requests. With IP restrictions, you can whitelist or blacklist specific IP addresses or ranges to either allow or deny access to your APIs through APILOGY. This feature helps in enforcing security measures and protecting your APIs from unauthorized or malicious access.
USAGE
Once IP restrictions are set up, APILOGY will enforce the configured whitelist and blacklist rules for incoming requests to your API. Requests from whitelisted IP addresses will be allowed, while requests from blacklisted IP addresses will be denied.

allow: An array of IP addresses or CIDR ranges that are allowed to access the API. Requests originating from IP addresses or ranges specified in the whitelist will be permitted.deny: An array of IP addresses or CIDR ranges that are denied access to the API. Requests originating from IP addresses or ranges specified in the blacklist will be rejected.
10. OAUTH2 AUDIENCE
I. Kong Plugin OAuth2 Audience
Validate access tokens from a third-party OAuth 2.0 Authorization Server (including OpenID Connect) by leveraging JWT verification [RFC7519] and/or OAuth2 Introspection [RFC7662] and associate the external OAuth2 client with an existing Kong consumer based on the audience parameter [](). Each consumer can have multiple audiences. At the same time, each registered audience can only be associated with a specific issuer (`iss` claim) and client id (`client_id` claim). This allow for complete control over the list of extenal OAuth2 Client that can be associated with the consumer.
II. Configuration Reference
This plugin is compatible with requests with the following protocols:
- http
- https
This plugin is partially compatible with DB-less mode. In DB-less mode, Kong does not have an Admin API. If using this mode, configure the plugin using declarative configuration. Consumers and Credentials can be created with declarative configuration. Admin API endpoints which do POST, PUT, PATCH or DELETE on Credentials are not available on DB-less mode.
III. Parameters
Here’s a list of all the parameters which can be used in this plugin’s configuration:
| Form Parameter | Description |
|---|---|
|
name
Type: string |
The name of the plugin to use, in this case oauth2-audience. |
|
service.id Type: string |
The ID of the Service the plugin targets. |
|
route.id Type: string |
The ID of the Route the plugin targets. |
|
enabled Type: boolean Default value:true |
Whether this plugin will be applied. |
|
config.issuer required |
OAuth2 issuer identifier that needs to be present in is claim on the OAuth2 token. |
|
config.oidc_conf_discovery optional Default value:true |
A boolean value that indicates whether the plugin should send OpenID Connect Discovery request to obtain information regarding JWT Verfication or OAuth2 Token Instropection. If set to false then appropriate jwt_* or introspection_* settings are required. |
|
config.required_scope optional |
Describes an array of scope names that must be available on the OAuth2 token. |
|
config.required_audiences optional |
Describes an array of audience value that must be available in the OAuth2 token auth claim. |
|
config.audience_prefix optional |
Prefix string that must be added in the aud claim to be recognized as kong credential. For example if the audience associated with a consumer is nCztu5Jrz18YAWmkwOGJkQe9T8lB99l4 and the prefix is kong:, then aud claim should contains kong:nCztu5Jrz18YAWmkwOGJkQe9T8lB99l4 |
|
config.jwt_signature_secret semi-optional |
Secret key used in Symmetric JWT verification. |
|
config.jwt_signature_public_key semi-optional |
Public key used in Asymmetric JWT verification. If left empty and oidc_conf_discovery is not false, then this plugin will try to extract it from endpoint specified in jwks_uri metadata in OpenID Connect Discovery response. |
|
config.jwt_signature_algorithm optional Default value: [“HS256”, “HS512”, “RS256”] |
A list of allowed JWT signature algorithm. This plugin only support HS256, HS512, and RS256 algorithm. |
|
config.jwt_introspection optional Default value:false |
If true and introspection_endpoint is available, then verified JWT will also be introspected. |
|
config.introspection_endpoint semi-optional |
Oauth2 Instrospection Endpoint for introspecting non-JWT token or if jwt_introspection is set to true. If left empty and oidc_conf_discovery is not false, then this plugin will use introspection_endpoint metadata in OpenID Connect Discovery response. |
|
config.introspection_auth_method semi-optional Default value: client_secret_basic |
Authentication method used to contact the introspection endpoint. The valid value is one of
|
|
config.introspection_client_id semi-optional |
Client ID information to be used in introspection request. Depending on introspection_auth_method, it will be used as basic auth username, client_id form param, or iss JWT claim. |
|
config.introspection_client_secret semi-optional |
Client Secret information to be used in introspection request when using client_secret_basic, client_secret_post, or client_secret_jwt authentication method. |
|
config.introspection_client_rsa_private_key semi-optional |
Client Secret information to be used in introspection request when using private_key_jwt authentication method. |
|
config.introspection_client_rsa_private_key_id semi-optional |
The value of kid JWT Header when using private_key_jwt authentication method. |
|
config.introspection_param_name_token
optional Default value: token |
URL-Encoded Form parameter name to contain the OAuth2 token to be introspected. |
|
config.introspection_params optional |
Additional parameter to be included in OAuth2 Token Introspection request. |
|
config.introspection_claim_expiry optional Default value:exp |
OAuth2 Token expiry claim. The value will be used in caching mechanism. |
|
config.introspection_cache_max_ttl optional Default value: 900 |
Maximum TTL to cache introspection result. |
|
config.auth_header_map optional Default value: {“consumer_id”:”X-Consumer-ID”,”consumer_custom_id”:”X-Consumer-Custom-ID”,”consumer_username”:”X-Consumer-Username”,”credential”:”x-authenticated-audience”,”anonymous”:”X-Anonymous-Consumer”} |
Map containing upstream header name to be passed to upstream server. |
|
config.claim_header_map optional Default value: {“iss”:”x-oauth2-issuer”,”client_id”:”x-oauth2-client”,”sub”:”x-oauth2-subject”} |
Mapping of OAuth2 Token claim to upstream header. |
|
config.auth_header_name optional Default value: authorization |
The name of the header supposed to carry the access token. |
|
config.hide_credentials optional Default value: false |
An optional boolean value telling the plugin to show or hide the credential from the upstream service. If true, the plugin will strip the credential from the request (i.e. the header or querystring containing the key) before proxying it. |
|
config.anonymous optional |
An optional string (consumer uuid) value to use as an “anonymous” consumer if authentication fails. If empty (default), the request will fail with an authentication failure 4xx. Please note that this value must refer to the Consumer id attribute which is internal to Kong, and not its custom_id. |
|
config.run_on_preflight optional Default value: true |
Default value: true A boolean value that indicates whether the plugin should run (and try to authenticate) on OPTIONS preflight requests, if set to false then OPTIONS requests will always be allowed. |
|
config.ssl_verify optional Default value: true |
A boolean value that indicates whether the plugin should do SSL/TLS verification when sending OAuth2 Token Instrospection or OpenID Connect Discovery request |
Quick Information
Quick Information provides an important summary of your API management, including the API List to view a list of APIs that have been created, the Backend List which displays connected backends, the Subscription List to monitor user subscriptions to APIs, and the Total consumption which provides detailed information regarding subscriptions and API consumption. This feature makes it easier for you to manage and monitor APIs and their subscriptions efficiently.
1. API List
The API List on Apilogy.id is a catalog or complete list of the various types of APIs available that we have created on the platform. API itself is an abbreviation of Application Programming Interface, which is a set of rules and protocols that allow various applications to communicate with each other and exchange data.
2. Backend List
This backend service is an important part of an application that functions “behind the scenes”, managing data, business logic, and interaction with the database currently connected to the portal publisher platform.
3. List Subscription
The Subscription List is a list of everyone who has subscribed to the available APIs. There are several types of subscription, namely free, pre paid, post paid.
4. Total Consumption
List Consumption is information that can be seen how much API a publisher uses.
Subscription statistics
Subscription Statistics provides information about the number of developer users who subscribe to your API. This data helps you understand how much your API is used and in demand by the developer community, so you can more accurately measure your API’s performance and popularity.
1. Subscription
Provides API subscription information that occurred in that year and month.
2. Subscription Accumulative
Provides accumulative information on API subscriptions that occur each year and month.
3. Subscription total per Api
Provides accumulative subscriber information per API.
4. Subscription total per Subscriber
Provides accumulative information on subscribers who subscribe.
Consumption Statistics
The Consumption Count statistics provide information about the number of developer users actively using your API. This data allows you to track API usage levels in real-time, providing insight into the performance and user engagement of the APIs you provide.
1. Consumption (Count)
Provides information on the number of publisher APIs used.
2. Consumption (Billing)
Provides information on the number of opinions from the APIs used.
3. Top Up (Count)
Provides the number of subscribed APIs upgrade information according to payment.
4. Top Up (Billing)
Provides the amount of information paid when subscribing to the API
API Statistics
API Count statistics provide important data about your API performance, including the number of responses sent, the number of subscribers or developers who subscribe, and how often your API is used. This information helps you understand API usage patterns, measure their popularity, and identify opportunities for further improvement.
1. API Calls
Provides response status information when a API is called.
2. API Calls Accumulative
Provides information on accumulated response status every month.
3. API Calls total per API
Provides information on accumulated response status per API.
4. Api Calls total per Subscriber
Provides information on accumulated response status per subscriber.
Export
Data Export allows you to download and retrieve information related to your API in a structured format. This feature makes it easier to manage API data, so you can perform further analysis or keep backups of API data easily.
| Name | Description |
|---|---|
|
Type |
Provides options for what type of information you want to retrieve
|
|
Interval |
Provides a choice of time range needed to be taken
|
|
Export |
Provides options for exporting what data
|
|
Api/subscriber |
In accordance with the Export type selection so that you can carry out the required customization |
|
From |
Select a start time range |
|
To |
Select the end time range |
|
Export To |
Choose export in xls or csv format |


